The most exploited and worn out part of the room is the floor. In this regard, floor repair is a procedure that requires a thorough and meaningful approach. How to repair the floors in the apartment, what to pay attention to and how to avoid unnecessary expenses, we will consider below.
Assessment of the complexity and capital of work

Open the old coating and determine the scope of work
Before proceeding with the purchase of building materials in order to repair the floor, it is necessary to decide what condition the coating is in now, and clearly understand what quality the floor you want to receive at the end of the process.
To do this, it is necessary to open the floor covering and assess the condition of the screed. If this is a new building, then there are fewer problems, the screed is visible and its quality is quite easy to assess. Repair of floors in an old fund apartment may include the dismantling of a cement screed.
In addition, when starting to repair a wooden floor in an apartment with your own hands, it is worth assessing the condition of the final floor covering: a complete replacement is required or a partial reconstruction is possible.
As a rule, high-quality wooden floors made of boards or parquet are not completely changed, but only completely damaged elements are restored and replaced.
This is primarily due to the high cost of the material and the ability to carry out patch or segment floor repairs.
Let's consider two situations:
- floor repair, including restoration of concrete screed;
- restoration of wooden floors.
Overhaul of the flooring

On a dried screed, you can lay hydro and thermal insulation
After removing the top finish and assessing the condition of the screed, you came to the conclusion that the concrete base needs to be replaced. To fill a new screed, you must:
- dismantle the old base to the floor slabs;
- thoroughly clean the floor surface from debris;
- perform waterproofing measures by treating the base with a deep penetration primer;
- lay the floor with a film with an overlap on the walls and fix it with a damper tape;
- pour concrete screed;
- perfectly level the base with a finishing fill.
After the screed has dried, you can carry out work on the device of any type of floor covering. Between the thin decorative coating and the concrete base, it is necessary to lay a waterproofing film and thermal insulation material. This will extend the life of the coating, significantly reduce heating costs and postpone the next floor repair.
A new screed can be equipped in several ways, each of which has its own advantages and disadvantages.
| Screed type | Advantages | disadvantages |
|---|---|---|
| Liquid pouring with concrete mortar or DSP | Ease of work, the most economical and familiar option. | Long drying period, during which work on the further installation of the floor cannot be carried out |
| Self-leveling floors based on dry building mixes | Easy to mix, easy to pour and level, their drying period is maximum 10 days. There are self-leveling liquid floors and repair in this case will not require much effort at all: there is no need for leveling. The result of the floor repair will please - a perfectly flat, durable surface. | The cost of the material: the price of CCM floors is quite high, and the volume to be purchased will be large. |
| Dry screed | It will become an outlet for repairing the floor in old houses. The light weight of the material will not add load to the floors, while it will be additional heat and sound insulation. | Cannot be used on sloping floors. In addition, a dry screed is not recommended for installation in rooms with high humidity. |
Reconstruction of an old screed

If the concrete base of the floor, in general, has no complaints, and there is only a need for cosmetic repairs of small cracks and chips, then the following work must be carried out:
- clean the places of cracks from debris and dust,
- treat the surface with a primer;
- fill the crack with cement mortar with the addition of plasticizers;
- wait for a complete setting;
- clean the surface flush with the floor level.
In a situation where the restoration of the old screed is carried out, it is still better to fill in the finishing leveling coating, 0.5 - 1 cm thick, in order to avoid unpleasant surprises when laying decorative floor coverings.
Restoration of wooden floors
In the situation with cement floors, everything is clear. But faced with repairs in old houses, the owners are wondering: how to repair the wooden floor in the apartment? This type of flooring has its own specifics both in device technology and in working with the material.

Wood floor repair
The procedure for repairing wooden floors in an apartment should be started from the foundation, namely, by checking the condition of the logs. A wooden floor on logs, many builders consider it an ideal option for flooring:
- no concrete screed required;
- quick floor readiness for operation;
- additional thermal insulation.

Replace old lags with new ones
If the lags are rotten, they must be dismantled and new ones installed. At the beginning of work, it is necessary to get rid of defects in the ceiling, filling in all cracks. Then lay the waterproofing material and proceed to install the log.
For guides, a beam up to 7 cm thick is used. When installing the log, strictly observe the horizontal level. To simplify the process, set the two extreme logs, pull the beacon between them and bring the rest to a given height.
After installing the lag, thermal insulation material is laid between them. This can be slab insulation, backfilling with expanded clay or foaming.
Next, a finishing coating is arranged on the logs. The flooring from the boards is laid on the guides and fastened. The sheeting is mounted offset for proper load distribution. When installing a log for sheet materials, it is necessary to take into account the dimensions of the plate. How to replace rotten floors, see this video:
The beam must be installed with such frequency that during the installation of the sheet it falls with its surface on at least 3 guides.

Scheme of the device of a wooden floor
The procedure for installing flooring sheets on logs:
- the surface of wooden elements is treated with an antiseptic and refractory solution;
- the outer side of the plywood sheet is impregnated with hot drying oil;
- sheets are laid out with an offset;
- fix the plywood with self-tapping screws into the logs; close up the connecting seams with putty or adhesive tape.
If two layers of plywood are laid, then the second is fastened with self-tapping screws with additional coating of the reverse side with glue. In this case, the sheets are stacked perpendicularly.
Partial replacement of wooden floor

If the wooden logs are in good condition, then the finishing material needs to be replaced. In such a situation, the repair of floors takes place according to the following scenario:
- sanding boards, removing paint to assess the condition of the wood;
- we select material suitable for further use;
- we dismantle rotten sections of the floor;
- we strengthen suitable boards, fasten them with screws to the logs, deepen the old nails;
- restore the evenness of the surface with putty;
- we mount new boards on damaged areas;
- we walk on the floor with a grinder;
- we clean the boards with a brush, vacuum, do wet cleaning, let the wood dry for at least 12 hours;
- paint or varnish. See more in this video:
All work is not complicated and does not require special skills, so everyone can repair wooden floors with their own hands.
Having started repairs in an apartment, one cannot help but face the question: how to make a flat floor correctly so that the price of materials does not “bite”, and do all the work yourself, without calling specialists. And it doesn’t matter at all whether work starts from scratch or is it an old floor that needs updating, the issue is serious and worth considering in detail. If only because not only strength, beauty, but the abrasion of the coating, the features of sliding, styling, and so on are important.
What to lay?

Market offerings are practically unlimited. Each user can choose coverage according to price, color and preferences. Finishing materials are divided into groups, prices and the manufacturer tries to take into account all the wishes of customers. But not every material can be used in a particular room. For example, tiles. Plain, ceramic, dense and beautiful. Finishing is ideal for the hallway and bathroom, but in the living room and bedroom it is not always appropriate. Therefore, you should first think about what and where to lay in an apartment or house. For example, pay attention to universal coatings: laminate, linoleum.
If you try hard, you can always find acceptable material in terms of quality and affordable price. And then proceed to the process of renovation, restoration or complete repair of the floor with your own hands.
Stages of laying a floor with a concrete base

Even starting repairs from scratch, you must first prepare the base. Not every consumer likes concrete, especially if it is the floor in an apartment on the first floors, so the base will have to be insulated. The process is carried out, as a rule, with the help of a log, which allows you to get a flat floor, which is inexpensive.
Concrete base repair

Often the subfloor has chips, dents or notches that can be removed with your own hands. The easiest option is a screed. The execution will not take much time or effort, and will not require knowledge. And even if the user takes up work for the first time, it is enough to buy a ready-made mixture and do everything as written on the package. Dry powder is sold in packages that are clearly calculated on the area, so you will have to find out this point before work. Now cover the base with waterproofing and proceed to renovate the floors with your own hands:
- Lay the rolled materials overlapping with an edge overlap of 10-15 cm;
- Leave an allowance for wall panels also 10-15 cm;
- Fix the edges of the strips with construction tape along the entire butt border;
- Pour the finished screed.
To make a flat floor in an apartment correctly, watch a video that will help you calculate the time spent on repairs. An important point: if the area of \u200b\u200bthe apartment is large, it is worth dividing the space into sections and pouring the foundation gradually. The use of metal guides in this case is necessary so that the solution does not overflow. After pouring, they are removed, the joints are sealed and transferred to another area, you can use metal elements as many times as you like.
In order for the floors in the apartment, made by hand, to please with strength and warmth, you will have to choose a heat-insulating substrate. In this case, the floor will always remain dry, and the final coating, for example, parquet, will not creak after the first year of operation. Manufacturers offer a wide range of materials that differ in structure, appearance and characteristics. For example, expanded clay is a dry filler, the price of which is very affordable. Possessing high quality and practical indicators, expanded clay fits comfortably. It is enough to scatter dry material over the base, level and pour another layer of screed. It's good to make reinforcement with a reinforcing mesh. They lay it on top of the insulation, thereby fixing the screed and at the same time, without limiting its "flexibility".
As for roll or tile insulating materials, after laying it is worth covering them with waterproofing in the form of cellophane, for example. Otherwise, the liquid (condensate), getting on them, will destroy the quality properties and the insulation will become useless.
Watch again the video on how to make the floors in the apartment with your own hands and you will definitely get a flat floor that will last for decades.
How to make a joist floor

Making floors in an apartment or house with your own hands along the logs is even easier, but only if the height of the ceilings allows. Many experts recommend this option, emphasizing the optimality for several reasons:
- This is a dry method that does not require a screed;
- The increased speed of the entire procedure allows you to move on to the final work without much time.
If you do everything right, a new flat floor will be ready in just a matter of days. But for starters, they putty, fill cracks, chips, and so on. Then waterproofing and installation of a log. For this, a bar with a height of up to 70 mm is used, which is set in a horizontal plane. It will facilitate the process of setting two extreme logs with stretched transverse threads - it is easier to align the intermediate elements along them, without losing their height and evenness.
After preparing the crate, lay out a layer of insulation and waterproofing between the lags, which is attached directly to the bars, and any material of your choice is placed on top of the structure. For example, if you want a wooden floor in an apartment, take boards, but under heated floors you need to make a solid foundation:
- plywood sheets;
- Boards.
Under the sheets and slabs, the crate is adjusted so that each element covers three bars: one in the middle, two on the edge. The support must be strong, but the tiled material should be laid out, slightly shifting. This improves the distribution of the load, it will evenly fall on the entire area of \u200b\u200bthe base. What and how much material to take will have to be decided independently, calculating the area to be covered. It is convenient to do floors on logs in a new apartment, starting repairs from scratch and in a room where the floors are pretty worn out. The option is extremely economical, especially with the use of expanded clay as a heat insulator, while the materials are lightweight, which means that there will be no extra weight on the floors.
But there are a number of points, the implementation of which is mandatory:
- The tree is covered with an antiseptic;
- Plywood from the top side is coated with hot drying oil so that the base always remains dry;
- Fastening with self-tapping screws on the logs will provide strength;
- The joints are sealed with dry construction tape, puttied.
Important! If you want to make a solid floor, you can lay plywood in 2 layers, but in this case, self-tapping screws and glue are used for the top sheets. Now the coating is ready for final finishing and you can lay parquet, laminate, carpet or tile. To make the process even clearer, watch the video.
Alternatives

You can make the floors in the house with your own hands in a different way. For example, by means of a dry screed. It is enough to lay gypsum-fiber sheets with density and strength. But here you need a flat surface and laying in at least 2 layers. How many items to buy will tell you the size of the area of \u200b\u200bthe room. The convenience of using this material is that the connecting element of the tiles is a lock, you don’t have to buy it in addition or think about how to fix the fragments on the base.
Important! GVL slabs are laid both on concrete and on logs. Watch the video, which shows the main points of laying out and fastening GVL sheets, perhaps this option for updating or repairing floors with your own hands will be the most acceptable.
Which option to choose is up to the owner. But remember that even the most complex processes do not always require vast knowledge and experience. A few tips, patience and full calculation: how much material to take, how to fix, what to put will help you cope even in a difficult situation when you need to make the floors in the house with your own hands. And thanks to new technologies, manufacturers offer almost completely finished materials, the process of working with which is extremely simplified.
A high-quality, beautiful and comforting floor in an apartment is the key to a pleasant stay. It is a good coating that will save the owner from many problems, including health, if the choice is made in favor of environmentally friendly material. However, only wood can boast of absolute safety of all existing finishing materials. And the wooden floor in the apartment is the perfect combination of comfort, coziness, environmental friendliness and beauty. How to make it yourself? This will be discussed in the article.
Despite the abundance of offers on the construction market and the mass of all kinds of flooring options, many are still of the opinion that nothing can be better than a wooden floor. Especially in an apartment or a private house. A lot of positive feedback about this method of finishing can be heard from those who are seriously worried about their health. Indeed, we are surrounded by synthetics, artificially created materials, and we want to at least feel at home in some security, and it is doubly pleasant to relax in environmentally friendly rooms.

Also, a wooden floor is not only safety for a person in terms of health, but also practically a standard of quality. The wear rate of the base of the boards is very high - on average, wooden floors without repair and replacement of floorboards can last for decades, of course, subject to proper installation. They are distinguished by high strength and other physical indicators. For example, a wooden floor retains heat well, making it very pleasant to walk on it - there will be no feeling that the apartment is cold. He, even covered with paint, is pleasant to the touch, and looks great.

On a note! The wooden floor can be varnished, retaining the color and texture. This option is chosen by those who prefer to design an apartment in an eco-style.
However, not only in eco-style, a wooden floor fits perfectly. It can be laid in the implementation of almost any design ideas. Unless it may not fit the hi-tech style or another modern one. But even here there is a way out of the situation, if you really want to make wooden floors in the apartment - they can be painted in any color.
Also, the advantage of a wooden floor is the possibility of laying it with your own hands and, if necessary, fixing it. Of course, the recommendations of experienced professionals will not interfere in this matter, but still, anyone can figure out how to do the work with due desire.
The wooden floor may not be the finishing option for the coating - it may well become the basis for laying any other material, except perhaps when the wooden base is completely dismantled. In general, linoleum, laminate, tiles, etc. can be laid on a wooden floor. Also, due to the installation features, various communications can be laid under a wooden floor, it can be additionally insulated or waterproofed.

Types of floor boards
Having found out that wooden floors are a great option for flooring, you should understand that they can be made using different materials. Rather, it will be a board in any case, but the floors can be decorated with its different types, from the shape to the type of wood from which it is made.
Popular types of boards for creating a floor.


In general, when choosing a floorboard, you should focus on personal wishes and preferences, as well as on the general idea of interior design. It is also worth remembering that wood is still not the cheapest material, so be sure to focus on the budget when choosing a material.
Prices for engineered floor board
engineering board
The choice of wood for coating
Among all interior elements, the floor is the most susceptible to various negative influences; it wears out faster than other parts of the finish. However, proper care and the right choice of material from which it will be made will allow keeping it beautiful for a long time.

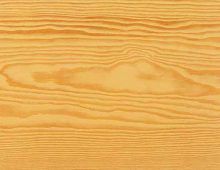
Massive board - larch
Various types of wood can be used to create floorboards, ranging from ordinary birch or pine to oak. It can be both coniferous and deciduous trees. A dendrological reference will help you understand which boards from which wood to buy is best.
Table. Information about different tree species.
| wood species | Characteristics in terms of construction | Physical indicators |
|---|---|---|
| The most common in Russia. For the procurement and creation of building materials from it, the Daurian variety is most often used, which grows in Siberia, the Far East, as well as the Siberian and European varieties. The color of the wood is pleasant, brown-reddish, with clearly visible stripes of growth rings. Differs in a minimum number of knots, strong, dense, not prone to decay. The main disadvantage of such wood is the tendency to crack when dry and the complexity of processing. | Density - 665 kg / m3, wear resistance 0.14-0.17 mm, resistance to decay - 9.1, flexural strength - 109 MPa. |
| Most often, spruce or Siberian spruce trees are harvested. The wood is light yellow in a delicate color, up to white, with clearly visible rings. Strong, strong, resistant to rot, but its performance is slightly worse than that of pine. Difficult to process due to the large number of hard knots. | Density - 445 kg / m3, wear resistance 0.24 mm, resistance to decay - 3.6, flexural strength - 79 MPa. |
| The second most common coniferous culture in Russia. Most often, an ordinary variety is used for harvesting. The wood has a pleasant reddish-yellow hue, rich color, the texture is very beautiful due to the pronounced growth rings. It has good strength properties, is not prone to decay, and is easy to process. | Density - 505 kg / m3, wear resistance 0.28-0.31 mm, resistance to decay - 4.6, bending strength - 85 MPa. |
| It resembles spruce in its characteristics, but does not have resin passages. The most durable types of fir are European, Caucasian. Others are used extremely rarely. | Density - 375 kg / m3, wear resistance 0.26-0.3 mm, resistance to decay - 3.8, bending strength - 68 MPa. |
| The wood is similar in appearance to oak, bends well, does not crack. Looks very nice and expensive. | Density - 680 kg / m3, wear resistance 0.14-0.17 mm, resistance to decay - 4.9, bending strength - 118 MPa. |
| The most famous type of noble wood. Color - brown, brown-yellow, with well-defined textures. Durable, not afraid of rot, with excellent flexibility type of wood. It is not afraid of moisture, as it absorbs it rather slowly and gives it back just as slowly. | Density - 690 kg / m3, resistance to decay - 5.2, flexural strength - 103 MPa. |
| The color is reddish or yellowish white, with clear textures, interesting mottled pattern. Robust, reliable, flexible option. | Density - 680 kg / m3, wear resistance 0.14-0.17 mm, resistance to decay - 3.3, flexural strength - 104 MPa. |


On a note! Interestingly, cedar also belongs to the genus Pine, but it is not used for the manufacture of flooring because of the rather soft wood.

Undoubtedly, the best option in terms of strength and beauty is oak, but it is very expensive and not everyone can afford to buy such a board. It may well be replaced by ash, but it is used undeservedly rarely. Beech is prone to deformation due to its tendency to absorb moisture - it reacts sharply to changes in its indicator in the room.

Only larch can boast of an optimal price-quality ratio, which can compete with oak in almost all respects, with the exception of strength.
On a note! The cycle track in Moscow's Krylatskoye, built before the 1980 Olympics, was completely covered with larch. At one time, this cycle track was considered the fastest in the world. Also, the buildings of Venice are on larch piles. And, as you know, there is enough water in it. Larch in water does not begin to rot - on the contrary, it "hardens", its strength characteristics increase.
Pine is also often used to create floors, due to its availability - this breed grows almost everywhere, and therefore is not at all expensive. It is also easy to use, as it is processed without much effort.

How to choose the right board size
A common and erroneous opinion of beginners is that the ideal option for creating a floor is to use the widest board. But this is far from being the case - on the contrary, using this type of material, you can encounter a lot of problems. It is wide boards that most quickly begin to deform, bend, reacting to any changes in the microclimate in the room. In the future, large gaps may appear between the floorboards. Also, the boards are quite difficult to work with due to the large weight. For the manufacture of wood flooring in the house, it is highly recommended to use medium-sized boards.

In the photo - pine boards
As for the length of the board, everything is limited only by the possibilities of transportation and the convenience of working with the material. For flooring, floorboards of any length are suitable. Moreover, if necessary, long boards can be easily shortened by simply sawing them.
"Warm" and wooden floor
Wooden floors in the apartment may well be combined with a heating system. It is most convenient to install the system itself on the logs, and lay the boards on top. Heating can be modular and rack. For example, in the first case, a special design is made of chipboard with grooves, where the heating pipes are laid.
Also, a wooden floor can serve as the basis for creating a heating system. To do this, pipes or heating modules are installed on its surface, and then any other type of finishing material is laid on top.

We make our own wooden floor in the apartment
Installation of a wooden floor can be done in different ways, depending on the desired final result, the type of subfloor and other factors. Let's get acquainted with three possible types of installation of a wooden coating.

Wooden floor on joists
This method is often used if there is at least some kind of rough foundation - for example, a concrete floor. In this case, the wooden coating will spread on the so-called logs - long bars fixed on the base and serving as a kind of support for the floor. Logs can be installed on small concrete columns or bricks.
This type of construction is able to withstand significant loads, but it is important to remember that the step between the individual bars should be small, otherwise the floor will sag. The main thing is that the lags themselves are quite strong and do not bend when walking on the floor. They are also installed strictly horizontally, and the board is laid perpendicular to them.

Wooden floor on beams
Sometimes a wooden floor can be mounted not on concrete ceilings and logs, but on wooden floor beams - this option also has a place to be, as it is simple and at the same time very reliable due to the wide cross-section of the beams. Also, the system can be supplemented with lags.
The beams themselves up to 4-12 m long are installed immediately on the foundation, fixed. Since they are very heavy, it is recommended to involve outsiders in the construction. Logs are already mounted on top of the beams, and then the floor boards are laid.

Wooden floor on concrete
This is the very “apartment” option, since it is he who is the simplest and most convenient for implementation in an apartment. The wooden floor in this case is simply laid on a concrete base - the main thing is that it be fairly even. Otherwise, it may need to be leveled with other materials. Logs can also be used here.

Basic recommendations for laying a wooden floor in an apartment
Installation of a wooden floor in an apartment must be carried out according to certain rules. Only this will ensure the high quality of work. Wood flooring tips:
- work is usually done closer to spring, when the winter cold begins to recede;
- the room should not have high humidity;
- the base must be well prepared when it comes to flooring on concrete;
- waterproofing is necessary, especially if the apartment is located on the ground floor;
- if insulation is laid, then it should lie without cracks;
- boards are laid along the long wall of the room, perpendicular to the wall with a window.

Wood flooring
Before proceeding with the installation of a wooden floor, you should prepare all the tools and materials that you may need. These include:
- board;
- insulation;
- timber 50x50 mm;
- waterproofing roll material;
- jigsaw or saw;
- perforator;
- screwdriver;
- self-tapping screws;
- building level.

The instructions for installing a wooden floor look something like this.
Step 1. A log is installed on the concrete floor prepared and cleared of debris. Logs are set at one level at a distance of about 40-50 cm from each other. Installation starts from the highest point of the floor.


Step 2 You can fix the logs on a concrete base using metal corners and dowels. To do this, holes are drilled in the floor and lags according to the marks made with a pencil through the holes in the corners.

Step 3 The logs and the entire base are completely covered with waterproofing material. For this, a dense polyethylene film can be used.

Step 4 A dense insulation is laid between the lags - for example, mineral wool.

Step 5 After that, the floor board can be laid. The whole process begins from the wall farthest from the exit from the room. The board is not laid close to the wall, but taking into account a small compensation gap, so that the floors do not deform in the future. The gap will later be closed with a plinth.

Step 6 The boards are screwed to the lags with self-tapping screws. In this case, the fastener is screwed in at an angle of 45 degrees. Approximately 2 self-tapping screws are spent per attachment point.

Step 7 Thus, the entire floor is covered. If a tongue-and-groove board is used, then it is important to ensure that the tenon on the next board fits into the groove of the previous one. The boards are knocked together with a hammer if necessary. The main thing is not to damage the end of the board.

Video - Laying boards on the floor
How to protect a wood floor
Unfortunately, if the finished wooden floor is not treated with anything, it will quickly lose its attractive appearance. Therefore, it must be varnished or painted. Before applying these compounds, the floor is cleaned of dust and debris. Then you can apply varnish and dry it well, sand the finished surface and again apply a couple of layers of glossy varnish.
Attention! You can move on such a floor only a day after the work is done, and interior items are placed only after 7-10 days.

In order for the wooden floor to please the owner of the apartment, it is important to pay attention to all the work carried out and the choice of material. This is what will determine the success of the event. And properly laid and protected by coatings, the floor will last for many years and will not let you down.
Major repairs in the apartment involves the replacement of old floors, this is a task that requires significant investment. Many homeowners, having weighed all the pros and cons, limit themselves to changing the facing, but sooner or later, labor-intensive work will have to be done.
Do-it-yourself repair is quite a feasible task for a home master, so do not rush to look for a construction team.

When the owner already has some skills, he can try to repair the floors on his own, all work must be carried out in stages, observing all the technology.

Definition of the scope of work
All homeowners have to face the task of repairing the floor in the apartment, it is important to deal with the main causes of the problem. This article will focus on repair work in apartment buildings, where the basis for the floor is a reinforced concrete floor slab.
Laying floors on concrete screed
Over time, the old foundation begins to present unexpected surprises, creaks appear, pebbles with sand rustle underfoot, in some places the floor covering fails.

Warm floor
If it does not function properly, you need to find out the cause of the breakdown. Underfloor heating repair involves replacing the damaged area, so if you have an electric underfloor heating, then the new cable is connected using heat shrink tubing and crimp sleeves.

A simple rule applies here - if defects are found, the old coating must be completely removed.
At the final stage, a concrete screed is made, it is better for beginners in construction to use ready-made mixtures, then they will not have to calculate the proportions on their own.

Look at the photo of a beautiful floor after repair, you can enjoy such an attractive coating for many years.

Floor repair photo


Tsugunov Anton Valerievich
Reading time: 5 minutes
The surface of the floor is constantly subjected to significant loads and wears out over time. This manifests itself in the form of external defects, creaking and increased deflection of the elements. If you decide that the time has come to put the flooring in order, we invite you to find out how the floor is repaired in an apartment with your own hands in stages, and get acquainted with the important nuances that you need to remember in the process.
Floor assessment
The volume and technology of repair work will depend on the scale of floor defects in your home.
Wood floor repair
Options for repairing the floor in the apartment may be different. In some cases, when it will be enough to replace only the most worn floorboards, fix the loosened elements, close up the cracks and scrape. It may be necessary to replace rotten logs, repair the concrete base.
Redecorating
This type of repair involves the following sequence of actions:
- The floorboards are cleaned of the old coating. The modern way is scraping or grinding with a machine. In this case, the nail heads are pre-deepened by 5 mm.
- Cracked and rotten boards are replaced with new ones. During the replacement process, it does not hurt to look into the underground and check the state of the lag.
- Poorly fixed floorboards are additionally attached to the logs with self-tapping screws.
- Narrow gaps are sealed with wood putty, and large ones are closed with wedge-shaped glazing beads on glue or putty. The protrusions are removed with a planer, and the puttied areas are processed with a grinder.
- Debris and dust are removed, and the renovated floor can be coated (painted, varnished) or covered with linoleum, laminate, etc.
Redecoration of a floor with a base in the form of a screed consists in a simple replacement of the top coat.
The repair process can be seen on the video, and the types of flooring - on numerous photos.
Complete floor replacement
Overhaul of the floor in a high-rise building includes the following steps:
- dismantling of the old coating and log or screed;
- elimination of foundation defects;
- installation of new logs, insulation and sound insulation or installation of a new screed;
- laying flooring and finishing floor coverings.
Dismantling
For the design on the logs:
- The plinths are removed, access to the boardwalk is released.
- Boards can still come in handy, so they should be removed carefully. Each floorboard is gently lifted from the wall, after which the nails are pulled out with a nail puller. It is especially difficult to disassemble grooved boards, as there is a risk of breaking the connection.
- The panel house has reinforced concrete floors to which logs are attached. You need to dismantle them carefully so that you do not have to do extra work later to seal the holes.
If it turned out that the state of the log allows you to use them further, you just need to change the flooring. For it, you can use boards, sheets of plywood or OSB.
For screed coating:
- The floor covering is removed.
- The condition of the tie is checked. If the defects are minor, it can be repaired with a fresh cement mixture or a concrete repair compound (depending on the composition of the screed).
- If the screed is badly cracked, becomes loose, peels off from the base, it should be removed with a perforator.
When removing the screed, you need to be careful not to damage the concrete floor.
Subfloor repair
Cement mortar or a special thixotropic repair compound for concrete close up defects in the concrete floor. The entire surface is treated with a deep penetration primer.
Now you need to decide on the design of the floor. You can choose one of the following options:
- "Wet" screed using a cement-sand mixture. An inexpensive way to prepare the base, its disadvantage is prolonged drying for 1–1.5 months.
- using special mixtures for leveling. Allows you to get the perfect surface, dries in just a few days. The cost of self-leveling compounds is quite high, so it is advisable to use this method for a base with small differences.
- "Dry" screed using expanded clay backfill and GVL.
- Log system. The method is good in that heat and sound insulation can be laid between the lags. At the same time, the logs give the floor additional strength, and the presence of an air gap provides insulation and ventilation.
Floor device on logs
If you decide to mount your new one, the order of work will be as follows.
- Logs are laid on the base for the width of the insulation roll. They are attached to the base or mounted on screw metal studs, leveling exactly horizontally with a level. They should stand at a distance of 40-50 cm from each other.
- The heater is installed. It should be placed between the lags around the entire perimeter of the room. A vapor barrier is laid on top of the insulation.
- It is important to properly lay the boards or sheets of plywood so that they fit snugly against each other, and there is a gap of 5 mm between them and the walls. The sheets should lie on at least three supports, and the joints should be in the middle of the lag. They are stacked in a checkerboard pattern, which makes the floor more rigid.
- Small gaps between the boards are sealed with putty, after which the surface must be scraped off.
- A floor covering is laid on the repaired floor, skirting boards are attached.


