In recent years, the trend of decorating the home with handmade items that look original in any room, and most importantly - exclusive, has increased significantly. These can be hand-embroidered paintings, boxes, vases, photo frames and much more. etc. There are many reasons not to waste time and effort making decorations yourself, because it is much easier to purchase decor in a store. However, the process of handmade work itself will bring a lot of pleasure, and a frame with a picture of a dear person will look much more impressive compared to a “factory” one. It is very easy to make a photo frame from paper or cardboard, and the result will exceed all expectations.
DIY photo frame made of paper: master class

You can make an original photo frame if you have the following materials and tools on hand:
- Scissors;
- Unnecessary piece of wallpaper;
- Whatman;
- A sheet from a sketchbook;
- Ruler;
- A simple pencil.
The sheet is placed on a vertical surface, on each side it is necessary to draw four stripes, spaced one and a half centimeters apart from each other. As a result, all drawn lines should have a point of intersection with each other in each corner of the sheet (4 squares are obtained).

The resulting side of the square is 6 cm; the squares should be cut out. Next, you need to step back one and a half centimeters from the outer edge in the place where the second line is drawn, and cut off the corners. The next step is to draw a line vertically and draw diagonal stripes to it on 2 sides to form a trapezoid. The figure is cut out on one side.
The final stage is to fold the sheet along the drawn lines so as to form a frame. In order for the structure to be more durable, the corners must be inserted one into the other. The frame can be painted with your favorite colors and decorated with paper or cardboard ornaments. It is not recommended to apply heavy decorative elements.
DIY cardboard photo frames

It is best to use cardboard to create photo frames, as it is more durable than paper. To create a wall-mounted version, you need to attach a loop to the back wall of the material, and for a tabletop frame you will need to cut out a footrest. All cardboard products have the same manufacturing principle, the only difference is in the decorative design. Basic tools that will be useful are scissors, simple pencils, cardboard itself, any decor and PVA glue.
The initial stage is tracing the outline of your favorite photo on cardboard. Then on each side you need to add an extra few centimeters and cut out the resulting workpiece.
An interesting option is to decorate a cardboard frame with fabric, as in the photo below.

You can decorate it using gouache, a special varnish, or covering it with a layer of fine decorative sand. Beads and small shells work well. The back part is a regular rectangle cut out of cardboard, which must be glued to the workpiece. It is worth remembering that at this stage you need to leave a small gap between the parts so that you can then insert a photo.
Creative photo frames

Making an original photo frame is quite easy, the main thing is to show your imagination and have a set of beautiful decorative ornaments on hand. Products made from colored paper (or wallpaper) of the same color look creative.
Based on origami, you can create incredible frames from several sections that are interconnected.
In addition, do not rush to get rid of old newspapers. Using knitting needles, you can twist this paper into a tube, and then weave a base-frame, forming a frame of any shape. If you need to change the color, the material can be painted with gouache.

Note! You can cut out many interesting decorations for the frame from paper of different colors: leaves, animal faces, hearts, berries, flowers. To create decor, you should stock up on stencils.

Options made from holiday wrapping paper look original, and the advantage is that you don’t need to paint or sculpt decorations on it. Your favorite photos look beautiful in frames decorated with sequins, colorful buttons, small figures, beads, coins and even puzzles and bottle caps. Don’t be afraid to fantasize and invent something new; the main thing in work is accuracy and a creative approach.
In times of digital technology, the value of paper image media has dropped significantly. But in vain, photography is primarily a memory from the past. People are accustomed to keeping things dear to their hearts close to them. But storing photos in digital media is not always convenient, and the presence of an attractive frame with a favorite image on the table automatically attracts the eye and, accordingly, brings back pleasant memories. You can make a photo frame with your own hands from available materials, using natural materials for decoration.
You can make a photo frame with your own hands using available materials
Knowing how to make photo frames yourself at home is quite useful - sometimes you need a frame of non-standard sizes to hang on the wall, for example, a poster from your favorite computer game, or a large photo, but it can be quite expensive to buy a large frame, and one that matches the photo in color and texture cannot always be found. A homemade frame will come to the rescue if you decide to hang a hand-embroidered picture, or a certificate of honor, or a page of assembled handwritten text on the wall - at weddings and anniversaries, guests often write such congratulations and wishes as a souvenir to the newlyweds or anniversaries. Photos from kindergarten, or from a school function on September 1, a wedding, or just a good photo from a walk - are there many reasons to hang one of those happy moments on the wall or put it on the table? Let's take a step-by-step look at how to make a suitable frame for them.
You will need:
- 2 sheets of thick paper measuring 30 by 35 cm;
- Old glossy magazine;
- PVA glue, a piece of cardboard;
- Multi-colored threads, colorless nail polish;
- Stationery knife.

This photo frame will be quite affordable.
How to do:
- Stepping back from the edges of the sheet, measure 5 cm. Draw lines along the marked points. Cut the resulting rectangle from the middle of the paper sheet. The result is the base of a photo frame.
- Roll one magazine page tightly into a tube and secure the edges with glue.
- Wrap thread around the curled page, securing the ends of the threads at the bottom.
- Make several of these tubes.
- Glue each piece to the base starting from the inner corners of the product. To give the effect of a volumetric bend, bend the tube at the corners.
- Glue three sides of the second sheet of paper to the inside of the frame. The fourth side is necessary for placing photographs into the product.
- We form the frame leg from a piece of cardboard.
After drying, the craft can be carefully and easily coated with varnish.
Cool DIY photo frame in 5 minutes (video)
How to make a beautiful photo frame from cardboard
Necessary:
- Colored cardboard, colored paper;
- Stationery knife;
- Colored pencils, stickers.

A cardboard photo frame can be very simple
How to do:
- Cut out a rectangle of the given parameter with a stationery knife.
- Mark the dimensions of the photograph on the wrong side of the figure, deviate 1 cm from the markings, and place measurement points for the window. Cut out the inner rectangle.
- We cut out the inner side of the product from less dense paper.
- Glue both sides of the frame, leaving one side for inserting a photo.
- Draw the desired pattern with pencils and decorate with stickers. The edges of the photo frame can be decorated with golden chocolate wrapper.
We make the frame's stand from cardboard. Cut a thin rectangle, fold it in half, and glue it to the craft with the base.
Original design for a photo frame: master class
A very delicate and beautiful frame is obtained when decorated with artificial flowers, wallpaper, pieces of lace or braid.
Necessary:
- Wooden or plywood frame - base;
- Scissors, glue;
- Pieces of wallpaper, golden braid, lace, beads.
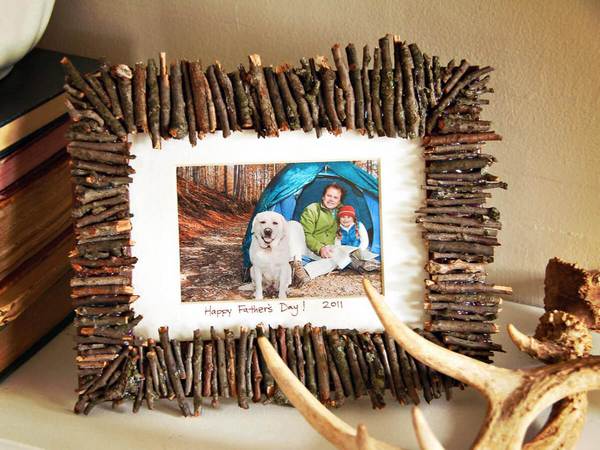
The photo frame can even be decorated with broken branches
How to do:
- Artificial lilac branches or other flowers with small fluffy flowers are ideal for crafts. Arrange each flower into inflorescences.
- Cover the base with wallpaper and let it dry completely.
- Place one inflorescence on a drop of glue from the top corner, bend the petal up a little and glue the second one next to it. Thus, fill the entire upper corner of the frame with flowers.
- We decorate the lower opposite edge with lace, gluing it with glue.
- We glue golden braid along the edges of the inner frame.
- Place the beads on the glue like flower cores. Glue beads of the appropriate tone to the lace ornament.
- Glue a piece of starched lace along the top of the flower corner of the craft.
How to decorate a regular photo frame
Photo frame design options:
- Worn discs. Since the material contains sharp corners when broken, it is more advisable to wrap the discs in an unnecessary towel. Break it with a hammer. Place small pieces in an interesting mosaic on the frame using glue. After drying, apply black acrylic paint under gloss to the spaces between the fragments.
- Wallpaper. Pieces of wallpaper remaining after renovation are very suitable for decorating crafts, especially if they have pictures. Cut out a wallpaper pattern or flower and glue it to the corner of the frame.
- Old buttons. Collect all unpaired buttons. Decorate the product with them, gluing them with glue from the outer corners.
- Sea pebbles and shells. They look great when paired with starfish decor made from salt dough, rope threads and a figurine of a sea anchor. Such a frame with a joint photo is a wonderful gift for a loved one.
- Satin ribbons. When gluing the ribbon as a decorative element, decorate it with the remnants of lace.
- Puzzles. Pieces of the picture, laid out randomly around the frame, will be an amazing addition to a child’s photograph. For variety, add toy figures cut out of paper to your decor.
- Decorate the frame in the New Year style with Christmas tree tinsel and shards of balls.
- Paints. To paint frame parts, it is better to use gouache or acrylic paint.
- Pieces of fabric. Here you can come up with both finishing each detail of the frame with a fabric base, and weaving elements of decoration from fabric strips.
- Quilling and beads. Paper swirls will make the photo frame very interesting. And beads and beads give the decoration a fabulous look.
- Colored threads. They harmonize well as decoration when creating frames from magazine pages. Tie each page with thread and glue it to the base of the product.

The photo frame can be decorated however you like
If desired, crafts can be decorated with decorative small flowers, knitting threads, pieces of wool, dry herbarium, colored pasta or seeds.
What can you use to make a photo frame with your own hands?
If you plan to hang a framed photograph on the wall, it is better to use lightweight material for production - ceiling plinth, cardboard, paper.
- A very simple frame layout can be made from ceiling plinth. The smooth surface of the material will ensure that you do not make a mistake in size. Use a ruler to carefully measure the required measurements and cut with a utility knife. Further, according to inspiration, the product can be decorated with paints or decorated with natural materials: shells, branches and leaves of a tree. After the glued decor has completely dried, carefully cover the craft with colorless wood varnish.
- Wooden frames are more durable in construction. For the craft, take two identical strips in size. Knock down with nails or glue in the form of a rectangle, open with varnish.
- A photo frame made of cardboard and yarn is a very easy craft to make. Fold cardboard or thick paper into a rectangle or other geometric shape in several layers. Carefully spreading PVA glue, we sequentially glue the frame with multi-colored yarn and buttons.
- A frame from a glossy magazine looks unusual. Roll each page of the magazine into a tube and glue it into a geometric shape.
You can involve your child in creating a frame from dough. An exciting activity will amuse the little fidget, and the product will turn out to be unusual.
- Mix flour, non-iodized salt and water. We take half a portion of flour with salt, and half as much water as salt.
- After kneading the dough, let it rest, then mold the craft. Keep the finished frame in the oven at 80 degrees until completely dry on both sides.
- The ornament for such a product can be molded together with the frame.
After drying, paint the craft with gouache and open it with colorless nail polish.
We will send the material to you by e-mail
The picture looks complete and laconic only in frame design. Whatever one may say, an unshaped piece of canvas or just art on a sheet of paper will not make the right impression without a frame. The editors of the online magazine site believe that it is not necessary to buy a baguette, since making a picture frame with your own hands is not only interesting, but also easy!
It doesn't take long to become a frame maker
What determines product design? The interior surrounding it. It’s not enough to just want to see a blue ornate frame on a picture in a room with a classic interior - so we focus strictly on the style of the room.


The size of the canvas and the image itself will tell you which sizes are preferable. Agree, if the canvas is small and the frame takes up half the wall, this indicates problems with the person’s taste.
How to make a stretcher for a painting with your own hands
The stretcher is used to stretch the canvas and comes in two types: modular and solid. When making picture frames, people themselves decide which stretcher is more convenient - each model has its own characteristics. A blind subframe is a solid structure, the corners of which are fixed to each other with glue and wooden triangles. If the canvas sag, you have to re-tighten it.


We'll tell you how to make a blind stretcher with dimensions of 100x180 cm.
To do this, we will prepare two-meter wooden slats, Moment wood glue, a tape measure for measurements, sandpaper for processing the product, a hammer, a furniture stapler with staples, corners and screws.
Moment-Joiner
- We apply slats perpendicularly to the length of the slats (180 cm) and measure 100 cm.
- For stability, make a couple more vertical support sticks.
- We cut the slats at an angle of 45°. We go through sandpaper and remove shavings and sawdust.
- To connect the vertical and horizontal slats, we need wood glue: we apply it to the cuts, press it and immediately fasten it with a stapler on each side. If you have a special vice in the house, now is the time to use it.
- We tap the staples with a hammer to ensure that they do not bulge.
On the reverse side of the structure, metal corners need to be screwed to the corners.
Related article:
Photo frames for the wall: varieties, how to choose the right one, rules for making collages, selection of scenes for different rooms, examples of photo placement, original ideas for compositions - read in the publication.
How to make a baguette for a picture with your own hands
Painting on canvas or paper can be framed in a beautiful wooden or polyurethane foam baguette, simple or carved - as your soul dictates. A baguette is made from a wooden or polyurethane foam profile using a jigsaw, stapler and clamp. We'll show you how to make a picture frame from a baguette.
Making your own wooden picture frames
Wooden picture frames look elegant and fit into almost any style.


What do you need for work?
As already mentioned, we purchase a ready-made wooden profile, fine sandpaper, prepare a jigsaw, wood glue and a tape measure.

If the profile is completely ready, then no additional actions are required, although, if desired, the baguette can be decorated with gilding, craquelure varnish, or patina.
Instructions for making a picture frame from wooden plinth
We take measurements of the painting and compare them on the profile. The task is to make cuts at an angle of 45° and sand each one perfectly.

We apply glue to each cut and connect them together. This is where we come in handy with a clamp, which will help make the fastening points very strong.

The reverse side of the picture must be covered with a sheet of plywood or durable cardboard.
Making your own picture frames from polyurethane ceiling plinths
If you want to see a white picture frame on the wall, you can make a baguette from the ceiling plinth.


What do you need for work?
Ceiling plinths are now sold in every hardware store, and the choice of products is large. For the first time, we suggest trying to make the simplest version from a medium-width profile without any special decorations.
For gluing, we take Titan glue for ceiling tiles and baseboards, we also need a stationery knife, a ruler and a protractor for measuring the angle. If you want to paint over the whiteness of the baseboard, prepare the desired color of acrylic paints.
Glue Titan

Instructions for making a picture frame from polyurethane plinth
Having taken horizontal and vertical measurements, we prepare the base of the picture from thick cardboard or ceiling tiles (if the size of the canvas allows). The base either matches the picture or slightly exceeds it.
Let's start creating the frame:
- We measure all the measurements taken on the baseboards and mark them using a protractor (remember that we need an angle of 45°).
- We make cuts with a stationery knife according to the markings made, or using a miter box we immediately cut off the finished elements.
- Before starting the gluing process, all sides are aligned with each other to ensure that all edges match exactly.
- You can glue all the parts together and leave them alone for a while.


How to make a cardboard frame with your own hands
A do-it-yourself picture frame made of cardboard can be made by people without experience in applied arts: it is cheap, beautiful and not at all difficult. In order for everything to work out the first time, you need to immediately prepare all the elements necessary for creativity.


What do you need for work?
The work will require thick cardboard for the base and for the framing itself. Both simple cardboard and corrugated cardboard are suitable here: it all depends on the desired thickness and strength of the product.

In addition to the main material, we prepare scissors, a stationery knife, a glue gun with glue sticks (or, in the absence of such, we purchase wood glue or “Titan” glue for ceiling tiles). All that remains is to select everything for the exterior decor.


Cardboard products allow you to widely use your own imagination: there are no boundaries either for shape or for decoration. You can decorate the product with textiles, beads, shells, and scrap paper.
Instructions for making a passe-partout
Let's proceed to the instructions on how to make a frame out of cardboard for a picture.
| Illustration | Description of action |
|---|---|
 | We cut out a frame from cardboard taking into account the size of the photo. We lay the scrap paper face down on the table and place a cardboard blank on it. We're not gluing anything yet. |
 | We cut off the outer corners with scissors, and make diagonal cuts inside using a stationery knife. |
 | We bend the outer borders. |
 | Carefully cut off the excess inside the product and bend the internal borders. We are not in a hurry: everything should be smooth. Now we glue the inner borders to the frame, and then the outer ones. |
 | This is what the frame will look like. You can leave it simple without any decoration, but a couple of decorations will not be superfluous. |
Video: DIY cardboard photo frame
How to make a picture frame with your own hands from scrap materials
Making picture frames with your own hands is your own imagination, embodied in practical application. It has become fashionable to decorate walls or tables with your own products, because this is the most direct inclusion in the design of your favorite home. Why is it worth trying to make frames with your own hands when there are a great many of them on sale? Well, who knows your preferences better than you? Who cares more about the warmth of the home, except the owner of the apartment?


If we describe all the ways to create picture frames, all the pages of our magazine will not be enough, so we will focus on the two most accessible materials: newspapers and buttons.
How to make your own picture frame from buttons
Beautiful picture frames are made from buttons! Many people have button deposits left over from their grandmothers and mothers, but not everyone knows where to put them. For creativity, we don’t need tons of new buttons, any will do!


What do you need for work?
Here we will use the previous point of content and get down to making a cardboard base: cut out the desired frame shape from cardboard.
Advice! Don't limit your imagination! Let the shape be unexpected, catchy, angular, streamlined.
Prepare the frame base, acrylic paints or spray paint, instant glue or hot-melt gun. If the buttons themselves are very beautiful, chosen in a harmonious combination with each other, then you only need to paint the base.
Now turn on the appropriate music and get creative!
Manufacturing instructions
We select the largest buttons and use glue to attach them one by one to the frame base. Don't rush with the next layer - let the first one set properly.
Then we begin to glue medium-sized buttons, trying to cover all the holes. Small buttons cover the remaining holes and are located over the entire surface of the frame.


A spray can will paint the entire frame at once, and you can create interesting color variations with acrylic paints.
Picture frame made from old newspapers
As soon as newspapers that have been read and become unnecessary are not used in everyday life! If earlier they used to wash glass and mirrors, today it is a fertile material for weaving baskets and various kinds of decor. Fans of making frames were also attracted to newspaper as a decorative material.


What do you need for work?
We will not explain the basics of weaving here, but will show you how to easily and quickly make a wonderful frame for a picture or photograph from. We take a bunch of newspapers, PVA glue, a heat gun, acrylic paints or gouache of the color in which you want to see the frame and the actual frame base (can be cardboard).
Nuance! Magazine pages are too bright for color paintings, but are perfect for black and white. It is better to either paint or simply varnish newspaper tubes.
Manufacturing instructions
We cut newspaper sheets in this way:

- Each strip is laid on a thin knitting needle (in its absence, an electrode that needs to be tapped first, or a strong thin long wire, equal in length to the knitting needle, will do) at an angle of 45° and begin to wind almost to the end of the strip. The tip of the strip is greased with PVA glue and wound until the end. The tube is removed from the knitting needle and coated with PVA entirely. In this way, several dozen tubes are made (if the volume of the frame is large). Once the products are dry from the glue, you can paint them any color.
In this thematic section you can find hundreds of interesting ready-made solutions for creating original photo frames and frames.
How to create a truly exclusive frame for a bright shot from life or a worthy work of art with your own hands is shown in illustrated step-by-step master classes. Table and wall frames, classic shapes or in the form of flowers, suns, hearts, boxes and other things. Made from cardboard, salt dough, pasta, plastic dishes, and other improvised and waste materials. And also unusual decorations that will help turn any, even the simplest frame into an exclusive one.
Author's frames for photos and drawings.
Contained in sections:Showing publications 1-10 of 379.
All sections | DIY photo frames and frames
C spruce: make together with moms photo frame"Pussy" made of napkin lumps. Tasks: to cultivate love and respect for the mother, a feeling of gratitude. Promote the rapprochement of children and parents, the development of positive emotions, a sense of mutual assistance. Move events: The word “mother” is one of...
 Children of senior preschool age like to make functional gifts (Christmas tree decorations, pincushions, decorations for a flower pot, etc. Such things are visible, they are actively used and it brings joy to the child. This year, for Mother's Day, we...
DIY photo frames and frames - Master class “Photo frame “Musical note” made from wooden clothespins with your own hands
Publication “Master class “Photo frame “Musical note” made of wooden clothespins...”  Really interesting things can be made from wooden clothespins. These crafts will delight children every day or they will come in handy as a beautiful gift. The main thing we need to master is the decor of clothespins, and our imagination will do the rest for us. What do we need...
 Image library "MAAM-pictures"
 In December, as part of the weekend club "Tsvetik - Seven-Tsvetik", the group "Rainbow" visited the Fire Station. The children were met by the unit duty officer. Under his leadership, the children walked around the territory of the unit, examining a fire truck and the necessary equipment for extinguishing a fire. Getting to know...
 A frame for congratulating children on their birthday I wanted to make something like this for a long time, since the established tradition of placing congratulations on children’s birthday in the locker room, in full view of their parents, and writing the first and last name of the birthday boy seemed wrong to me. Rather, in relation to...
Master class for parents “Making a photo frame from pasta” Master class for parents “Making a photo frame from pasta.” Goal: teach parents how to make a photo frame from pasta. Objectives: to develop knowledge about the technology of making photo frames from pasta; show ways of coloring pasta; Do you think they can...
Do-it-yourself photo frames and frames - Photo report “Do-it-yourself photo frame”
 Our group is located on the second floor. We decided to decorate the flight of stairs leading up to it with photographs of children. To make it look bright and beautiful, parents and children were invited to the DIY photo frame master class. We prepared the necessary materials for them, told them about...
 "Play. Explore. Learn" Didactic games are played with kindergarten children, starting from a very early age. There are a large number of exciting games through which teachers introduce little pupils to natural objects and objects, their color, shape...
It’s not difficult to make something like a DIY tabletop photo frame. Craftsmen make frames from literally everything. A variety of materials are used in the creative process: cardboard, wood, plaster, strong thread (twine), fabric, braid. Shells, shards of glass or mirror. Everything is used, even brushwood, sushi sticks, toothpicks, matches, tree bark. A masterpiece can be created using beads, beads and even banal buttons.
The photo below shows the components that usually make up a photo frame:
In order for the photo frame to stand and not fall, you need to provide a stand (on the far right in Figure 1). This is the sheet to which the tongue is attached. shaped like a man's tie. This tab can be folded back and the frame can be placed on the table. Or fold it, then the frame can be laid horizontally or hung on the wall.
Making a photo frame from cardboard:
- We decide on the size. Photos usually have certain dimensions. We take this into account and add a couple of cm to the width of the frame. And we make a blank, for example, 23x18 cm. The “window” will be 14.7 * 9.7 cm.

- Cut out the blank for the stand. It is due to this part that the frame will stand and not lie. These two blanks need to be connected to fabric or leather at a distance of approximately 0.5 cm. Due to this, the stand will bend:

- Using the existing patterns, we make “layers” of the photo frame. The design can be simplified: for example, do not install glass, do not fix the photo with clamps.
- The front side can be made of cardboard and decorated to your liking: glue padding polyester, a layer of cardboard and cover it with fabric or wrapping paper. Stick flowers, beads or even stationery, as in the photo:

But it’s better to see once than to read 100 times. For those who like videos, here is a master class on making a tabletop frame:


