Any bath needs high-quality insulation of the ceiling - warm air, according to the laws of physics, tends to rise up. And if there is no heat-insulating layer on its way, then significantly more fuel will be needed to heat the bath and maintain a consistently high temperature in it.
But that's not the only problem - in the absence of insulation on the ceiling of the bath, condensation will accumulate, and drops dripping from above on the head and back are unlikely to bring great pleasure to anyone. And the moisture going up along with the heat will contribute to the destruction of the ceilings and the roof support system. The only way to avoid these troubles is to make high-quality ceiling insulation in a bath with a cold roof. And our material will tell you what and how to do it.
We plan work
Before you buy materials and take on tools, you should carefully plan your actions. A clearer understanding of the matter will save you from annoying mistakes and the need to redo everything in the future.

The first question is whether it is possible to insulate the ceiling in the bath on your own.? Or is it worth entrusting this business to a team of builders? The process of insulating the ceiling itself is not something complicated, therefore it is not difficult to perform it on your own, even without much experience in repair and construction. The main thing is to carefully observe the technology and approach the matter responsibly. The availability of the necessary materials also speaks in favor of self-insulating the ceiling - they can be found in any large hardware store or on the market.
The second question is what, in fact, needs to be done? Insulation of the ceiling in a cold bath consists of three stages:
- vapor barrier;
- thermal insulation;
- waterproofing.
As a result, a kind of “layer cake” should be obtained, the lower layer of which is the ceiling covering, and above it, vapor barrier, thermal insulation and waterproofing are located sequentially from bottom to top. More details about why this is necessary and how to do it will be described below. Now it's time to think about the choice of materials.

We select a heater
The melted bath maintains a very high temperature and humidity. The heat-insulating material must meet these conditions and, most importantly, not emit harmful substances when heated. In addition, a good heater for a bath should be fire resistant. It is undesirable that the thermal insulation material be too heavy or inconvenient to carry and install. Now consider the materials in more detail.

It is the most common type of insulation for baths and private houses; This is a fibrous heat-insulating material that exists in three types:
- glass wool;
- stone wool, which is made from basalt or other molten rocks;
- cinder wool, made, like cinder blocks, from blast-furnace slags.
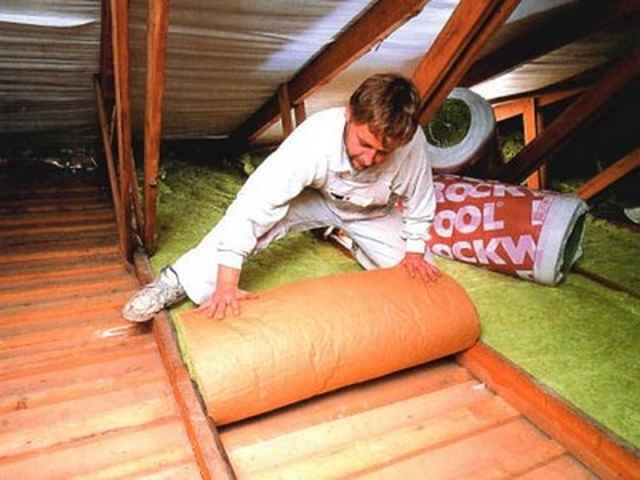
The main advantage of mineral wool, in addition to its very low thermal conductivity, is that it is not a breeding ground for fungi, mold, insects or rodents. For a bath located on a private plot, this is especially important. It is also worth noting that this material does not burn, does not change its volume and shape when heated or cooled, and is very easy to install due to its low weight. Mineral wool is produced in the form of rectangular panels or in the form of rolls.


As for the disadvantages, there are two of them - the ability of mineral wool to absorb moisture (especially slag wool) and the potential harm of the phenols contained in them. Both of these shortcomings can be eliminated if you correctly approach the issue of vapor and waterproofing and prevent contact of mineral wool with the air flow, especially inside the bath.
Important! Small particles of mineral wool can have a damaging effect on the eyes, skin or lungs of a person, therefore, when working with it, be sure to wear tight clothing and use gloves, goggles and a respirator.
Table. comparative characteristics of various types of mineral wool.
Expanded clay
It is a small pebbles of clay with a porous structure. In terms of its advantages, expanded clay is the most suitable material for insulating the ceiling in a bath.
- Security- it does not burn, is environmentally friendly and does not emit harmful substances into the air.
- Durability- expanded clay does not decompose under the action of sunlight and does not collapse over time.
- This material not an attractive environment for fungus or bacteria.
- Has a low cost and is easy to install.
Also, expanded clay absorbs significantly less moisture than mineral wool, but at the same time, the need for vapor barrier and waterproofing layers still remains.

Expanded clay
Styrofoam
At one time it was one of the leaders among heat-insulating materials. But even taking into account all its advantages, you should not choose polystyrene foam as a ceiling insulation in a bath - in case of fire, the material burns well, and its smoke is very dangerous for human life and health. It is also capable of decomposing simply under the influence of high temperatures (and they are inevitable in a bath), therefore polystyrene foam can hardly be called a reasonable choice in this case.

Styrofoam
Ecowool
A natural fibrous material made from cellulose with additives that make it flame resistant and repel rodents, insects and micro-organisms. Ecowool has a low weight and the ability to fill all the cracks and gaps. Like expanded clay, it is environmentally friendly and does not emit any substances harmful to humans into the air.
However, ecowool is able to absorb a lot of moisture, which worsens its thermal insulation properties. Therefore, when using it, good ventilation under the roof and high-quality waterproofing are desirable. Another disadvantage of its use is the complexity of installation - with the "wet" method of application, special equipment is required.

"Wet" method of applying ecowool
A mixture of cement and sawdust
It is a "classic" material for insulation, which was used even before the appearance of mineral wool or polystyrene on the market. In some cases, clay can be used instead of cement, and straw instead of sawdust.
First, a dry mixture is prepared in the following proportion: one part of cement and one lime is taken for 10 parts of sawdust. The resulting dry mass should be poured with one and a half parts of water and a sufficiently thick and homogeneous solution should be obtained. The mixture is spread on the surface and distributed in a fairly even layer.
Important! It is advisable to use sawdust that has been dried for several months or better than a year.
Such material is very cheap and environmentally friendly, but it does not have such high thermal insulation as expanded clay or mineral wool. In addition, the process of its manufacture is laborious, and after laying it is required to repair the resulting cracks (and they are inevitable).

Materials for vapor and waterproofing
For a bath, ceiling vapor barrier is vital, otherwise rising moisture will not only worsen the thermal insulation properties of the insulation, but will also contribute to the development of fungi and mold on the ceiling itself and on the roof rafters. As a material for vapor barrier, specialized films and coatings are used. Particular attention should be paid to anti-condensation membranes. When buying vapor barrier films, it is advisable to choose those that have a foil layer.
Important! When working with such films, be careful not to allow any breaks in the vapor barrier material or foil layer, otherwise its protective properties will deteriorate significantly.
As for waterproofing, for it you can use both special films that can be found in any hardware store, as well as cheaper roofing material or dense polyethylene.

Common vapor barrier materials: 1. Geosynthetics. 2. PVC membrane. 3. Glassine. 4. Tol. 5. Aluminum foil. 6. Thermofol.
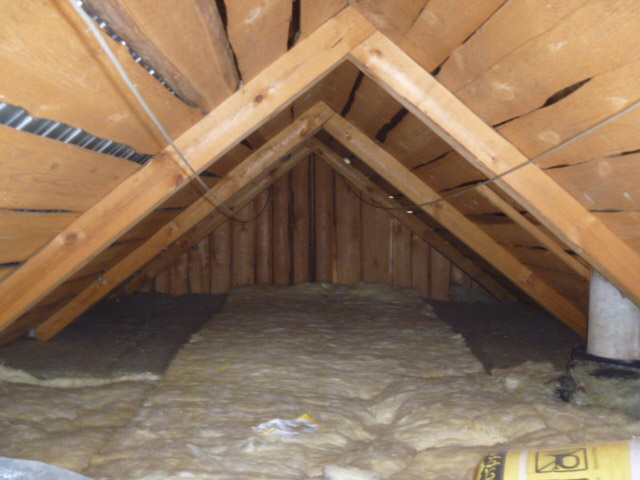
Floor ceiling insulation
There are three main types of ceilings in the bath:
- hemmed;
- panel;
- grazing.
Now we will consider the last type and find out how to insulate it and what nuances should be taken into account.
The floor ceiling is usually used for small-sized baths, which are heated quite rarely and seasonally. Sheet piling or simple edged boards are laid on the upper part of the wall, adjusted to each other and fixed, without the use of support beams. The resulting design is very simple, but at the same time it is unable to withstand a large load, therefore it is impossible to use a thick layer of thermal insulation here.
Important! It is advisable to lay the floor ceiling slightly lower than the height of the walls in order to leave space for backfilling expanded clay or laying mineral wool. If this is not possible, then along the perimeter of the ceiling under the roof, the sides should be nailed.
Step-by-step insulation of the bath flooring ceiling is as follows.
- From the side of the attic, a vapor barrier film is laid on the flooring so that the foil layer is directed downwards. The material should be overlapped by 10-15 centimeters, the seams and joints are sealed with foil tape.
- Mineral wool is laid on top of the vapor barrier, expanded clay is poured or a mixture of cement and sawdust is laid, depending on your choice. Please note that it is undesirable to use too thick a layer of insulation, since the flooring is not suitable for high loads.
- The heat insulator layer is closed from above with roofing material, polyethylene film or waterproofing coating, overlapping and with careful gluing of the joints.
- The final step will be laying sheets of plywood or boards on top of the resulting “layer cake”.

It makes sense to use a flat ceiling in small baths and in the case when simplicity and speed of its installation and installation of insulation are important to you. If you are planning to make a large enough steam room or arrange an attic under the roof for storing bath accessories, then you should stop your choice on a false ceiling.
False ceiling insulation
Here, not the flooring itself is laid on the upper part of the wall, but support beams made of wooden beams or boards spliced together. And already from below and above, the ceiling and the floor of the attic are laid on the beams. At the same time, layers of steam, hydro and thermal insulation are laid in the space between them.

The process of insulating a ceiling with a similar design depends on what material you use. For mineral wool, this happens as follows.

Video - We insulate the ceiling in a bath with a cold roof using mineral wool
The process of warming the hemmed ceiling of a bath with a cold roof looks a little different in the case when expanded clay or a cement-sawdust mixture is used. Let's put it in the form of a step by step guide.
- From below, a rough flooring of boards is laid on the floor beams. The gaps between them must be treated with a sealant or smeared with a mixture of clay (or concrete) and sawdust.
- A vapor barrier film is laid on the flooring both from the side of the steam room and from the side of the roof, and not only the boardwalk, but also the beams themselves should be covered.
- Expanded clay is poured into the resulting boxes or ecowool is laid.
- Roofing material or other waterproofing material is overlapped on top of the insulation and attached to the beams using a construction stapler.
- Boards or plywood are laid on the waterproofing to form the attic floor.
- A lining is laid on the draft boards from below.

If you use a mixture of clay and sawdust to insulate the ceiling, then it is advisable to put a layer of mineral wool or expanded clay on top of the frozen mixture - this will improve the performance of thermal insulation.
Important! The optimal thickness of the layer of a mixture of clay and sawdust for using a bath in the warm season is 50 mm. If you plan to bathe in it in winter, then you will need to make a layer of insulation of at least 150 mm.
Panel ceiling insulation
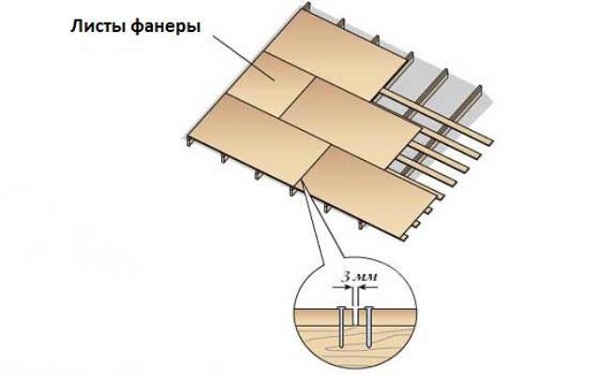
Such a ceiling design is the most difficult for self-manufacturing - first you need to make the panels themselves, and then lift them up and fix them either on the transverse beams or directly on the top of the walls.
Each of the panels is made as follows.
- A layer of boards, carefully adjusted to each other, is laid perpendicular to the supporting bars. This layer will serve as the ceiling for the bath.
- Boards are attached to the inside of the resulting shield, which will serve as the sides of the panel.
- A vapor barrier material is laid on the boards and sides and fixed with a construction stapler.
- Mineral wool or ecowool is laid in the interior space of each panel. You can also use a cement-sawdust mixture or expanded clay, but in this case the panel will turn out to be especially heavy.
- A polyethylene film or roofing material is laid on top of the heat-insulating material, with overlapping joints of 5-10 cm.
- The top layer of boards is laid, which will serve as the floor for the attic.

The resulting panels should be lifted and mounted, while it will not be superfluous to lay solid boards on top and bottom of them, connecting all the panels to each other. The joints between them also need to be insulated with strips of mineral wool scraps. Alternatively, you can take the same mixture of cement and sawdust.

Advice! The assembly of ceiling panels, their lifting and installation is very laborious. Therefore, it is advisable to use some kind of lifting device and work not alone or in pairs, but as a whole team.
Choosing the type of ceiling and the insulation material used should be based on the budget, your own experience in construction work, the area of \u200b\u200bthe bath and how often it will be used.
Video - Device ceiling in the bath
Many of my readers often ask me how to properly insulate the ceiling in the steam room of the Russian bath. The question is really important, since the maximum steam leaks go through the ceiling. You also need to remember that the temperature of the ceiling plays a very important role in creating the right conditions for the Russian bath.
First of all, let me remind my readers that the finishing of the steam room ceiling should be done with a massive board of non-coniferous wood (linden, aspen). The lining, traditional for dry-air steam rooms and saunas, is far from the best choice for a Russian steam room. An array of wood on the ceiling accumulates a large amount of heat and gently releases it in the form of the right IR radiation, good heat, steaming. The temperature of the ceiling in the steam room of the Russian bath is always higher than the temperature of the walls, since the heat always rises. The correct temperature of the ceiling contributes to the correct formation of the steam cake. Usually the temperature of the ceiling in the right steam rooms is + 70- + 85 degrees. You also need to remember that the stove is the heart of the bath and the correct conditions in the steam room directly depend on the correct choice of the stove for the bath.
Below I will describe the correct classic pie for warming the ceiling of a steam room in a Russian bath using modern materials. If we describe the “pie” starting from the side of the steam room, then it consists of the following layers:
1. Finishing the ceiling of the steam room. As I wrote above, for this you should use an array of boards, and not lining. The board must be made of non-coniferous wood (linden, aspen) and have a thickness of at least 25-30 mm, and preferably thicker. You can use croaker. If you use a board of coniferous wood (spruce, pine) on the ceiling of the steam room of the Russian bath, then the probability of resin release under the action of high temperatures in the area of the steam room ceiling is very high. This resin will tend to collect into drops and, due to the force of attraction, will begin to drip. Resin can get on the open areas of the body of those who are steaming, which will at least lead to discomfort, and at most to a burn.
2. The gap between the fine finish of the ceiling of the steam room of the Russian bath and the vapor barrier. Usually, to organize such a gap, wooden slats of any kind of wood with a thickness of 20-50 mm are used. Some believe that this gap in the "pie" is not needed and the finishing ceiling boards can be sewn directly to the vapor barrier. I am not a supporter of this, since when attaching the finishing ceiling boards directly to the vapor barrier, the risk of mechanical damage to the vapor barrier material, more often aluminum foil, increases significantly. In the same way as well-known experts on the reflective properties of foil, with whom I once had a chance to talk, say that the absence of a gap significantly reduces the ability of the foil to reflect thermal energy.
3. Vapor barrier. The most responsible and very important layer of the "pie" of warming the ceiling of the bath. Treat it with the utmost care! Since there can be significant temperatures in the area of the ceiling of the steam room of the Russian bath, ordinary film vapor barrier is not suitable. The film will just melt. Most often, aluminum foil with a thickness of 0.5-0.7 microns is used to vapor barrier the steam room ceiling. It is convenient to work with paper-based foil. Just do not take paper, with aluminum coating - this is a completely different material. The foil material Izospan FB, Armofol has proven itself well. I strongly do not recommend the use of foil materials based on polyethylene foam type Penofol. The foamed substrate will most likely not withstand the high temperatures of the steam room and will begin to melt, releasing harmful substances. Foil materials based on expanded polypropylene, such as Penotherm, can be used. This material is resistant to temperatures up to +150C.
The foil material on the ceiling is laid in two layers, preferably with overlapping joints. All joints of both the first and second layers are carefully glued with aluminum tape. Careful gluing is very important! Otherwise, there is a very high probability of the appearance of places through which steam will escape. Use only high-quality adhesive tape that adheres well to the foil! It is convenient to shoot the foil to the ceiling with a stapler. Places of paper clips are also better to be glued with adhesive tape. Pay special attention to the corners and where the ceiling meets the walls. In these places, I recommend making a good overlap of foil material on the walls (at least 10-20 cm). The junction of the ceiling foil with wooden walls or bricks of the chimney pipe is treated with silicone sealant. The sealant adheres well to the foil. In places where the foil overlaps on wooden walls, after gluing to the sealant, I recommend reinforcing with tightly attached wooden slats.
If foil is also present on the walls, for example, in a frame structure, the joining of the ceiling foil and wall foil is also very carefully glued with aluminum tape. I recommend running the wall foil onto the ceiling foil, and not vice versa.
4. Draft ceiling. Usually done with a board of any kind of wood 25mm or thicker. It is convenient to attach a vapor barrier to the draft ceiling, and also to move around when laying insulation in the attic, leaning on it. Some try to make a steam room insulation pie without organizing a rough ceiling with laying the insulation directly on the foil. I do not recommend doing this. The foil will sag a lot and its installation, as well as later, the installation of insulation becomes problematic.
5. Insulation. The thickness of the insulation must be at least 150mm. Low-density roll or tile insulation is usually used. More often, basalt or other mineral wool is used, which is designed to insulate ceilings. For greater efficiency, it is better to organize the insulation in three layers with overlapping joints. Attention! The insulation is laid directly on the draft ceiling! A common mistake is that another layer of vapor barrier is laid on the draft ceiling under the insulation. It is unacceptable! With such an incorrect “pie”, the probability of a quick decay of the draft ceiling is very high!
6. Vapor-permeable hydro-wind protection type Izospan-A or analogues. This membrane is laid so that the insulation is not dusty and is protected from any possible influences. Attention! A very common mistake is to install a vapor barrier instead of a vapor-permeable membrane. With such an incorrect “pie”, the probability of the insulation getting wet in the steam room of the Russian bath is very high! The heater stops working as an insulating material.
7. Ventilated gap. Usually organized with wooden slats 20-50mm thick. You can do without this gap, but I still recommend doing it. Moreover, it is ventilated, that is, when laying the finishing floor of the attic, it is necessary to provide gaps between the floor and the walls of the attic for free air circulation in this gap.
8. Finished attic floor. It is carried out with a floor board with a possible subsequent decorative coating.
I am often asked about whether it makes sense to insulate the ceiling of a steam room not with modern materials for building a bath, but with the use of "environmentally friendly" materials based on clay. Indeed, in ancient times, the steam room insulation pie was different. There was no foil. On the ceiling of the steam room, a rolling of logs or semi-logs was made. He was caulked and from above, from the side of the attic, paper, cardboard or dry leaves were laid. On top of them, liquid clay was poured in several layers, reinforced with sawdust, straw or dry leaves. I do not see the point in our time to make such a difficult cake to make. Experience shows that these technologies are now almost lost. Those who have gone down this path almost always have big problems with cracking of the clay, its strong shrinkage and the loss of the clay layer from the wooden walls of the attic. The fact is that the clay must be prepared in a special way, and then shed it in very thin numerous layers, waiting for the complete drying of each layer. From the point of view of ecology, I also consider this method not justified, since these layers of insulation do not come into contact with the atmosphere of the steam room and cannot have a positive or negative environmental impact on the steamers.
Also, many insulate the ceiling of the steam room with dry leaves or a thick layer of sawdust without the use of clay. This option has the right to life if you are building a heavily budgeted bath. Savings are illusory, and rodents almost always start in such heaters.
Many people consider foil not an environmentally friendly material, but wax paper is used as a vapor barrier on the ceiling of a steam room. I don't see the point either. Modern foil is environmentally friendly, it is even approved for contact with food. At least I have never met reasoned arguments about the harmful effects of foil on humans.
Proper insulation of the ceiling of the steam room of the Russian bath
How to properly insulate the ceiling of a steam room in a Russian bath. What materials and in what order to use
The principles of insulation in the steam room from the inside: step by step instructions
A special place in the Russian, and not only in the Russian, banya is reserved, of course, for the steam room. Because it is in this room that the main action takes place - it is in order to feel the healing and refreshing effect of a hard maple broom and a soft park that we visit the steam room. In order not only to wash, but also to acquire a good charge of positive and healthy energy. And since this room is the most important in the bath, and the conditions in it are the most severe, the warming of the steam room from the inside should be done with great care.

As part of this publication, we propose to consider options for how to properly insulate a steam room and how to choose the right insulation materials based on their physical characteristics.
Insulation materials
Thermal insulation of the steam room is carried out with a variety of materials, ranging from ultra-modern to time-tested. And we will begin our analysis of the characteristics with, perhaps, the most used, but rather outdated material - mineral wool.
Mineral wool
 As mentioned above, this material has long been known and many experts consider mineral wool to be obsolete. Nevertheless, in terms of its thermal insulation characteristics, it is hardly inferior to modern heaters. However, this material is quite expensive and is very afraid of moisture. When wet, mineral wool loses its thermal insulation properties and begins to rot, transferring this process to the adjacent wooden structures. In this case, the steam room will have to be insulated on a new one.
To prevent this from happening, when insulating the steam room from the inside with mineral wool, you should take care of high-quality and reliable hydro and vapor barrier of all surfaces insulated with mineral wool, that is, walls and ceilings, with foil vapor and hydro insulators. The vapor barrier of the steam room is very, very important, since with properly executed vapor and waterproofing, mineral wool can last a long time without losing its thermal insulation qualities. It is quite possible to replace mineral wool with stone or glass wool.
Now we will briefly consider one of the most modern heat insulators for a steam room - polystyrene foam and how to insulate a steam room in a bath with this material.
Styrofoam
 Why do we write about this material briefly? Yes, because it is not quite suitable for insulating the steam room of the bath. Although its thermal insulation performance is very, very high, it is not afraid of moisture and rodents and mold do not like it, all these advantages come to naught when you recognize its other side.
Despite the fact that polystyrene foam does not burn, at high temperatures it begins to melt. And everything would be fine. But! When melted, this heat insulator releases toxic substances, which is fraught with poisoning. And although many still use it, we, when answering the question of whether polystyrene foam can be used as a heater for a steam room, strongly do not recommend doing this.
Let's move on, in fact, to the warming of the steam room from the inside, step-by-step instructions for what follows.
Tip: Before proceeding with the insulation measures, we recommend that you treat all surfaces previously cleaned of dirt and dust with antiseptics and allow the latter to dry.
We insulate the ceiling
 Since insulation and finishing work in any room (and the steam room is no exception) is recommended to be carried out from top to bottom, let's start from the ceiling.
When choosing materials in order to insulate the ceiling of the steam room, one important nuance should be taken into account: the thickness of the insulation on this surface should be at least twice as much as on the floor and walls. Because the upper part of the steam room is the main path through which up to 20 percent of the heat so valuable for this room can escape.
Since the ceiling of the steam room is a surface that is constantly subjected to extreme loads (high temperature, high humidity), it is necessary to insulate the ceiling in the steam room using insulation materials that meet the following mandatory requirements:
- Increased resistance to aggressive vapors and moisture, as well as temperature extremes;
- The absence of any predisposition to the appearance of harmful bacteria, fungi, mold, as well as colonization from the inside by rodents and insects;
- Good compatibility with floor and finish materials;
- Low moisture absorption;
- Ecological cleanliness, as well as safety;
- An increased level of thermal insulation, that is, the possibility of keeping heat in the bathhouse for the longest possible time and the maximum possible complete isolation of it from external premises and the street;
- The ability to easily mount the insulation material, without losing its characteristics.
 Let's start with the internal insulation of the steam room of the bath. To insulate the steam room from the inside, you need to do the following:
- we cover the surface of the ceiling with roll paper, making a good overlap between the sheets;
- we fix the paper with a crate of timber with a section of 50x50 millimeters;
- we insert layers of insulation cut to the size of the cells into the cells of the crate;
- we lay a foil insulator on top of the insulating material and fix it with aluminum reinforced tape. The edges and joints are especially carefully glued;
- on top of the foil vapor barrier we lay, we create a crate of bars with a section of 20x30 millimeters. This will ensure high-quality air exchange;
- on the resulting crate, you can lay the final ceiling sheathing.
Separately, it should be said about the ceiling of a steam bath from a log house (log). In such a room, it is not necessary to insulate the ceiling at all. Sheathing with 60 mm boards will be enough.
If the bath has an attic, then the ceiling above the steam room should also be insulated from the outside. Such insulation is carried out with basalt wool, expanded clay or glass wool.
We insulate the walls
 In fact, the insulation of the walls of the steam room is no different from that of the ceiling. However, we will consider the so-called "design type" of insulation, in which it is possible at any time to dismantle part of the walls in order to replace part of the insulation, cladding, and so on.
This process is carried out as follows:
- on the cobbled walls we fasten vertically narrow slats-beacons. On the floor under them we make marks;
- We fasten the racks to the rails with ordinary self-tapping screws. For them, it is better to use a thermal tree or an ordinary lining;
- then we lay the foil vapor barrier, while not forgetting to glue all its joints with aluminum reinforced tape in order to achieve complete tightness. We do not recommend fixing the foil with a construction stapler, as many do. Since when piercing with staples, holes may remain in the vapor barrier, which is highly unacceptable;
- on top of the foil we put a layer of thermal insulation (for example, mineral wool slabs). Next, we perform a coating from another layer of vapor barrier and fix it with a crate of thin bars mounted with self-tapping screws;
- we carry out surface sheathing, for example, clapboard.
We warm the floor
 Not everyone knows the methods of proper floor insulation in the steam room of the bath. And there are actually two of them: extruded polystyrene foam (aka foam) and perlite. Which one to choose? And not on what! We propose to combine them together.
- we start warming the floor in the steam room by cleaning it from dirt, dust and debris and, if necessary, level it with a cement screed;
- we create reliable waterproofing by laying film material;
- we lay polystyrene foam boards on the resulting waterproofing layer so as to avoid cavities and gaps;
- install a reinforcing mesh and fill it with concrete;
- after the concrete layer has dried, prepare a perlite solution (mix perlite in a ratio of 2x1 with water, adding a small amount of cement) and cover the concrete screed with a thin layer of the resulting mixture;
- when the perlite layer dries (this happens for about a week), it is recommended to lay another concrete layer on top of it. This will help protect the perlite layer from destruction due to mechanical stress;
- after the final drying of the concrete floor, it can be tiled or laid with a removable wooden base. The second option is preferable, since it implies the possibility of removing wet boards so that they can be taken outside and dried.
But what about polystyrene foam? the reader will ask. He's harmful. We answer: unlike the ceiling and walls, floor insulation in the steam room with polystyrene foam is still acceptable. There are two main reasons for this:
- The floor temperature is never too high and its level is not enough to melt the Styrofoam;
- When laying expanded polystyrene on the floor, it, as described above, is poured with a multilayer concrete screed, which makes it hermetically separated from the steam room.
After completion of all insulation work, all surfaces should be carefully sheathed. Sheathing not only gives additional warming to the steam room in the bath. It is also important from an aesthetic point of view. Since bathing in a beautiful and clean steam room is much more pleasant.
Warming the steam room from the inside step by step instructions with photos and videos
How to insulate a steam room in a bath from the inside. Detailed instructions with consideration of the features of materials and methods.
Warming the steam room in the bath: step by step instructions
The steam room is the most important part of the bath. It should not be cold, and such a statement can hardly be disputed. Every zealous owner of the bathhouse tries to minimize any heat losses in its steam room, since extra heating costs, problems with heating the room, keeping it warm and the discomfort of bathing procedures usually do not please anyone. For reliable thermal insulation of the steam room, it is necessary to go through several stages of work on the insulation of its walls, floor and ceiling.
Features of reducing heat loss in the steam room

To avoid unnecessary costs for kindling the stove and keeping heat in the steam room, you need to consider a few simple rules for planning a bath:
- The area of the building is determined depending on the number of visitors present in it at the same time and the number of its rooms - a steam room, changing rooms and others. The size of the steam room is usually 4-6 m2.
Thermal insulation materials for steam room insulation

Natural raw materials and artificial products are used as heat-insulating and sealing materials for the steam room.
Insulation of the ceiling of the steam room in the bath

To insulate the ceiling in the steam room, we will use a modern method, which involves the use of foil material as a vapor barrier layer.
- Insulation is attached to the ceiling beams with a stapler, facing the inside of the room with a layer of aluminum foil, which simultaneously serves as a heat-reflecting screen. This will reduce the cost of heating and keeping the steam room warm by 2-3 times. The joints of the panels of the overlapped insulator are glued with aluminum tape. Other vapor barrier materials are also used for baths, but they are not as effective.
Thermal insulation of the walls of the steam room in the bath

Before the internal insulation of the walls in the steam room, it is necessary to seal all joints and gaps in them with a sealant. After the composition has dried, you can begin to perform thermal insulation. Its process is similar to the insulation of the ceiling, but has some nuances. Wall insulation is carried out in a horizontal direction along the perimeter of the steam room, moving from the top to the floor. Moreover, the strip of foil overlaps to the slope left during the insulation of the ceiling. The insulated wall of the steam room should have three layers of protection: waterproofing, thermal insulation and vapor barrier membrane.
- To exclude the possibility of the formation of vapor condensate on the walls, the enclosing structures of the steam room are covered with a waterproofing film.
Unlike warming a steam room in a brick bath, a wooden building will require fewer heat-insulating materials, since the wood itself has similar properties.
Warming the floor of the steam room in the bath
Insulation of the wooden floor in the steam room

Structurally, a wooden floor has differences from a concrete floor, but their thermal insulation has the same principle. The whole system looks like this: foundation, floor beams, logs laid on beams, a layer of vapor barrier material, a subfloor, insulation, a waterproofing layer, a finishing floor.
Thermal insulation of the concrete floor in the steam room

The scheme of the concrete insulated floor in the steam room is as follows: foundation, concrete floor, waterproofing layer, insulation, concrete screed, ceramic tile or wooden floor.
- The laying of the base of the lower layer of the floor is carried out from a concrete mixture having a crushed stone fraction of 20-35 mm. The thickness of the concrete cushion is 120-150 mm.
As you can see, warming a steam room is easy to do on your own. Turn on your patience and diligence, and the result will be sure!
Do-it-yourself warming of the steam room in the bath
Thermal insulation of the steam room is a must in any bath, regardless of the material of its manufacture. It is best to devote time to this matter at the stage of construction work, although this is also possible in a finished bath.
Insulation of the steam room - how to carry out work according to the rules and without risk to health

If we talk about insulation, then the most important room in this regard is the steam room. Any, even the most insignificant heat loss in it can reduce all comfort to "no", and therefore it is important to think over every detail of its inner lining and design. But how to properly insulate a steam room in a bathhouse in order to create the effect of a “thermos” - and absolutely safe for health - our article will tell.
Attention to the ceiling of the room
Any warming of the steam room of the bath begins with the surface of the ceiling. For him, you need to take materials twice as thick as for walls - after all, it is there that all the hot air and steam rise. In addition, if the built bath will be used as a real Russian one, that is, with thick, moist steam, it is impossible to insulate the ceiling of the steam room according to the technology, as for saunas, in no case. Indeed, in such a steam room, steam will begin to leave, and there will not be much of it left for bathing procedures.
- Step 1. The ceiling must be covered with roll paper - so that the joints are obtained with a generous overlap.
- Step 2. Now the paper is fixed with 5x5 cm bars, between which insulation materials are mounted.
- Step 3. At this stage, you will already need foil - it is she who will cover the insulator. The main thing is that it has 100% solidity - this is important. And you need to fasten it with a special aluminum adhesive tape, which can be purchased today at any hardware store. And often such a tape is sold immediately with foil for insulation, which is very convenient. True, among such tapes there are both high-quality and low-quality ones. Checking this is quite simple - you need to stick a piece of tape right in the store to a piece of foil and try to tear it off. If it turns out to be ordinary tape, then it will not work.

- Step 4. The extreme sections and all joints must be especially carefully fixed - after all, the foil in the future is just designed to contain steam and reflect heat. Indeed, if moisture penetrates into the insulation for the steam room through some gap on the ceiling, the consequences will be quite unpleasant. Therefore, it is important to check everything well then for tightness. Instead of aluminum foil, it is allowed to use waxed paper and thick cardboard, pre-impregnated with drying oil. But on such a vapor barrier it is necessary to lay out a layer of clay - and only then proceed to the direct insulation of the ceiling.
- Step 5. The foil should be fixed with small bars - preferably 2x3 cm, in order to maintain good air exchange and then mount the decorative finish you like on the bars themselves.
For a frame bath, it is necessary to put insulation on the ceiling and walls, but for a timber and log bath you can do without it. For example, if the bath is made of logs, its ceiling must be sewn up with sufficiently thick boards - at least 6 cm. Mineral wool is most suitable as a heater for the ceiling - only you need to lay it in a layer of at least 15 cm.
If the insulation turns out to be dense enough, it is still possible to make a cement-sand screed over it for strength. If not, lay sheets of fiberboard, or cover it with a windproof film, and lay floor boards on it. But special attention when insulating the ceiling of the steam room should be given to the passage of the chimney - heat should not go through it, and the ceiling should heat up in this area.
Rules and technology for wall insulation
The whole essence of the technology, how to insulate a steam room, is as follows: first the ceiling, then the walls, then the floor. Their thermal insulation is carried out in the same way as for the ceiling - but we must not forget about a well-thought-out ventilation system, without which a bath is not made.

The most proven, convenient and optimal option is the insulation of the walls of the steam room according to the constructor type. At any time, such a structure can be easily disassembled, something replaced or repaired. And it's done like this:
- Step 1. Beacon rails are vertically attached to the walls of the timber. Under them on the floor you need to make marks from pieces of electrical tape. For installation, it is better to take narrow strips - they are much less susceptible to natural deformation processes. Before installation, the wood panels themselves should be treated with a special impregnation, which is designed specifically for the steam room.

- Step 2. Racks from lining are attached to the rails on ordinary self-tapping screws - better than the so-called thermal tree.
- Step 3. On top of these rails, you need to fix the foil - preferably 50-100 microns. The foil itself is an excellent vapor barrier if there are no holes in it and all its joints are well glued with high-quality tape. If this is not seen, the timber will begin to rot, and the insulation will get wet and begin to conduct cold. But, if everything is done absolutely hermetically, no more additional vapor barrier foams will be needed. By the way, you need to fasten the foil to the steam room with a construction stapler - directly to the beam, and then press it with a clapboard. And be sure to leave an air gap between the foil and the lining - at least 1-2 cm.
Only here in a horizontal or vertical way to mount the insulation? Experienced builders say that the most optimal is still the horizontal method, because with it heat losses turn out to be less.

Which wall cladding to choose?
Let's pay more attention to wood materials for sheathing - they should be of low density. Aspen and linden are ideal for this purpose. But the first one, unfortunately, has a significant drawback - it begins to darken over time, although it is considered by the people to be the most healing. And, nevertheless, pine is more practical - when the room warms up, it begins to release resins and the smell throughout the steam room is very pleasant and no less useful.
In any case, it is better to determine the type of sheathing even before insulating the steam room in the bath - after all, each material has its own properties and strength. But, if everything is done using this technology, there will be no draft or condensation in the steam room - only a pleasant aroma and comfort.
Insulation of the steam room - attention to the walls and ceiling
Everything about how to insulate a steam room in a bath is safe for health and effective. The best heaters for the steam room and the technology for their installation, detailed video and photo instructions for the process.
The heated air tends to rise and, if there is no obstacle in its way, it goes into the atmosphere. This barrier is the ceiling. In case of insufficient insulation, about 2/3 of the thermal energy can go through it. Therefore, in order not to incur unnecessary expenses for heating the street, it is necessary to insulate the ceiling of the bath with your own hands. Everything should be organized in such a way that condensation does not form on the wood, and because of it, microorganisms that can destroy the building material do not appear.
Types of baths in accordance with the characteristics of the roof
Depending on the structural features of the roof, log saunas or log saunas are divided into buildings with and without an attic.
Baths with an attic have a significantly more powerful ceiling, which prevents warm air from escaping from the room. In this case, the thermal insulation of the bath ceiling
produced during the construction process. The air mass that fills the space under the roof also helps to reduce losses. The heat will be delayed a little more by the roof insulation.
In a building that does not have an attic, there are much fewer barriers to heat retention and they are too weak, so insulation is especially necessary here. But it is also necessary to do the insulation of the ceiling in a bathhouse with an attic or attic.
Features of the vapor barrier device
In any case, the vapor barrier material is laid first, and only then the heat-insulating material.
The following materials are used as a vapor barrier in baths without an attic:
- aluminium foil;
- thick cardboard, well impregnated with drying oil;
- wax paper.

Of the materials produced by the industry, the following are used:
- Polyethylene film (0.4 mm with variations). It creates a greenhouse effect and therefore is not popular. When using this material, leave a gap that is required to evaporate the resulting condensate.
- A special vapor barrier polyethylene film with villi that are able to retain condensate.
- Vapor barrier membrane.
The main task of vapor barrier is to retain steam and prevent it from entering the insulation. Due to the accumulated moisture, the service life of the heat-insulating material is reduced, the weight of the ceiling structure increases, and the quality of the insulation decreases.
Functions of bath ceiling insulation
With an increase in the required temperature in the room, the construction of a barrier to prevent heat loss becomes more complicated. This problem can be solved by laying heat-insulating material in a multilayer ceiling structure.
Thermal insulation eliminates the following types of thermal leaks:
- heat loss through ceiling cracks;
- the gradual movement of heat from warm objects to cold ones;
- overcoming homogeneous barriers with warm air.

With the proper organization of insulation, all the functions assigned to it will be implemented. In the case of illiterate thermal insulation, problems such as the formation of condensate, long heating of the room and the waste of more fuel can occur.
Types of insulation materials
Before starting work on thermal insulation, it is necessary to choose how to insulate the attic of the bath.
Mineral wool is a randomly intertwined fibers, air voids are formed between them, which perform the function of retaining heat. This insulation on the ceiling in the bath is used most often. When wet, mineral wool loses its thermal insulation qualities. If the roof has insufficient protection against rainwater leakage, then it is recommended to lay a waterproofing material on top of the insulation. There must be a thermal insulation gap between the layers of waterproofing and insulation.
Also, the ceiling in the bath can be insulated with foamed polypropylene. This material is very light and will not weigh down the ceiling structure. Especially for baths and saunas, a material foiled on one side was developed. In addition to the main function of insulation, it reflects the heat flow with the foil side. Acting on the principle of a mirror, this insulating material provides faster heating of the steam room.
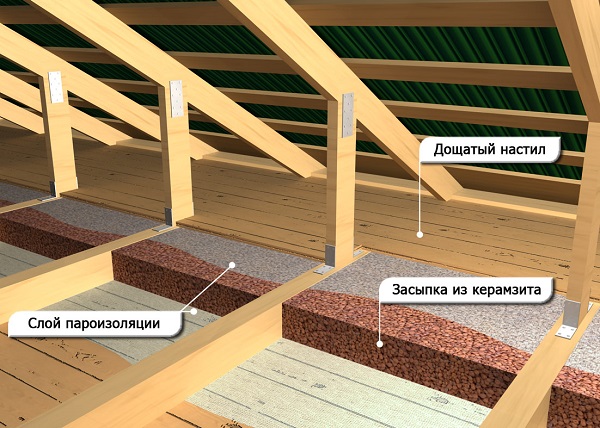
Expanded clay can also be used as a heater for the ceiling in the bath. It is used in large baths. It is necessary to fill up expanded clay with a uniform layer equal to 30 cm. The material is relatively light, but, nevertheless, the weight of the ceiling structure will increase. This insulation material, like mineral wool, absorbs moisture well, so a waterproofing layer is also needed.

Another option than to insulate the ceiling in the bath with your own hands is the so-called "folk" heat insulator.
In this case, the insulation is carried out as follows:
- Soft clay is laid with a layer of 2 cm. It can be replaced with a mixture of black soil and peat, wood shavings, which is poured with cement mortar, you can also mix clay with sawdust or sand.
- Sawdust or oak leaves fall asleep (you can replace any others).
- Dry earth is poured with a layer equal to 15 cm.
Also, growing aerated concrete is used to insulate the ceiling in the bath. To fill it, it is necessary to make a simple formwork.

Here are the different types of thermal insulation materials. And what is the best insulation for the ceiling in the bath to use is determined in each case.
ceiling insulation technology

Consider step by step how to properly insulate the ceiling in the bath:
- Boards are attached to the bottom of the beams.
- Roll-up shields are made, that is, low-quality boards are taken and two rows perpendicular to each other are knocked together. It should look like a box. Before knocking down the roll-over shields on the ceiling to the bath with your own hands, it is necessary to make calculations. Beams and shields should not be located close to each other, between them it is necessary to leave gaps equal to at least 5 cm. There must be a distance of at least 25 cm from the chimney to wooden shields. It is necessary to draw a diagram, and in accordance with it, calculate the dimensions and shape of each of the shields . To avoid confusion during installation, all shields must be numbered.
- Finished shields also need to be impregnated with antiseptic agents.
- Inside each shield there is a vapor barrier in the bath. It must be secured with staples.
- The shields go up. You need to start with those that will be installed last.
- Shields are placed in accordance with the numbering. Installation is carried out in such a way that the lower planes of the shield and the beam coincide.
- Then, heat-insulating material is placed in the "boxes". It is also necessary to insulate the joints between the shields and beams. The owners of the bath independently select the better to insulate the ceiling in the bath. The choice depends on a combination of various factors.
- Boards are laid on top. They must be placed across the beams. In this case, it is not necessary to take the board to its full length; short boards can also be used. Boards can be replaced with fiberboard or self-made slabs from a solution of cement mixed with sawdust.
- The finished ceiling should be treated with fire-fighting agents.
- All wooden elements located near the chimney must be covered with asbestos sheets.
The insulated ceiling is ready.
Thermal insulation of the ceiling in the steam room
The ceiling of the steam room should perform two functions: keep warm air and steam out and ensure the accumulation of steam in the room. The ceiling of the steam room should contain two layers of vapor barrier and additional layers of thermal insulation.

Consider several options for installing the ceiling in the steam room.
Design from Sosnin Yu.P. and Bukharkina E.N.
- Groove boards 25 mm thick are taken and attached to the beams. The boards must be covered with drying oil in two layers, which should give them moisture resistance.
- Boards of poor quality are fastened across the top of the beams. There should be a distance of 3 cm between them. In this way, a moisture gap is created.
- Further, a roofing material or plastic film spreads over the boards. Reinforced foil works best.
- Slag or sand falls asleep. The layer should be equal to 20 cm.
Other ways to insulate the ceiling in the steam room
The technology for performing thermal insulation using clay and mineral wool is as follows:
- For filing from below to the ceiling beams, an unedged board 5 cm thick is used.
- Outside, a narrow board is attached along the beams with the help of capercaillie. It is required to support the binder.
- Grooved aspen boards are screwed to a fixed thin board, a ventilation gap must be left between them.
- From the side of the attic, a vapor barrier material is spread.
- Then a layer of 3 cm is laid mixed with sawdust clay.
- Mineral wool is laid. You should take a heater with a density of 125 units and having a width of 15 cm.
- A polypropylene film is spread to protect against wind.
- At the end, the floor of the attic is made from the boards

If there is a log ceiling in the bath, then the crate is first made, and then the sheathing is attached to it. As a vapor barrier, glassine spreads on top. Then sand is poured with a layer equal to 20 cm. The rest of the actions depend on the desire of the owner of the bath.
For proper insulation of the bath, you need to know which insulation is best for the bath on the ceiling, in what order you need to arrange the layers, as well as the features of the ceiling insulation in the steam room. The options for arranging the ceiling described above can be changed depending on climatic conditions and personal preferences.
The Russian bath is a unique place for relaxing and healing water treatments and communication. Strong immunity, beautiful skin and a body cleansed of toxins - these are the results of a constant visit to the bath. However, the effectiveness of bath procedures cannot but depend on the quality insulation of the bath.
Everyone has long been accustomed to the fact that it is necessary to insulate internal surfaces (floors, walls, ceilings) in apartments and houses. However, high-quality insulation of the bath is no less necessary. If it is enough to insulate only the walls in the apartment, then the bathhouse and the private house need careful insulation of the ceiling. The thing is that the heated air becomes lighter and rises. If the ceiling is not well insulated, then the hot air will go straight to the roof and heat the air around the house, and this is a waste of heat.
Technology
 Mineral wool is needed must be isolated from water vapours.. To do this, it must be closed with a vapor barrier, which must be airtight and waterproof. Today, foil is often used for vapor barrier, glued at the joints with aluminum tape. Among the novelties of the construction market is foilizol, a modern material made on a fiberglass basis. In addition, glassine, membrane insulation or ordinary polyethylene film are often used.
Bath ceiling can be:
If the ceiling is false, that is, the boards are hemmed to the floor beams, it is necessary to insulate from the side of the attic. 2 layers of vapor barrier (glassine, roofing material, and so on), a layer of mineral wool, and again a layer of vapor barrier are laid on the ceiling.
In case of panel ceiling, each panel is covered with a vapor barrier film, mineral wool is laid on it and closed with a vapor barrier. All this is sewn up with boards.
The easiest way to insulate a flat ceiling. The technology here will be the same as in the case of a false ceiling. To do this, a vapor barrier is rolled out on the boards from the attic side, then a layer of mineral wool 200-250 mm thick is placed on it and completely covered with a vapor barrier. Next, the floor is sewn up with boards.
Advantages and disadvantages
 Among the advantages of mineral wool insulation you can call it:
- this material almost does not conduct heat and can well isolate the room, including from extraneous sounds;
Everything has its downside, and mineral wool as a material for insulating the ceiling of a bath, unfortunately, was no exception. It has few disadvantages, if we compare their number with the number of advantages, but These shortcomings are very significant.. Consider them:
- mineral wool cannot be crushed or tamped, because the compacted fibers greatly lose their thermal insulation properties;
The technology of warming the ceiling of the bath with mineral wool
Mineral wool is one of the most inexpensive and reliable materials for warming the ceiling of a bath. The insulation technology is quite simple, and even a non-professional can handle it.
Thermal insulation of the bath ceiling with mineral wool: instructions
 Since heat loss through the roof can range from 25 to 40%, insulating the bath ceiling with mineral wool is an important step in the construction of a steam room. In the cold season, the stove will not be able to maintain the temperature at the desired level if the room is not insulated. And the condensate on the ceiling will gradually destroy the ceiling. To prevent this, it is necessary to insulate the ceiling with mineral wool from the inside or from the attic.
If you have the right tools and materials, all the work can be done independently. The main thing is to follow all the recommendations and instructions. Thermal insulation can be made with different heaters. One of these is mineral wool, the features of which will be discussed later.
Insulation overview
Very often, mineral wool is used to insulate the ceiling in a private house. This is due to the value for money. For a low cost, you can get a material with low thermal conductivity, the installation of which is not very difficult to do with your own hands. Mineral wool consists of blast-furnace slag, glass, sand and rocks. Synthetic resins act as a binder. Minvata is of several types:
- slag;
- glass wool;
- basalt wool;
- ecowool, or cellulose.
To know how to properly insulate the ceiling, you need to understand which material is better to choose. The first type tends to quickly absorb moisture, so its use in the bath is impractical. High hygroscopicity leads to loss of thermal insulation properties. Brittle and prickly slag fibers do not allow it to be used indoors. Its only advantage is its low price.
 Glass wool ceiling insulation is possible, but undesirable. It is a molten glass from which fine fibers are drawn. Like slag, they are fragile. If it comes into contact with the human body, it can cause irritation of the mucous membrane or skin. This material should be used to insulate from the side of the attic, but not from the inside.
When the ceiling is insulated in a private house with mineral wool, as a rule, basalt or stone wool is used. Since it is made from gabbro-basalt, it has plastic fibers. If the thickness of the insulation is less than 10 cm, it is sold in rolls. When the parameter is greater than 10 cm, then slabs or panels are formed. They have high strength and come in different densities. Basalt wool can be used to insulate a room from the inside and outside.
Some manufacturers make panels with a foil layer. If you turn the thermal insulator with this side into the room, the heat will be reflected from the surface and return to the room. This will help keep warm air inside.
Ecowool is 80% cellulose, therefore it is considered environmentally friendly. So that the material is not subject to destruction under the action of various bacteria, and in order to reduce flammability, boric and brown acids are added to the thermal insulator. The first protects the insulation from decay, microorganisms and rodents. Brown acid is a flame retardant, so its use reduces the fire hazard.
All types of cotton wool have high hygroscopicity. However, insulation of the ceiling with ecowool is preferable. This is due to the fact that it is able to absorb a large amount of moisture without a significant deterioration in thermal insulation properties. Minplate will lose 9% in thermal conductivity with an increase in humidity by 1-2%. Ecowool will add only 2-5% to thermal conductivity with an increase in humidity by 25%.
Thus, the insulation of the ceiling in a wooden house with mineral wool is less preferable, since cellulose wool maintains indoor air in comfortable conditions without compromising the thermal insulation properties. Since the installation is not very complicated, you can make ecowool insulation with your own hands.
The disadvantage of mineral wool is the binder. Resins release chemical compounds into the air that can be harmful to humans. And for laying ecowool, you need to use special equipment.
Vapor barrier and waterproofing
Insulation of the ceiling in a mineral wool bath cannot be carried out without vapor barrier work. As warm air rises to the ceiling, it penetrates under the skin and turns into condensation on the insulation. And this reduces the thermal insulation properties of cotton wool and contributes to the occurrence of fungi and mold. Vapor barrier is designed to protect the insulation and wood floor beams from moisture. In bath rooms it is better to lay a foil film.
Waterproofing will help protect the thermal insulation from moisture from the attic. A leak may appear in the roof, or condensation will begin to form in the attic. And so that the insulation does not come into contact with moisture, it is covered with a waterproofing film. To do this, use the usual plastic film, roofing material or special materials. It is necessary to lay steam and waterproofing with an overlap, and glue the joints with ordinary or reinforced tape.
Attic insulation technology
 Mineral wool comes in different thicknesses, and climatic conditions are the determining factor. The thickness of the mineral wool for the insulation of the ceiling must be at least 10 cm. It is laid between the crate in the spacer.
Insulation of the attic floor with mineral wool begins with the fact that boards are hemmed to the beams. Thanks to this, the insulation can be placed between the ceiling. If the height of the beams is not enough, slats are fixed on them. The mineral wool layer should be slightly less than the width of the rails.
Then the beams, slats and the space between them, in which the heat insulator will be laid, are covered with a vapor barrier film. It must be laid overlapping so that the edges overlap each other by 10-15 cm. The instructions for insulation work provide for sealed layers of hydro and vapor barrier. Therefore, all joints must be glued with construction tape. The material can be attached to wooden partitions with a stapler.
Further, mineral wool is laid in the space between the slats. In order for the thermal insulation to be of high quality, the plates must be tightly fitted to each other. Even small gaps will lead to heat loss.
When the insulation is laid, proceed to waterproofing. A film overlap is laid on top of the cotton wool. The edges should also overlap by 10-15 cm and glued with tape. At the end of the work, a plank covering is laid on top. Thus, the attic floor is insulated along wooden beams.
Insulation from the room
 It is also necessary to consider how to insulate the ceiling in the bath with mineral wool from the inside. With this method of thermal insulation, it is better to use stone wool. Before insulation from the side of the attic, waterproofing material is laid on the floor beams. A board covering is laid on top of it.
After that, the insulation of the ceiling with mineral wool will be carried out indoors. The heat insulator is laid between the beams. If their width is not enough, slats are additionally attached. The distance between the beams should be 3-4 cm more than the width of the insulation boards. This is necessary in order for the panels to stand upright.
How to insulate the ceiling with mineral wool in an already built bath? To do this, you need to fix the guides to the ceiling. First of all, markup is carried out using the building level. Mark the lines along which the guides will be installed. The distance between the rails is adjusted to the dimensions of the insulation boards so that the material is tightly fixed between the guides.
The wooden frame is fixed with self-tapping screws after 50-60 cm. Metal slats are attached to special suspensions. With their help, you can adjust the distance to the ceiling and fix the insulation with bent parts, which does not hold tightly.
When the work on laying the mineral wool is completed, proceed to the vapor barrier. The instructions for its laying provide for an airtight coating. For this, the canvas must be overlapped and the joints glued with adhesive tape. Then wooden slats are attached to the beams on top of it. A decorative lining will be screwed to them.
Only the correct fulfillment of all conditions will ensure high-quality thermal insulation of the room. However, if you are in doubt about how to insulate the ceiling in the bath with your own hands, or are not confident in your skills, it is better to seek help from professionals.
Thermal insulation of the bath ceiling with mineral wool: instructions
Since heat loss through the roof can range from 25 to 40%, insulating the bath ceiling with mineral wool is an important step in the construction of a steam room.
Insulation of the ceiling in the bath with mineral wool
When building a bath with your own hands, one should not forget about the need to insulate the ceiling, otherwise all the heated air will evaporate outward and the bath will quickly cool down. Warming today is carried out with different materials, but one of the simplest and most inexpensive options is to use mineral wool. In this article, you will learn how to insulate the ceiling in the bath do-it-yourself mineral wool, in order to bathe in pleasure in winter.
How to properly insulate the ceiling in the bath
mineral wool afraid of moisture, so it must be isolated from all kinds of fumes. To do this, the insulation is closed with waterproof hermetic thermal insulation. For vapor barrier, foil materials are best suited, which are glued at the joints with aluminum tape. Folgoizol has a fiberglass base and guarantees high-quality insulation. You can also use membrane insulation, glassine or plastic film.
The bath may have the following types of ceiling, which can be insulated with mineral wool:
- Grazing
- Panel
- hemmed
In a false ceiling, the boards are mounted to the overlapping beams. Warming with mineral wool should be carried out from the attic side. Any vapor barrier is laid on the ceiling in 2 layers, a layer of mineral wool comes on top, and then another layer of insulation. The seams in the bath are glued with foil tape. For vapor barrier, flooring is made from boards.
Insulation of the flooring in the bath do-it-yourself is considered the easiest. From the attic side, a vapor barrier is spread. Then comes the mineral wool, about 25 centimeters thick. From above, everything is closed with vapor barrier and boards. For a panel ceiling in a bath, the panel is covered with a film, mineral wool is laid on the vapor barrier, everything is covered with another layer of film and sewn up with boards.
Advantages of mineral wool for warming in the bath
Mineral wool practically does not conduct heat, it is safe and environmentally friendly, while it allows you to isolate the room from extraneous sounds. Another advantage of mineral wool is that insects and rodents do not start in it, it does not rot, it does not undergo mold.
Mineral wool as a heater in the bath easily tolerates mechanical loads and is durable. This insulation material is fireproof, easy to install and long lasting. When laying, it must not be subjected to tamping and crushing, as this affects the quality of thermal insulation. All kinds of water evaporation should be excluded, as this leads to a deterioration in the beneficial properties of the mineral wool.
The technology of laying mineral wool for warming a bath is quite simple and does not require specialized skills. An insulated bath is guaranteed to keep warm for many years, so you can enjoy visiting it with the whole family or with friends. Learn on our website and make repairs in the bathhouse and country house yourself.
How to insulate the ceiling in the bath with your own hands with mineral wool
The best materials for warming a wooden bath in the country. The advantages of mineral wool as an attic insulation, steam room, country house ...
Bath insulation with mineral wool
Those who have their own sauna know how much energy they need to use to reach the desired temperature in the steam room. In order to save money and time, all measures are taken to make the most efficient use of the heat received. For this purpose, the ceiling, floor and walls of the bathhouse are insulated with mineral wool. This material is not afraid of high temperatures, it is non-toxic and has a fairly low coefficient of thermal conductivity.
How to insulate a bath: inside or outside?

External insulation without a ventilation gap is bad.
To begin with, let's figure out when it is necessary to insulate the bath from the inside with mineral wool, and when from the outside. There is such a science of heat engineering, it studies the theory of the use of thermal energy in residential and non-residential premises. Based on this knowledge, certain methods are adopted to reduce heat losses in practice. So, according to the principles of heat engineering, insulation should be carried out outside. Thanks to this approach, the dew point is shifted to the thermal insulation layer, where there are no conditions for condensate to settle.
Therefore, if there is a technical possibility, then the mineral wool for the bath should be laid exactly outside. This applies to both the steam room and other rooms. If this option is not suitable or impossible to perform, then it is possible to install the insulation from the inside. By the way, in pairs most often this is exactly what they do. It has to do with the cost of the work.
When warming the bath from the inside with mineral wool, you save on the exterior of the building. In one of the articles, we said how to insulate walls with mineral wool from the outside. In short, there are two methods:
- ventilation facade - siding is laid as a finish;
- wet facade - mineral wool is plastered in two layers.
Regardless of which side you put the insulation on, from the inside of the room you still need to make a crate, put a vapor barrier and sew it all up with clapboard. By laying mineral wool from the inside, you save on the cost of external lathing, finishing (siding or plaster) and work.
 In fact, installing a heated towel rail with your own hands is a fairly simple procedure if you know how to pack the thread.
In this article, we talked about the principle of operation of a heated towel rail in the bathroom.
Which vapor barrier to choose

Penofol is used as a vapor barrier for a bath.
Using mineral wool for a bath, you need to take into account its tendency to soak and retain moisture. When wet, the insulation ceases to be such, and instead of containing heat, it begins to intensively remove it outside the room. It should be borne in mind that the humidity in the steam room is very high and steam can penetrate into the thermal insulation, even if it is laid outside. At the same time, the wall will also get wet, which is also highly undesirable. Therefore, the vapor barrier must be laid from the inside of the room on a previously erected crate.
In principle, any rolled material with vapor barrier characteristics that meets the following requirements is suitable:
- not toxicity;
- strength;
- high temperature resistance.
Most often, foil materials are used as a vapor barrier for a bath, for example, Penofol. This is a two-layer material, which consists of a pillow made of polyethylene foam and a layer of aluminum foil. This is reflective insulation, which beats off up to 97% of IR rays, which is especially important in the steam room itself. At the same time, the reflective effect of Penofol should not be exaggerated, and even more so if it is installed incorrectly. If you make a mistake, you will only increase heat loss.
 The simplest air recuperator for an apartment is installed directly in the wall. It is able to provide oxygen in a small room.
Mineral wool installation methods

The counter grille is stuffed over the vapor barrier on all work surfaces.
We will consider baths with beam ceilings, since this design is the most common. It is rare to find a sauna with concrete ceilings. We divide the installation into two groups:
As we have already said, sauna mineral wool can be laid on the walls from the outside and from the inside. Methods outdoor insulation of the house we've already covered, so let's focus on the inner workings. What's more, it's cheaper. To begin with, we select the section of the bars for the future crate. The height of the beam should be such that the mineral wool lies flush, or even more. The step between the guides is three centimeters less than the width of the insulation. The bars are attached perpendicular to the floor.
Mineral wool is placed between the guides. On top of the crate with a stapler, Penofol is attached with foil inside. Vapor barrier tapes should not overlap, they are laid end to end. The joints must be glued with aluminum-coated tape to create a monolithic mirror. A horizontal counter-lattice is stuffed over the vapor barrier, which is then sewn up with clapboard.
Penofol on the walls, floor and ceiling must be connected to form a sealed protective layer, as in a thermos.
Insulation of the ceiling in the bath with mineral wool and the floor can be combined, since the technique is almost the same. In both cases, the insulation is placed on the rough coating:
- on the subfloor from the inside;
- on the draft ceiling - outside from the attic.
There are no tricks here, you just need to lay the necessary layer of mineral wool flat. Next, it's up to the vapor barrier, which always fits between the insulation and the heated room. Penofol is placed on the floor on top of the mineral wool, the joints are sealed and a counter-lattice is stuffed for a final finish. With the ceiling, things are different, since not only thermal insulation, but also load-bearing beams must be protected from moisture. Therefore, penofol is attached to the draft ceiling from the inside with a shiny side in the middle of the room. All this is sealed and a counter-lattice is stuffed for further finishing.
Why do you need a counter-lattice
As you may have noticed, a counter-lattice is stuffed on top of Penofol on all surfaces. It is needed so that a buffer air zone remains, which performs two functions at once:
- allows the foil to reflect IR rays;
- prevents condensation from soaking into the finish.
In order for Penofol to beat off infrared rays, there must be an air gap of at least 15 mm, since IR radiation is transmitted only through the air. If the foil touches the finish, heat is transferred directly from one material to another. In this case, aluminum will only accelerate the heat transfer reaction, respectively, heat loss will be more intense.
Thermal insulation of the bath and sauna ceiling from the inside with mineral wool
Mineral wool is used to insulate the ceiling, floor and walls of the bath. It can be installed both outside and inside. In the sauna you need to use a vapor barrier
Any bath needs high-quality insulation of the ceiling, since warm air easily leaves the room if there are no obstacles in front of it. Fortunately, today in stores you can find a variety of heaters at different prices - choosing the best option is not difficult.
Today we will take a closer look at the process of insulating the ceiling in the bath.

Peculiarities
Not only residential buildings, but also baths need good insulation. If the installation of thermal insulation material is neglected, a comfortable temperature will not be maintained in such a structure. Warm air, so necessary in a bath, will simply leave the room. However, the problem of leaving warm air is not the main one. Also, without insulation on the ceiling in the bath, harmful condensate will accumulate. Because of it, unpleasant drops will drip onto people from above, which can be very annoying.
The moisture leaving along with the heat will negatively affect the ceilings. Under the influence of such external factors, the structures are at risk of rotting and deforming. Further renovation of the bath will require free time and money.


Today, there are a large number of manufacturers producing high-quality thermal insulation materials on the market. Thanks to this, each consumer will be able to choose suitable heaters.
Warming the ceiling in the bath is quite possible to do it yourself. To do this, you do not need to be an experienced master or have the appropriate education. The main thing in this case is to strictly follow the instructions and use only high-quality materials.


To insulate the ceiling in the bath, you need to use materials that have the following important characteristics:
- they must be resistant to fire and not support a flame;
- the insulation must be environmentally friendly and absolutely safe for human health;
- the material must be resistant to dampness and moisture, which are inevitable in a bath.
Fortunately, in modern retail outlets it is quite easy to find materials that meet all of these requirements. The bath may have a ceiling with or without an attic space. In both cases, the building will need reliable insulation. The only difference is that in the absence of an attic space, you will not have many ways to lay heat-insulating material.


It is also worth considering another important feature - if your bath is built of wood, it will need literally perfect roof insulation. Making mistakes in this case is fatal. This can lead to decay and deformation of floor structures.
Of course, you can coat the wood with special moisture-proof and anti-fungal impregnations to extend the life of the material and insure yourself in case of improper installation of the insulation. However, such means are not omnipotent. Even if you apply them to ceiling structures, under the constant action of steam they will fail and the bath will have to be repaired.
Experts say that if you follow all the technologies for installing heat-insulating materials, you can avoid serious mistakes. The main thing is not to neglect any of the necessary stages of work. In this case, the result will not disappoint you.

Material selection criteria
A suitable insulation for a Russian bath should be chosen according to the following important criteria:
- Can be combined with other building materials. The thermal insulation coating must be combined with other materials without in any way affecting their specific qualities.
- Non-susceptibility to accumulation of condensate. Insulating material should in no case accumulate excess moisture in its structure - this will necessarily negatively affect the ceiling structure, especially if it is made of wood.
- Minimum moisture absorption. When choosing a heater, pay attention to the fact that it has a minimum water absorption value.
- Certificates of quality and safety. When buying insulation for a cold roof in a bath, you must ask the seller for all the necessary quality certificates. The material must meet sanitary and hygienic and fire safety requirements.


If the material you have chosen for the thermal insulation of the bath fits all of the above criteria, then inside the steam room and dressing room it will be not only warm and cozy, but also safe.
materials
Today, the market is replete with thermal insulation materials. They are made from different raw materials and have their own distinctive qualities. Let's take a closer look at the most popular and sought-after heaters that are in demand among most homeowners.


mineral wool
Most often, people choose good old mineral wool as a bath heater. Despite the fact that there are a lot of good alternatives to this material on the market, many users continue to buy it.
This insulation is sold in rolls, plates and cylinders. For insulation of the roof and ceiling, rolled materials or slabs are most often chosen.. They fit easily and quickly. Mineral wool in cylinders is usually used to insulate pipeline bases.

Let's get acquainted with the main advantages of mineral wool, making it popular:
- This material is characterized by high thermal insulation, which is especially important for a bath. It can be installed in almost any environment. However, it should be borne in mind that other insulators will be required during its installation.
- Mineral wool is a waterproof material. High-quality glass and basalt wool contribute to the passage of steam and do not absorb excess moisture. Due to this quality, mineral wool can be safely used to protect structures from the appearance of dampness.
- Mineral wool has good air exchange. Such a heater will promote air circulation. The base will "breathe" and will last much longer.


- Also, this heat-insulating material boasts good sound-proofing qualities. Being in a bath insulated with such a coating, you will not be distracted by extraneous sounds coming from the street.
- Minvata is not afraid of aggressive chemicals. It is not destroyed by acids and alkalis.
- Mineral wool is a fire-resistant material, which is very important for a bath. Moreover, in contact with fire, this insulation does not emit acrid smoke.
- Such material has a long service life. High-quality mineral wool can last from 25 to 50 years.
- Many consumers choose mineral wool, as it is environmentally friendly.

However, this material also has some disadvantages:
- The quality of mineral wool suffers significantly if it absorbs too much water. Under the influence of such a factor, this material may not act as effectively.
- Another disadvantage of mineral wool is considered to be a rather high level of dusting. In such a heater there are very brittle fibers, and their fragments are sharp and thin. If they get on the skin, they cause severe itching and irritation. It is possible to work with such a heater only in special protective clothing and glasses.

There are several varieties of mineral wool:
- stone (or basalt);
- slag;
- glass wool.
More affordable is budget glass wool. It has a special fibrous structure and a yellowish tint. Such material is made from cullet, borax, sand, soda, limestone and dolomite.


Glass wool has good thermal qualities. In addition, it seamlessly tolerates strong vibrations. When compressed, glass wool reduces its volume by almost 6 times. Glass wool is the softest type of insulation from all subspecies of mineral wool.
Not so long ago, glass wool in slabs appeared on sale, which is often used to insulate facade bases. Such material is more durable and reliable. However it should be borne in mind that glass wool is not only the softest, but also the most prickly insulation. You need to work with it very carefully. For this special protective clothing must be worn.

Basalt wool is very popular among craftsmen, as it is durable and keeps its shape.
Such a heater can be made from:
- diabase;
- basalt;
- gabbro.
Components such as dolomite and limestone are also added to these components.


Stone wool is good because it can withstand severe mechanical stress. In addition, this material does not burn and does not absorb moisture, which are decisive characteristics for a bath.
Often, basalt wool is produced with a special foil or fiberglass substrate. To make the material more durable and reliable, it is additionally stitched with special glass threads. Wire is sometimes used instead.
This material is used a little less often than others, as it absorbs moisture. For this reason, it is better not to use slag wool to insulate the bath ceiling - it will quickly fail and require replacement. In addition, this material is not designed for any load.


Ecowool


Now let's look at the disadvantages of ecowool insulation:
- Over time, the thermal insulation ability of ecowool decreases, especially if it is located in a room with a high moisture content.
- To install ecowool, you need to use special expensive equipment, which, as a rule, only professional teams have.
- It will not be possible to carry out the installation of ecowool on your own, not only because of the requirements for equipment, but also because of the complexity and specificity of the work. Their implementation should be entrusted to professionals.


- A lot of dust remains from ecowool during installation. If you use a wet installation option, then it will dry out for a long time.
- Ecowool cannot boast of a sufficient level of rigidity.
In no case should this insulation be installed in places close to open sources of combustion. Being next to the flame, ecowool begins to smolder gradually.

Penoplex
Its main advantages are:
- high hydrophobicity;
- low weight, which makes it cheap to transport and easy to install;
- good strength characteristics;
- composition with anti-corrosion components;
- the ability to install penoplex in almost any conditions;
- does not cause allergies;
- does not attract insects and rodents.

Of course, penplex, like other heaters, has its weaknesses, which include:
- susceptibility to burning;
- fear of contact with solvents (when interacting with them, the penoplex dissolves);
- high price.
Inside the structure of this insulation there is foam and air. Due to this feature, this material is not subject to corrosion, destruction from time to time and is not afraid of interaction with moisture.

Expanded clay


- Expanded clay is a heat-resistant material. It is not afraid of fire and does not melt at high temperatures.
- Such a heater has a small weight, therefore it does not exert loads on the base.
- Not afraid of pests.
- Versatile in application.
It should be borne in mind that working with such material is not too easy. When laying expanded clay to insulate the ceiling in the bath, it is very important to provide the base with additional vapor and waterproofing.

Clay
The ceiling in the bath can be insulated with clay. But do not think that this process will be very simple and affordable. In its pure form, this material is not recommended to be laid.
It has long been combined with:
- sawdust;
- chopped straw;
- tree bark;
- sand;
- expanded clay.
Most often, clay is combined with straw, sawdust and sand. It is advisable to use expanded clay only if you are laying the clay mixture in layers.


Sawdust
If you decide to insulate the ceiling in the bath with sawdust, then you should consider that such material is the most fire hazardous. In this case, the fire retardant will not help. In addition, sawdust is quite dirty, and in the event of a draft, they will gradually scatter throughout the bath.
However, this material is environmentally friendly and absolutely safe for human health. It does not cause allergies and other similar reactions. Most often, sawdust for insulation is combined with clay or cement. Sometimes sawdust is covered with earth from above.

Indoor and outdoor work
Warming of the bath is permissible to produce both inside and outside. The second installation option should be consulted if there is no attic space in the building. In this case, it is best to use heaters in the form of flooring. Hemming structures make the ceiling more reliable and strong.


In this case, the boards are attached to the beams from the inside of the room, as well as from the side of the attic. In this case, multilayer thermal insulation materials must be laid between the decks. If you have a solid two-story bath (attic), then the laying of multilayer insulation begins from the side of the lower floor.
First, a vapor barrier is installed, followed by a heater, waterproofing material and floor covering of the second floor.

Warming scheme
To decide on the tactics of carrying out thermal insulation work, it is necessary to find out what the ceiling base itself is - hemming or flooring. In the case of a hemmed base, a board is hemmed onto the installed support beams (in the lower part). At the same time, the bars are closed from the inside and left only in the attic area.
If the method of overlapping is flat, then the board is fixed on top of the bars. Thus, flooring is created in the attic. At the same time, the bars themselves remain on the territory of the steam room.


If thermal insulation is carried out from the inside of the false ceiling, then the scheme of work will be as follows:
- first, on the floor boards, you need to fix a perforated waterproofing film that can let steam through;
- then a frame / crate is formed from wooden bars, taking into account the step under the insulation mats;
- next in the installation should be a heater (it must be laid out between the bars);
- this is followed by a waterproofing material, but in the bath it is recommended to use not a film, but a foil cloth;
- further according to the scheme there is a rail, which must be sewn over the bars.

If we are talking about the insulation of the flooring inside, then the scheme for laying materials will be as follows:
- first, a vapor barrier is laid on the boards located from the side of the attic;
- then a heater is laid on it (if it is mineral wool, then the thickness of its layer should be approximately 200-250 mm;
- followed by a layer of vapor barrier;
- at the end, the floor in the attic is covered with boards.

How to properly insulate?
When you have studied the insulation scheme and the type of ceiling construction, you can proceed directly to its finishing with mineral wool, foam plastic, clay or other materials. So that the result does not disappoint you, and the bath becomes warm and comfortable, when installing the insulation, you need to follow the step-by-step instructions. To begin with, it is worth considering in detail the guide to the insulation of the flooring.
Finishing such a base is carried out from the outside.
Stages of work:
- First, a vapor barrier must be laid on the flooring. It can be fixed with a construction stapler or nails.
- On top of the vapor barrier film, you need to put the insulation itself. If you use bulk material, such as expanded clay or sawdust with clay, then around the perimeter of the base you need to nail a side that will prevent the insulation from spilling out.
- The resulting "pie", consisting of several layers, must be covered with a waterproofing material.
- As a rule, thermal insulation is pressed against the boards, which were laid in increments of 40-50 cm.

Now you should consider how to insulate a false ceiling:
- First, a vapor barrier material is nailed to the beams on the ceiling. It is recommended to use canvases in which one of the sides is foil. The vapor barrier must be installed with a slight overlap of 10 cm (a similar entry must be made on the walls).
- Next, it is necessary to nail a lining or edged board to the beams. These materials should be pre-treated with antiseptic agents so that they do not rot.
To make the ceiling stronger and more reliable, it is recommended to use tongue-and-groove lumber, which has a groove and a ridge.

- Next, from the side of the attic in the space between the beams, you need to put a heater. Please note that the material must be laid correctly in order to create a dense layer without cracks and gaps.
- Make sure that the height of the thermal insulation material reaches the top of the beams by 3-5 cm. This will form the necessary space for ventilation.
- Next, the insulation is covered with a waterproofing film. It must be laid with an overlap of 10 cm.
- In conclusion, you should perform flooring from the boards.


If your ceiling in the bath is panel and consists of separate shields made of boards and bars, then you will have to act differently:
- On 2 parallel beams, you need to nail boards with a length of 60 cm. Before this, it is very important to treat the tree with antiseptic compounds.
- On all sides, the board should protrude by 5 cm. During docking, the resulting gaps will be closed with insulation.
- Next, from the inside of the panel, you need to fix the vapor barrier material.
- The resulting structures must be placed on a crate fixed at the bottom of the floor beams.
- At the joints of the panels it is necessary to install a heater that is resistant to moisture.
- At the final stage, you need to lay a plastic film - it will protect the finish of the attic floor. On the crate at the bottom of the ceiling, you can fill the lining.


If you decide to independently insulate the ceiling in the bath, then you should consider that you need to be especially careful about the steam room. If there are even the slightest flaws in the ceiling decoration, then the heat will definitely leave the room.
When working with vapor barrier films or foil, you should be as careful as possible. These materials can be accidentally torn, which will adversely affect their quality characteristics.
If you want to correctly lay the material, then it is better to do it a little lower than the walls, so that you have free space for filling bulk materials or laying the same mineral wool. If it is not possible to do this, you need to fill small sides around the perimeter of the ceiling under the roof.

If you decide to insulate the ceiling with a mixture of clay and sawdust, then you need to consider that when using a bath in the warm season, the optimal layer thickness can be 50 mm. If you are going to bathe in it in the winter, then it is better to put a heater with a layer of 150 mm.
If the ceiling is built of logs, then from the side of the bath you need to construct a crate. In this case, the logs must be covered with a vapor barrier, covered with a 20 cm layer of sand on top, and then insulated according to the usual scheme.
If we are talking about cranial boards, then they can be fixed on the top of the logs.

If you do not want to spend money on the purchase and installation of steam and waterproofing of the ceiling, then you should use high-tech insulation, which is made on the basis of mineral wool and has a foil layer. With such a coating, laying vapor and waterproofing is not needed.
Do not use material such as polystyrene to insulate the ceiling in the bath despite its cheapness. When heated, it releases toxic substances that have a negative impact on human health.
Do not save on thermal insulation materials and do not look for too cheap copies, unless, of course, the ceiling is supposed to be insulated with clay or sawdust. A suspiciously low price may indicate that the quality of the insulation is not the best.


