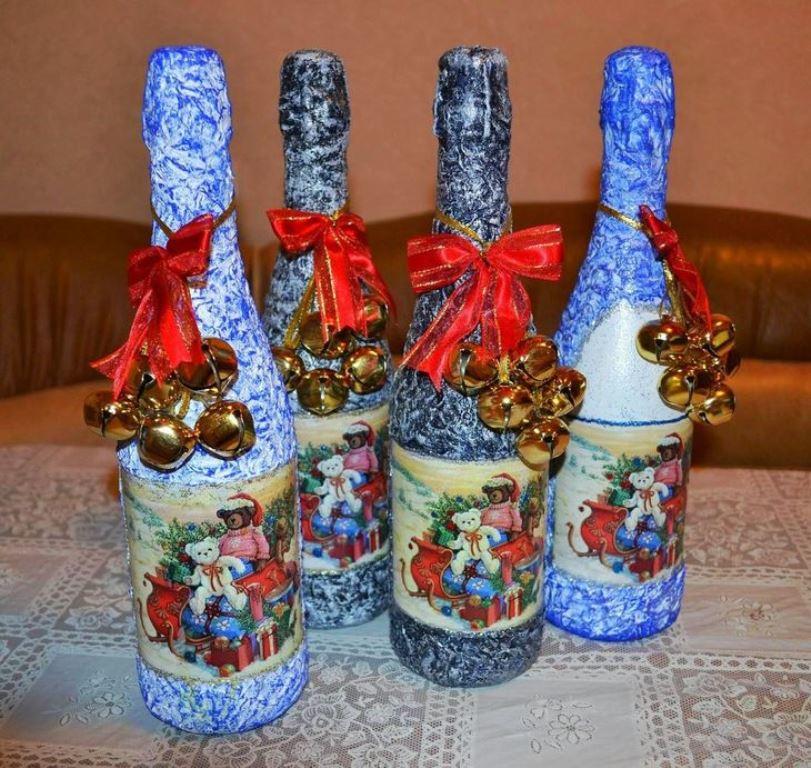
In this master class we will make such a beauty out of an ordinary bottle of champagne that it will be a pity to open it :) But you can proudly give it to someone for the New Year!

To decorate a bottle of champagne we will need:
- the champagne bottle itself;
- nail polish remover (or acetone, alcohol, dishwashing liquid);
- printout with a New Year's motif;
- acrylic putty;
- acrylic paints;
- acrylic matte varnish;
- relief paste in a tube with a thin spout;
- PVA glue ";
- semolina;
- lilac glitter (or any small sparkles);
- fresh branches of thuja (or cypress, spruce, fir);
- plastic plate, brushes, toothpicks, foam sponge, rags, napkins;
- palette knife (or any convenient tool for working with putty);
- sandpaper No. 800;
- tapes.

Soak the bottle in water for a couple of hours to easily remove all paper stickers. Then remove all labels and degrease with nail polish remover. Let's start with the primer. Prime the bottle with white acrylic paint using a sponge 2 times, drying in between. We don’t touch the very top part; we will decorate it minimally. Otherwise, it will be difficult to open champagne later.

Carefully trim off the edges of the printout. This will allow you to subsequently hide its borders when gluing. We cover with 3 layers of varnish with intermediate drying.

Let's try the printout on the bottle. We make small tears along the edges along the perimeter of the picture so that folds will clearly appear when gluing. Next, wet the white side of the print with a wet sponge and carefully roll up the paper, leaving only the colored layer.

Lubricate the area under the motif with PVA glue and glue the printout, expelling air bubbles and straightening the motif with rags or napkins. Let it dry. After drying, sand any small wrinkles that still appear.

Now let's start decorating the top of the bottle. To do this, mix the putty with a small amount of PVA glue in a plastic plate and begin applying it to the neck with a palette knife, gradually moving lower. As you apply, glue thuja branches onto the mass, pressing them well. In some places we coat the branches with putty additionally.


So, on the front side of the bottle there is a drawing, on top there are fir branches in a circle, and on the back side of the bottle we will write “Happy new year” with relief paste.

Now we leave everything to dry for a day.
When the putty has completely dried, you need to thoroughly check all the frozen branches. If there are soft pieces, they need to be trimmed. Next, we coat the relief with varnish and paint the entire bottle with a sponge in the main color blue metallic. Apply varnish again.


After the varnish has dried, we begin to paint on the motif, mixing paints and continuing it along the entire radius of the bottle. Cover with a layer of varnish. Let's dry it.


After this, mix semolina with white paint 1:1 in a plastic plate, add a couple of drops of PVA glue and “revive” the snow. In small areas it is convenient to do this with a toothpick. We will also sprinkle the fir branches and the top of the bottle with snow and decorate the inscription.


Let everything dry well. Then you need to mix a little varnish with a small amount of glitter. We cover the entire bottle with the resulting glitter varnish, paying special attention to the “snowy” places. Next, add more glitter to the varnish and additionally cover the inscription, making it more elegant and bright.
New Year is a favorite celebration of children and adults. Therefore, every housewife does everything to ensure that the holiday pleases everyone, regardless of age, guests and is remembered for at least another twelve months. Bottles decorated using the New Year's decoupage technique can surprise visitors with their originality and non-standard decoration of the festive table. How to make decoupage of bottles on the occasion of the holiday with your own hands - read the article.
Decoupage is a technique for decorating objects using various applications - gluing designs and ornaments cut out of paper, napkins, etc. onto the surface of objects.
Using decoupage, a bottle of absolutely any size and shape can be decorated. It is better, of course, to choose tall and wide bottles: they will be more convenient to decorate and they will not go unnoticed on the holiday table. As for the material, there are no frames or restrictions for decoupage: you can decorate both glass and plastic.

Before decoupage, the bottle is always prepared: all labels and glue residues are removed, the surface is degreased with alcohol, acetone, etc.
Traditional decoupage of bottles for the New Year
The traditional design of a New Year's bottle is accessible to absolutely everyone: this type of decor does not require a “stuffed” hand, expensive materials, or napkins with original images. For traditional decoupage, everything that can be easily found at home (white gouache, glue, brushes of different thicknesses, paper, glitter and cotton wool, scissors) and bought at a hardware store (colored interior paint, finishing coat - varnish) is quite suitable.
Before decorating, you need to decide on the base material to cover the bottle. For traditional decoupage, interior or artistic acrylic paint, gouache with glue are suitable. Since white paper, cotton wool and silver sparkles will be involved in decoupage, the color of the base should be different: for a New Year's theme, blue, light blue, and red are suitable.
When choosing a gouache coating with glue, it is worth remembering that they need to be secured with a non-water-based finishing varnish.
When the base layer has dried, you can move on to the second stage of traditional New Year's decoupage - applying applique.

Namely:
- We cut out snowflakes of different sizes and shapes from plain paper;
- Before gluing, we apply the applique to the bottle in order to have an idea of where the elements will need to be glued (you can use a pencil to mark the places for the snowflakes and inscriptions to distribute the ornament evenly);
- We place the dry elements on a dry surface, coat the top with special glue for decoupage or PVA, diluted one to one with water.
Apply glue from the center to the edges, avoiding the appearance of creases, folds and air bubbles. Next, we apply the inscription “Happy New Year” in calligraphic font using white paint, and decorate the bottle with glitter and cotton wool. Place cotton wool with PVA glue around the neck of the bottle (small pieces of cotton wool can be glued in the center of the snowflakes). We use glitter mixed with glue to decorate the applique, inscription, draw geometric snowflakes all over the bottle, etc.
Step-by-step master class: decoupage a bottle for the New Year using napkins
Decorating with napkins is the most popular type of decoupage, which makes it possible to get an original, beautiful craft. In order to decorate a New Year's bottle in this way, we will need: tableware, New Year's themed paper napkins; the basis; silver paint; regular foam sponge; PVA glue; tassels; scissors; optional, decorative sparkles, sequins, etc.

To get an original, beautiful product, we need:
- Apply base. As a base, you can use a white artistic primer or acrylic paint. In order to obtain a voluminous, unusual relief in the decoupage style, the base should be applied with a sponge. Coating in this way must be done in several layers (an additional layer can be applied only after the previous one has completely dried).
- Prepare applications. We cut out the elements we like from the napkin (this could be the inscription “Open for the New Year”, an image of Father Frost, the Snow Maiden’s granddaughter, a snowman, an elegant Christmas tree, New Year’s toys, etc.). If you decide to use the entire napkin (for example, if it is a napkin with a winter landscape), then it is advisable to reduce its size as much as possible by cutting off unnecessary edges.
- Glue the appliqués. We glue the elements using PVA (diluted with water 1:1) or special decorative glue for decoupage. Place dry elements on the dried surface and begin gluing from the middle to the periphery.
- After the applications have dried, we continue decorating the bottle using silver paint. We apply the paint with a foam sponge, going over the applications and thus hiding their borders, over the entire surface of the bottle. The inscription “Happy New Year” can also be loosely coated with silver, and then duplicated with white or colored acrylic paint.
- We wait until the layer dries completely and add decorative elements (for example, you can add shiny sequins or beads to the image of an elegant Christmas tree, and add a white decorative primer applied with a sponge to the winter landscape as snow, etc.)
After the product has dried, we coat it with a finish - a special decorative varnish.
Decoupage of bottles for the New Year with textiles
Decoupage of bottles with textiles is an interesting and unusual design method, which this master class will help you implement. To decoupage bottles with fabric, we will need: thin white fabric, a napkin with New Year-themed images, acrylic paint to match the motifs on the napkin, PVA glue in a 1:1 ratio with water, finishing coat.

To design a bottle you need:
- Prepare the surface (remove the labels and degrease it with alcohol, acetone) and the application (cut out the elements from a napkin).
- It is good to soak the fabric in a container with an adhesive solution and place it on the bottle, forming folds and leaving space for the images.
- After the fabric has dried, glue the applique using PVA or decoupage glue.
- Cover the fabric with gouache or acrylic paint to match the applique (if the drawings have clear edges, then it is not necessary to paint over them).
- Dry the product naturally or with a hair dryer and open it with a fixative.
The varnish should be chosen depending on the base (acrylic or gouache) and the desired effect (for example, yacht varnish will give white images and backgrounds a yellowish tint).
Decoupage of New Year's bottles (video)
Bottles decorated using decoupage will become an original New Year's present for family, friends and colleagues, a unique decoration for the New Year's table, will appeal to both adults and children, and will create a festive mood! Choose the equipment you like and create an unforgettable holiday atmosphere!
When we decorate the Christmas tree every year, we want to decorate it with new unusual balls and toys. Currently available in stores Christmas decorations for every taste, but, alas, the most beautiful, original ones are expensive. Don't despair, we offer you a simple way to make a Christmas tree ball with imitation painting and snow. The ball is completed using the decoupage technique, using 3-layer table napkins, acrylic paints for painting and semolina.
For a ball using the decoupage technique you will need:
- 3-layer napkin;
- plastic ball with a diameter of 6 cm;
- nail scissors;
- sponge, brushes for paint and varnish;
- stick for holding the ball;
- white construction paint;
- whitewash;
- acrylic paints;
- contours;
- dry silver glitter;
- decoupage glue or PVA;
- decoupage or parquet varnish;
- container with water;
- sandpaper;
- semolina;
- narrow and wide ribbons for a silver bow;
- Lurex thread;
- glue "Moment".
Let's start the magic!
From a great variety of napkins, we find the only one that suits us. When choosing a napkin, look at the image to see if it will fit the size of the ball, and only then cut out the fragments. You may have to adjust some to size, that is, cut them down a little, and also make darts so that the motif lies evenly on the ball and flows around it, and does not bunch up when gluing.
The first thing we should start with is- This is to wash the ball or wipe it with alcohol so that its surface is clean and non-greasy. We take a sponge and white construction paint, cover the ball with 5-6 layers and be sure to dry it after each new layer. In order not to get dirty with paint and to make it convenient to hold the ball in your hands, we put it on any stick.
The final step of priming is to apply 2-3 layers of white to the ball. Let's dry!
We sand the ball with sandpaper, preferably with sandpaper.

We dilute the PVA glue with some water, arm ourselves with a fan brush and begin gluing the cut out motifs from the napkin, placing them in a thematic image around the entire perimeter of the ball.

We coat the glued pattern once with varnish. This is necessary so that we can paint the pattern without fear, making it more expressive.
We take out all the acrylic paints we have and select colors similar to those depicted on the motifs. We paint the ball with mother-of-pearl paints, red with red, green with emerald, etc. It immediately becomes clear that the soulless drawing turns into a “living” image.

If you want, you can write “Merry Christmas” in English.

What's New Year without snow? Let's pretend that the Christmas tree and gifts stand beautifully in the snowdrifts and fluffy snow falls.
How to make snow?- you ask. Remember, the easiest and fastest way to make snow from semolina.
We will need:
- semolina itself;
- PVA glue;
- white acrylic paint;
- drop of blue paint.
Mix all the ingredients in a small container; the consistency should not be liquid.

We put the resulting snow on the bottom of the ball, capturing literally 1 mm of the colorful image. Let it dry and move on to the next step.
Paint the top of the ball with pale blue paint using a thin brush.

Time passed and the paint and snow dried. We take the contours, outline in red the branches of the Christmas tree and the boxes with gifts, as well as the inscription. We cover all the green areas with an emerald outline, shading the bows and toys with gold.
We decorate the inscription with the remaining snow. At your discretion, you can put a little snow on the gifts and sprinkle it on the Christmas tree, sprinkle droplets of snow all over the ball and draw snowflakes on the other side of the ball.

We cover the ball with three layers of varnish with intermediate drying. To make the snow sparkle, sprinkle it with dry silver sparkles.
We fix everything with varnish. Let's dry it.

Snow ball ready, but lacks airiness and completeness.
We measure and cut 20 cm from a narrow ribbon, 36-37 cm from a wide one, roll it into a bow and fasten it with a pin. We tie it with lurex thread in the center, and bring the thread to the wrong side. Drop a little Moment glue into the middle of the bow and glue it to the joint between the mount and the toy.

The ball with a bow became like a fairy tale, airy!

New Year's ball with snow!
Creating and decorating things using Decoupage technique, you can achieve excellent results in home decoration and, by transforming the interior with unusual and original objects, add zest and creativity to home decoration.

Christmas tree ball using the decoupage technique with the image of a Christmas tree, gifts and sparkling snow.
A Christmas tree decorated with homemade balls will become the center of attention and give a festive mood to your household.
Try and experiment, “decoupage” creativity allows you to apply patterns of various themes and styles to objects, making them irresistible.
Balls on the Christmas tree with snow- this is a Christmas tree decoration that you will store and, taking out of the chest every year, decorate the forest fluffy beauty. And if you give one like this hand made ball, to one of your friends and relatives, he will delight not only you, but them.
Not a single New Year is complete without champagne - this sparkling drink has become a kind of attribute of New Year's Eve. Just going to the store and buying a gift for a needlewoman is beneath your dignity, you must definitely do something with your own hands and put a piece of your warmth into it.
Let's decoupage a bottle of champagne!
And unusually creative, and beautiful, and most importantly, accessible, and very New Year’s!
So, I offer you a step-by-step master class on decoupaging a bottle of champagne 🙂For work you will need the following materials:
- the bottle of champagne itself
-a beautiful napkin or decoupage/rice card
—structural paste
-glue for decoupage
-white acrylic paint (or primer for decoupage) and blue paint (in my case)
—stained glass outline on Idea glass
— Viva glass-effect gel
- sponge and palette knife
-glue gun  Before you start decoupage, the bottle must be cleaned of labels and degreased.
  Let's start with the primer. To do this you will need white acrylic paint and a sponge. It is ideal for working with glass - the paint applied with it will not spread over the surface.
It is best to prime the surface with white paint, but gold and silver paint is also possible. But white is like a white canvas on which you can create in the future :) Dry well, you can use a hairdryer.
Choosing a napkin motif. And glue it to the bottle using a file.
For decoupage, you only need the top layer of the napkin, on which the image is directly applied. Let's carefully separate it from the rest.
And we put our image on the file, face (picture) down. Then you need to wet the napkin. To do this, you can use a sprinkler, or simply pour a little water on it.  After this procedure, we lift the file with the picture vertically so that excess water drains out. And the image itself is great! Carefully smooth out if there are large folds.
And then we put the entire structure on the bottle, and smooth it with a soft cloth, blowing out the air and leveling the cloth, we remove the file.  Since the bottle narrows towards the top, you will definitely have folds there. Don’t be upset 😉 We’ll cover them in the future.
But if you have a different bottle decor, then you need to make cuts on the napkin so that it lies smoothly and beautifully.  Dry well. It is advisable to leave the bottle until completely dry. But if you are in a hurry, you can speed up the process with a hairdryer :)
And then we coat our image with decoupage glue to secure it.
After the glue has dried, we proceed to the main background of the bottle. I have it in blue. Paint over the entire surface (where there is no napkin).  This is what happened.
  I decided to make some kind of icicles on the bottle, and therefore I need to tint the blue color a little. I do this using a foam sponge, which gives a large textured mesh to my bottle.
  Like this. You can even “focus” on the drawing a little :) This will add its own charm to the image.
  Now let’s create a texture and relief on the bottle. To do this you will need a hot glue gun.
  You can do it all over the bottle (like mine), or just the top. This is how you like it more :)
 Then, you need to “coat” this glue-icicle with white paint.
  And tint it a little blue (the one that was used as the main color of the bottle).
  So 🙂 Now let’s give the drawing itself some dimension. Let's make it a structural paste. You can use a paste like mine - rough structural paste No. 745. Or just regular structural paste and add semolina to it to give it the texture of snow.
Using a palette knife, apply the paste to roofs, Christmas trees and wherever you see fit 😉  This is how my snow turned out
  Then, I also decided to “turn on” the lights in the windows and hang the toys on the Christmas trees :), using Tie a beautiful ribbon and go visit! 🙂Create beautiful things and create a New Year’s mood!
It’s hard to imagine the New Year without champagne during the chiming clock. Therefore, it is not surprising that, recently, along with decorating an apartment and a Christmas tree, decoupage of bottles is gaining more and more popularity. Today, there are many ways to decorate champagne using the decoupage technique, each of which will allow you to create an amazing craft with your own hands that you can proudly put on the festive table. All you have to do is choose a design option!
If you have a bottle of champagne with a neck framed in gold foil, you shouldn’t get rid of such a spectacular and elegant element: you can skillfully use it in your design and make it part of the bottle’s festive decor. To do this, we will need gold paint, decorative primer or acrylic, brushes, New Year's napkins or pictures for applique, a foam sponge, and a fixative varnish for decoupage.
Before you begin, the label with the name of the champagne should be removed, and the surface of the bottle should be washed, dried and degreased. Then, apply primer or acrylic in several layers. If there are any rough spots left on the surface, they must be sanded: the coating must be perfectly smooth. You can decorate the bottle using New Year's napkins or New Year's themed pictures printed on a color printer and cut out. You can glue the elements using decoupage glue or PVA diluted one to one with water.
Dry elements should be glued onto a completely dry surface, applying strokes from the center to the periphery, carefully ensuring that no air remains under the applications.
After the applications have dried, the surface of the bottle should be painted with gold paint using a dry foam sponge in several layers. You can go to the borders of the pictures. After the surface has dried, the bottle should be varnished. This way we will preserve the coating for a long time and achieve an elegant shine of the golden surface.
Decoupage of a champagne bottle for the New Year with a window
A bottle with a window is an original craft that imitates a window cut into the surface of the bottle, through which you can see the inside of the container with a pattern. It’s very easy to decorate a bottle of champagne this way with your own hands. To do this you will need: a bottle (preferably with the lightest possible glass), a napkin with a New Year's motif, decorative primer or acrylic, adhesive paper or tape, decorative elements, fixative varnish.

To perform decoupage you need:
- Prepare the bottle for decoration. To do this, you need to remove the label, thoroughly wash and degrease the surface.
- Glue the napkin with the image inside (this image will be viewed through the “window”).
- Cover the area opposite the image with adhesive paper or tape. It is not necessary that the “window” be round: you can seal the area in a square, make the window oval or in the form of a semicircle.
- Cover the bottle with primer or paint (do not completely cover the area with self-adhesive). You can use a regular household sponge, a decoupage fan brush, or a special palette knife for this. It all depends on the surface you want to get.
- If you want to make the bottle bright, you can paint it any color over the primer.
- After the bottle has dried, you need to remove the adhesive paper using a stationery knife - the window is ready!
How to make New Year's decoupage of a bottle of champagne with sea salt
It’s hard to imagine decorating a bottle for the New Year without simulating snow and ice. The easiest way to do this is with a special decorative paste, but if you couldn’t find one, improvised means are also suitable for volumetric imitation. An excellent option would be to decorate with sea salt. In addition, we will need a primer or white acrylic, PVA glue, brushes, a sponge, a napkin with winter motifs (one large, clear image is perfect, for example, an elegant Christmas tree, a bullfinch on a branch, etc.).
.jpg)
In order to make decoupage, we need:
- Prepare the surface of the bottle and cover it tightly with primer or white acrylic, wait until completely dry.
- Cut out the image from the napkin and glue it to the surface of the bottle in the center of the widest part.
- Place sea salt on a sheet of clean paper.
- When the napkin has dried and adhered well to the primer or acrylic, coat the entire surface of the container with glue, slightly extending to the borders of the image.
- Take the bottle and roll it over a sheet of sea salt.
Thus, we will get a three-dimensional imitation of a bottle in ice with a central image. To secure the result, you can coat the bottle with a fixative spray.
New Year's decoupage of champagne: master class
You can also get a three-dimensional imitation of snow using semolina. For decoupage we will need: in fact, a bottle of champagne itself, a napkin with a New Year's image, white decorative primer and acrylic paint, brushes, a foam sponge, silver glitter, decoupage glue or PVA, fixative varnish.

To design a bottle you need:
- Prepare the surface of the bottle. Remove all labels, degrease the surface and cover it tightly with a white primer using a foam sponge.
- Cut out the image from the napkin. There is no need to work strictly along the contour: you just need to cut the napkin a little at the top or bottom so that you can conveniently place it in the widest part of the bottle.
- Attach the image to the bottle using the decoupage technique (the first master class tells you more about appliqué).
- If there are color transitions (for example, the sky on a napkin is made in purple tones), then it is worth hiding them by applying acrylic paint with a sponge to match the napkin over the entire surface of the bottle.
- Coat “snowy” areas (roofs of houses, tops of trees, etc.) and the bottom of the bottle with glue, place semolina on it.
- Next, you should paint the “snow” with white acrylic and, after drying, add silver glitter, lightly touching the snow with a sponge.
- We design the bottle and image according to our own wishes (you can add sequins, sparkles, etc.).
- We cover the bottle with a fixative after the decor has completely dried.
Decoupage of a New Year's champagne bottle: master class (video)
Decorating New Year's champagne bottles using the decoupage technique can become an excellent New Year's tradition for which all family members will gather. The resulting crafts can be collected into a collection, reviewing which you will be pleased to plunge into the holiday atmosphere. And the main thing is that all the bottles will be unique and creative, because decoupage opens up so many opportunities for the implementation of ideas. The main thing here is to show your imagination and not be afraid to experiment!


