- Opening measurement
- Door selection
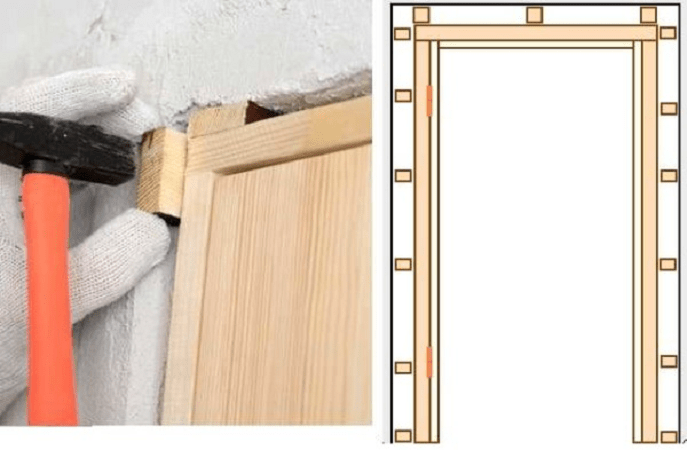
- Step 3: assemble the box
- Step 4: markup for hinges
- Step 5: Installing the box
- Step 6: Secure
- Step 7: attach the hinges
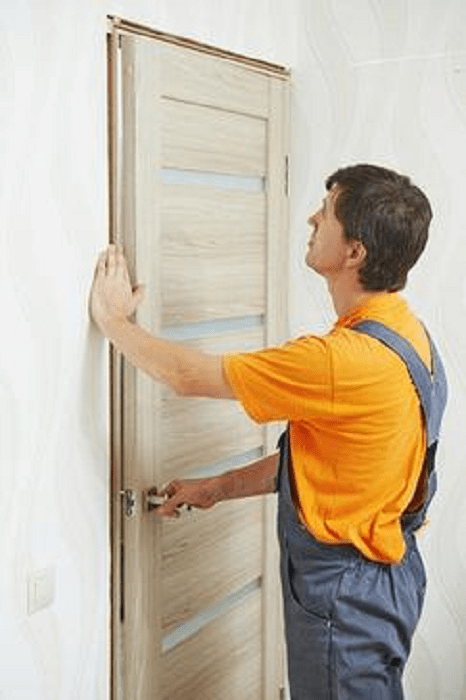
- Step 8: Hanging and Cladding
Replacing interior doors is not as time-consuming and complicated as it seems. You can fill a double or single opening yourself without the help of a specialist. Of course, you will not save time, but you will save money and acquire new skills when repairing an apartment or house.
How to install an interior door: in this article we will tell you how to choose a good door leaf, what the block for filling the opening consists of and how to mount it.
Opening measurement
Making a mistake at the stage of measuring the doorway is unacceptable: if you purchase a system of large dimensions, you won’t be able to insert it, smaller ones won’t be able to fix it well.
It is better to measure the doorway after dismantling the old door, when there is access to a bare wall. In this way, you can assess the situation and make the right measurements. Removing them is simple: take a tape measure and determine the height and width of the entrance along the wall in the narrowest place (relevant for buildings where the vertical structure is poorly observed). With this data, go to the store behind a brand new door.
There is no need to manufacture a product according to individual sizes: in houses with apartments, builders initially lay standard openings, and fillings for them are always available on the open market.
Interior doors in a private wooden house may differ from the standard ones, then you will have to order new ones and wait for them to be made.
Door selection
The first thing you should pay attention to when choosing a canvas and a box is the material of their manufacture.

The ideal option is to purchase a box and a canvas from the same material. You should not give preference to fiberboard, doors made of it are short-lived, they are installed at construction sites so that new owners can replace them with permanent ones made of more durable materials. Ideally, you should get a solid array as a door filling; to reduce the cost, the canvas can be replaced with MDF, which is also a durable raw material for making a cheaper door frame.
Additional slats and platbands can be made of fiberboard, wood or MDF. They do not carry loads, they only decorate gaps and mask connections.
Double doors are more often chosen for large rooms and halls, single-leaf blocks are installed in bedrooms and kitchens. In any case, the size of the box and the number of sheets are determined by the size of the opening.
Step-by-step instructions for installing from scratch
Installing interior doors with your own hands will not take much time, just stock up on the right tool, purchase the necessary material and you can get to work. Follow the detailed step-by-step instructions and you are guaranteed success.
This plan is valid for the installation of swing doors, sliding doors are mounted a little differently, but in a similar way.
Step 1: prepare the tool and material
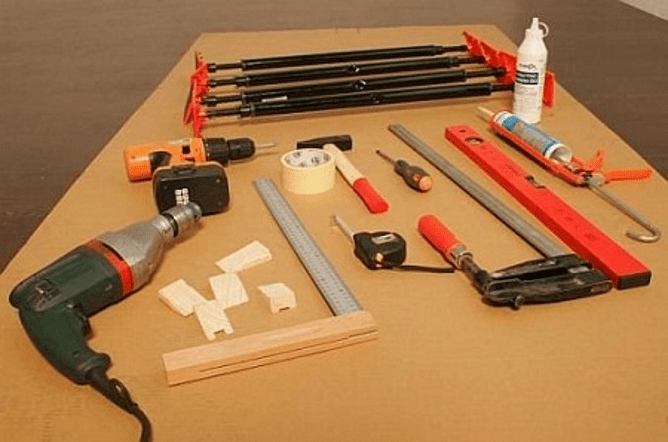
To install an interior door you will need:
- Drill or perforator;
- Drills for 3 and 4 mm for wood;
- Drills 4 and 6 mm for concrete;
- Saw;
- Screwdriver;
- wood screws;
- Level / plumb;
- Mounting foam;
- Roulette;
- Pencil.

In addition, a door block must be purchased in advance.
Step 2: determine the tactics of action
Installation of wooden doors is carried out according to the standard scheme shown in the photo.

- door frame;
- door leaf;
- Nail/screw;
- Mounting foam.
First, we will assemble the box, then insert it into the opening and hang the door.
Step 3: assemble the box
There are 2 options for assembling the box under the canvas.

To understand whether the extra parts of the tree are cut correctly, assemble the box on the floor like a mosaic: everything should fit perfectly. Then we fix the strips on the screws from the side of the wall.
For the threshold, you also need to determine the place by attaching a canvas to the box assembled along the upper part. Step back 2.5 mm from it and take a risk. At this mark, attach the lower bar - the threshold.
Step 4: markup for hinges
At the stage of assembling the box, it is worth determining the attachment points for the hinges. To do this, on the side stand, measure 20-25 cm from the top and bottom, attach loops and make risks with a knife or pencil. Screw the product with self-tapping screws, thereby determining the future location of the loop, which will facilitate its fastening. Now insert the canvas, measure the gaps to the side edges and make risks on the canvas. In the same way, make several fasteners, so as not to lose their location later.

Remove the screws and the loop, they will need to be fixed after mounting the box in the opening.
The box is ready for installation. A more detailed process is demonstrated by the author of the video.
Step 5: Installing the box
Now do-it-yourself door installation is suitable, and it begins with the installation of the assembled box. To do this, you need to put the structure on the threshold and align the vertical. For verification, use a plumb line and a level. To prevent the box from falling during the verification, fix it with spacers or temporary wedges from wood scraps.

Now you can check the canvas: will it open or not. To do this, insert it into the installed box, focusing on a flat wall. If the opening does not occur or is not fully realized, it may be necessary to correct the struts and adjust the position of the post and cross bars.
If you managed to install everything correctly and the canvas fits well into place, you can fix the box. How to do it:
- On the sides of the upper crossbar, wedges are driven in, then over its fastening to the uprights;
- Wedges are driven in along the entire height of the opening, constantly checking the evenness of the installation and the absence of displacements in any plane.
Step 6: Secure
The delivered and verified box must be finally fixed so that it can take on the canvas. There are 2 solutions:
- Screw the box to the side walls with screws. This is a reliable way, for its implementation a few screws or wood screws are enough. Choose inconspicuous attachment points, mainly use the areas under the door hinges and under the lock plate. They take a concrete block and make a hole for a screw. Now tighten the fastener so that its cap does not remain above the plane of the tree. If this amount of fasteners is not enough, you can drill through holes in other places and also plant self-tapping screws, the caps of which are covered with plugs to match the surface.
- The second way is to use hidden plates. A feature of the method is the absence of the need to drill the box and the wall.
After that, fill the space between the opening and the box with mounting foam for 2/3 of the total thickness. To prevent the structure from being squeezed out, install spacers inside the passage contour for the duration of the foam polymerization.

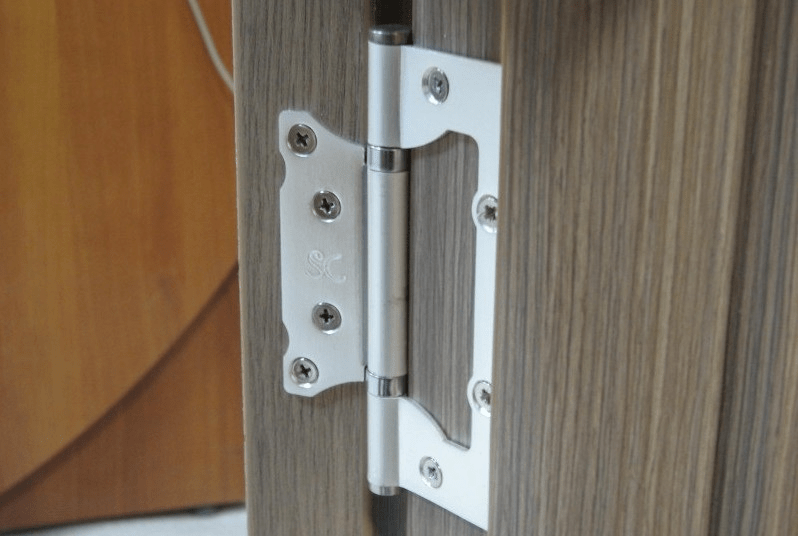
Step 7: attach the hinges
With the correct installation of interior doors, the hinges are fixed only before the direct hanging of the canvas. Screw the parts for the box to the previously marked places, repeat the steps for the canvas.
Step 8: Hanging and Cladding
The most difficult part is over, now you can hang the canvas and close the joints with platbands. How to install an interior door clearly tells the master in the video.
As you can see, it is quite possible to replace or install a new interior door on your own, following a clear procedure. The technology is described in detail and given in the accompanying videos, so it will not be difficult to understand the issue.
The ability to handle carpentry and measuring tools is already a reason to try to solve such a difficult task as installing interior doors with your own hands. The work is simple, but tricky in its own way. It will take scrupulousness, and even tediousness in marking and adjustment, otherwise it will not work to install the interior door with the box correctly.
Features of installing interior doors
At first glance, nothing complicated, but this is only a superficial impression. We are talking about not just installing the frame and the door leaf in the interior opening, but doing it beautifully, without distortions, scratches and sagging hinges. If this is the first experience, then it is best to make detailed step-by-step instructions for installing interior doors with your own hands before starting work. It's not embarrassing for newbies. Even experienced craftsmen often make notes with their own hands - what not to forget and what to look for when installing a door frame on a specific interior partition.
During the installation process, you will need to solve the two most difficult tasks with your own hands:
- Correctly assemble and install the frame of interior doors, align and fix it so that the frame does not sag under the weight of the door leaf;
- With your own hands, mark and cut out the mounting grooves on the vertical rack of the box and on the end of the interior door leaf.
An experienced craftsman takes 2-3 hours to install an interior door, a beginner will need at least a day to fully install the frame and hang the door leaf.
Advice! It is not necessary to stupidly follow the instructions for installing interior doors, which recommend consistently inserting lock fittings, attaching hinges, and only at the very end to solve problems with hanging interior doors. The main thing is to install the box and the door leaf with a fresh head with your own hands, and the platbands, locks and handles with platbands can be postponed for the next day.
You will have to measure and cut a lot. All cuts are made by hand with a hand saw, therefore, in addition to fresh forces, you will need to stock up on high-quality tools.
Tools for installing interior doors
A day or two before the start of work, it will be necessary to assemble a working arsenal for working with lumber. It can be collected from friends or rented. Why two days before installation? Because ahead of time before the start of work, you will need to check with your own hands the serviceability and performance of each tool:
- Building levels - small, 70-100 cm, and large, 150 - 200 cm, with a working bubble indicator. Usually, they do not pay attention to the condition of the camera and the lighthouse, considering them to be in good condition, but at the box office, it happens that there are bent and even broken specimens, this is the most important tool in installing interior doors;
- Marking tool - a carpentry corner with a ruler, a tape measure and a meter metal ruler. We check the presence of marks of angles of 90 o and 45 o;
- Screwdriver or electric drill with a bit nozzle for cross heads of self-tapping screws. We check with our own hands how the cartridge holds, and the serviceability of the wiring - batteries;
- A cutting tool, you can cut the timber of interior doors with an electric jigsaw, but it is best to stock up on a pair of hacksaws - carpentry and metal. The first is used for cutting the details of the box, the second is used for thin cutting of the platbands.
In addition to the tool, you will need a hammer, a clamp, a carpenter's chisel, mounting foam in a can, adhesive tape and gloves. When installing interior doors, there is little dust and waste, but you still have to periodically clean it with your own hands so as not to spread it throughout the apartment.
In addition, it would be right to have a puncher with a spatula-bayonet in stock, because when installing the interior door frame, there may be problems with the doorway in the wall. Ideally, the gap between the racks of the box and the ends of the opening should remain 10-20 mm, for normal alignment and foaming of the cracks. In reality, the opening may be uneven, and you will need to use your own hands, a puncher or a hammer with a chisel, to knock down part of the concrete or stone.
How to assemble an interior door frame
The best option would be to buy a ready-made door kit, which usually includes:
In this case, the entire process of mounting the box of the interior frame comes down to transferring the second parts of the hinges to the frame parts with your own hands, assembling the loot with self-tapping screws and installing it in the opening.

The entire job will take less than two hours. One of the options for installing interior doors with your own hands on video
The only drawback of the above scheme is that not all manufacturers of modern models of interior doors produce their products in kits designed for do-it-yourself installation. Most often, the customer buys a door leaf, and platbands and frame parts are purchased in order to install an interior door with a frame on their own.

How to install an interior door with your own hands
First of all, it is necessary to lay out the door leaf on a flat area. Next, the selected pair of beams is laid to the left and right ends of the sash. With a tape measure, we measure the width and estimated height of the future carrier frame. Then, with the help of a building level and a tape measure, the dimensions of the interior passage are checked.
Important! This is done in order to determine whether the platbands will close the edges of the gap in the wall, and how thick the additional elements should be used.

If you “miss” with the height or width of the frame, you will have to redo the trim with your own hands or, even worse, you will need to raise the interior door in height.
We assemble the frame of the door frame of arbitrary size
In order for the installation of the interior door to turn out without distortions, it is important to choose the right distance between the left and right pillars so that the door leaf enters the frame with a small gap, no more than 2 mm per side. In this case, the door will open freely without wedging in the loot.

The easiest way is to assemble the frame with your own hands using a clamp, a saw and two blanks. Vertical racks, as in the case of preparation, are attached to the ends, aligned and fixed with clamps.

From the side of the upper and lower edges of the web, an allowance equal to the thickness of the beam is left on the blanks. At the same time, a cut line is applied to the left allowance with their own hands at an angle of 45 ° for further docking with the horizontal crossbars of the frame. Without disassembling the structure, they apply markings for cutting grooves for awnings, locks and handles.
If the interior door is too wide or has a complex shape, then usually at this stage the conformity of the frame configuration with the door to the shape of the interior opening is checked. To do this, a pair of nails is hammered onto a wooden plank at a distance from each other equal to the outer width of the frame. The bar must be fixed above the opening, and a couple of construction plumb lines are hung on the nails. If the gap between the frame and the wall is 10-15 mm, then the calculation is correct.
Installing hinges on an interior door
After all the checks have been completed, it is necessary to cut mounting grooves for the canopies in the canvas with a chisel or a carpenter's knife and a hammer. The easiest way is to mill a niche with a manual router, but, as practice shows, you can do the work yourself and without expensive power tools.
If this operation is difficult, then overhead hinges or models for drilling can be used for interior doors. For installation, you only need to drill holes for screwing fasteners.
Fasten the frame in the doorway
- We mark with a marker on the steppe the level of the upper horizontal cross member of the frame, this will help to perform the correct installation horizontally and vertically;
- With the help of wedges and a building level, we align the frame vertically and horizontally with our own hands. We fix the position of the frame in the opening with wooden plugs and wedges.
Advice! If the frame and door leaf are light, then the frame can be fixed with mounting perforated petals to the wall of the interior partition.

Next, it is necessary to blow out the space between the frame and the wall with mounting foam, while installation on the PPU is being carried out, it is necessary to check again and, if necessary, finally align it vertically using a long building level. We apply a small building level to the upper mark and, if necessary, knock the frame to the desired height.

Door leaf installation
After the loot is firmly fixed with hardened foam, it is necessary to install the mating parts of the canopies. To do this, initially the door leaf is lifted with wedges so that a gap of 1-2 mm is obtained between the threshold and the lower edge.
It remains only to install the sash on the awnings, and you can proceed to the decorative trim of interior doors.
Installation of platbands on the interior door
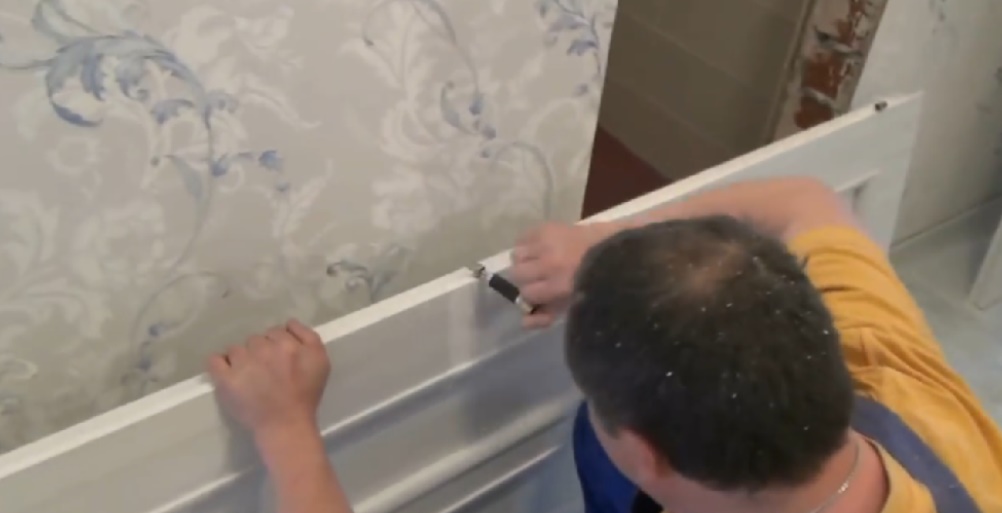
Facing the frame with platbands is not particularly difficult. First of all, install the vertical strips of the platbands. The height of the bar is measured according to the mark made earlier, after which the casing is applied to the frame and the line is washed down at an angle of 45 °.
Advice! It is best to make an undercut with your own hands using a thin hacksaw blade for metal. Preliminarily, adhesive tape is glued to the cut line. The bar is nailed with wallpaper nails or put on glue.

In a similar way, install the second vertical platband. After the vertical parts have been installed, you can mark the cut line on the horizontal bar, and install it on the door frame in the same way.
What are the sizes of extensions for interior doors
Additional strips are used as an additional element to increase the width or thickness of the door frame. Most often, the installation of extensions on interior doors is required in a situation where the wall is much thicker than the canvas, and there is a gap between them that needs to be closed.

The width of the additional rails ranges from 10 mm to 200 mm, for interior structures, the most popular size is 10-20 mm, and often, due to the non-standard profile of the slot, the extensions have to be ordered or cut out with your own hands from the trim strips.

How to install extensions on an interior door
If, after installing the box, the unpleasant fact is revealed that the vertical plane of the frame is recessed into the space of the interior opening relative to the wall surface, then the only way to correct the situation is to use additional trims.

It is first necessary to determine the size of the extension, for this the building level is applied to the wall and the distance to the front edge of the box is measured with a ruler. Thin planks are nailed with wallpaper nails, wide extensions are glued to the frame.
Professional advice on how to install interior doors
Among the features of installing home doors, the following problem areas can be noted.
Before mounting the platbands, you need to make sure that the frame or additional plank is located in the same plane with the surface of the interior wall. Otherwise, even if you make the edges washed down with your own hands perfectly, a gap will definitely appear between the platbands.
The second problem that one has to face is the sagging of the doors when installed incorrectly. To correct the situation, it is necessary to remove the canvas, put washers, or cut the edge and install the door in place.
Conclusion
Do-it-yourself installation of interior doors will require a little practice in installing canopies and extensions, but in general the work is simple, and with proper skill, the canvas can be hung in a few hours. Masters claim that with each installation, the quality of work with their own hands doubles.
Doing the installation of an interior door on your own is not a difficult job. A simple step-by-step scheme will be described below, starting from choosing the interior door you like in the store and ending with the self-installation of interior doors with step-by-step photos.
Interior doors can be divided into several types
On the market, manufacturers of door structures offer a fairly wide range of models. Ready-made interior doors can be made of different materials. The most common types of materials are:,,.
Useful information:
1. fiberboard - door: the frame is made of wood, and sheathed with fiberboard sheets with lamination. The advantages of such doors include: low cost relative to other types, low weight, which makes it possible to deliver them from the point of sale to the house on their own, ease of installation. Given these points, they are popular among buyers, so that their wide range is most often presented in stores.
Of the minuses, one can note the low strength of the fiberboard itself, which is why the door breaks and becomes unusable quite easily, poor resistance to moisture, the door can twist. Therefore, we do not recommend its installation in bathrooms with weak ventilation, this material loves dry rooms.
Photo - Models of MDF doors
3. natural wood- Interior doors made of this material are the most durable. Their price directly depends on what kind of wood was used for their production. Doors made of valuable species of wood are used for installation in rooms with the author's design; they will perfectly fit into a classic interior. The width of the interior doors is selected according to the size of your opening.
Photo - Models of wooden doors
The list of interior doors by type can be supplemented with steel ones, but these types are not very popular among the general population, so they are not included in the article for a detailed description.
Come here if you are interested in and.
Types of door frames for interior doors
The right interior door should be in a reliable box for the door, because its quality will depend on how long the door will last, as well as the design of the doorway of your room. Door frames can be divided into three main types.
1. Fiberboard box. It looks pretty decent, but when choosing a box made of this material, the strength of the entire structure will be questionable. The middle of the box bar sags from its own weight, not to mention the possible deflections from the weight of the door leaf itself. Since the main components in fiberboard, to put it simply, are glue and paper, it must be borne in mind that they are very fragile and not durable. It is not recommended to hang wooden and MDF doors on them because of their heavy weight.
Photo - Fiberboard box
2. Raw wood box. The cost is at the level of fiberboard boxes, but unlike the latter, boxes made from dry profiled timber have a higher strength. Therefore, when choosing between fiberboard boxes and raw wood boxes, we recommend choosing the latter. You also need to consider that you will need additional materials for the final finishing of the box.
Photo - Raw wooden box
3. Laminated wood box. It does not require final finishing, as it is already laminated with paper. And here there is one important point, when choosing such a box, the quality of lamination is very important. If thin paper was used for this, there is a high probability of scuffs, scratches, cracks, the coating loses its appearance. Perhaps a better option would be a box made of raw wood with self-finishing and painting.
Photo - Laminated wooden box
Also, the entire doorway of the interior door may require additional processing after the doors are installed. Everything will whistle from your opening, its size, the location of the door in it, the interior of the room.
For such processing, you can use an additional bar and platbands. Required kits can be purchased at the store. We recommend that you decide on their need after the final installation of the door in order to understand what kind of final finish you need. After all, the purchase of additional materials is an additional cost, which in the end may not be necessary.
An example door is considered with a fiberboard frame. If you need to install wooden boxes, you need to work on the same steps. Installation will be easier, as wood is stronger than fiberboard.
Step 1. Choice tools and necessary additional consumables. For installation you will need:
- saw;
- electric drill ();
- drills 3 mm and 4 mm for wood;
- drills 4 mm and 6 mm for concrete;
- screwdriver;
- roulette;
- a pen;
- wood screws;
- fast mounting dowels;
- mounting foam.
Step 2. We determine the scheme for fixing the box in the doorway of the interior door.
Photo - Scheme of fixing the door frame in the opening
The figure shows the scheme of fixing the door frame in the opening. As you can see, the interior door (2) is installed in the box (1), which is fixed in the opening with screws (3). Blow foam between the wall and the box (4). The process is as follows: we install the box in the opening, fix it to the wall, foam it.
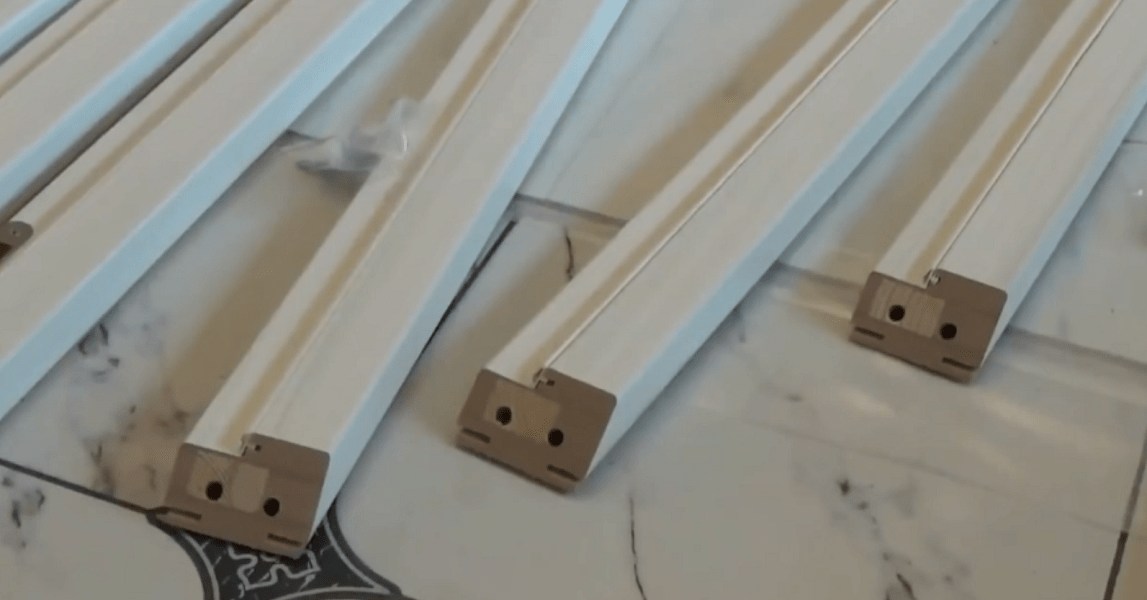
Photo - Disassembled door frame and door before installation
If, after installing the door, its threshold cannot be hidden in the floor, for convenience, choose a box without a U-shaped threshold. It does not have a lower crossbar, so you will simply have nothing to interfere with walking.
Step 3. Assembling the door frame.
Photo - The door frame must be assembled for ease of installation
Loops must be attached to the purchased box. The door should have a cutout for the handle, as well as for the door lock of the interior door. We begin assembling the door frame. It is necessary to connect all the parts of the box together and fit the size of the opening. The factory length usually comes with a margin of 5 cm.
The surest option not to make a mistake is to assemble the parts on the floor the way they should be in the doorway. Particular attention must be paid to the metal bases of the hinges, they should stick up so that the door can be hung on them from above.
Choose the opening side depending on the rooms between which the doors are installed. From small rooms, such as a bathroom, pantry, it is better to open the doors to the outside, from large rooms to the corridor - to the inside.
Photo - The correct position of the end strips
We attach the upper bar to the screws. The end strips (1) must lie in line. If there is no line, then the bar lies incorrectly and needs to be deployed.
Photo - Tighten the screws after pre-drilling
Given the structure of fiberboard and the characteristics of its strength, in the box, before screwing in, it is necessary to drill holes with a wood drill with a diameter of 3 mm. We carry out this action so that our box does not crack during the assembly process. For the same reason, screw fixing points should be located closer to the center, away from edges and corners.
Photo - Assembled box
Four self-tapping screws will be enough to fasten the bar, two on each side.
If the door is lying flat on the floor, place a soft cloth under it to reduce the chance of damaging the laminate.
Photo - Factory stock box
We will cut off the factory stock of the box (protruding edge). To fit the box, we accurately measure the dimensions of the doorway of the interior door. And we transfer it to the door frame, taking into account the gap minus 1-2 cm on all sides for the possibility of foaming. We recommend that you double-check yourself on the dimensions of the structure several times.
Photo - Measuring the height of the opening
Photo - Cutting line of the excess part of the box
The protruding surplus is best cut with a hand saw. It is advisable not to use an automatic saw to avoid damage to the coating.
Photo - Trimming the excess with a hand saw
As a result of all the manipulations, we get a U-shaped door frame, ready for installation in the doorway of the interior door.
Photo - Wooden box assembly
Step 4. Installing the box in the opening.
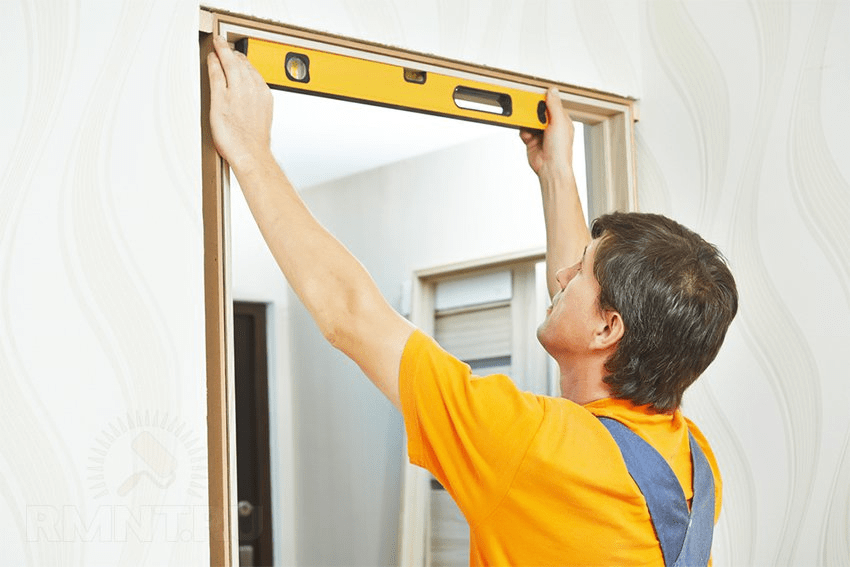
We put the box in the doorway. Level up. We check the correctness and evenness of the assembly of the box by hanging the door on the hinges and closing it.
Photo - Checking the position of the box with a level
Photo - Drill diameter 4 mm for wood
The box installed in the opening must be fixed with self-tapping screws. We remove the end decorating strip and drill 7-8 through holes on each side. The distance between the holes is 25-30 cm.
Photo - Drilled box
The wood drill is not designed for drilling walls, we only drill a fiberboard box with it. After that, we again check the position of the box with the help of a level, since it could move during the drilling process. If there are no changes, start drilling the wall. Using a thin concrete drill with a diameter of 4 mm, through the holes in the box, we mark the wall. It is impossible to completely drill the wall through the box, as it can be damaged. The hole diameter is 4 mm, if you make more, then the caps of the self-tapping screws will fall out. Next, we remove the box from the opening and begin to make holes with a drill with a diameter of 6 mm. If the wall is brick, the mounting holes should be in solid brick, and not in the masonry joint, in which the dowels do not hold very well.
Photo - Drilled brick wall
Photo - Dowels in solid brick
Photo - Self-tapping screws for quick installation - on the left, wood screws - on the right.
Dowels are mounted in the finished holes. We fix the box in the wall with self-tapping screws. For convenience, you can use a screwdriver or a drill with a nozzle for a self-tapping screw head. Do not screw in the screws completely, the deflection of the box is possible. In order to avoid deflection, wedge lining is possible. To check the evenness and absence of distortions, in the process of screwing in the screws, additionally check the box for level.
Photo - Lining wedges
At the end of the installation, the box is checked from the side of the room using a level.
Photo - Checking the box by level
Step 5. Installing the door on the hinges.
How to install an interior door? It is enough to put the door on the hinges
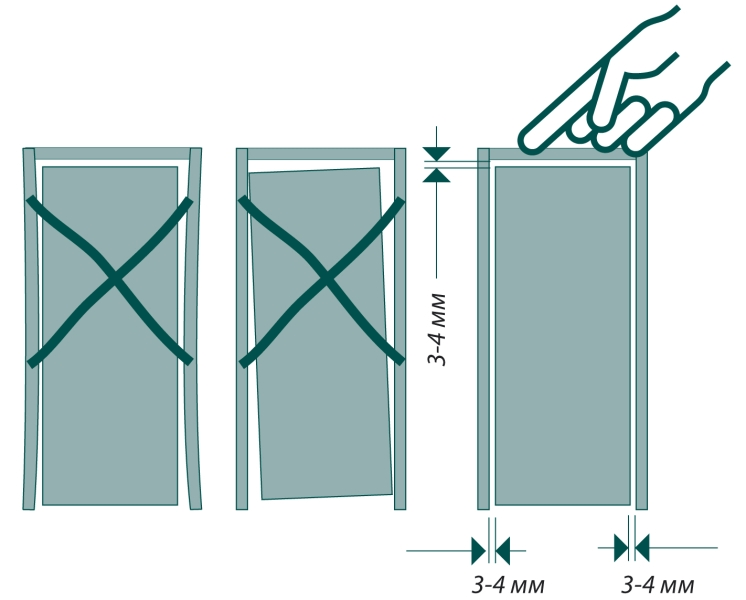
If this is a fiberboard door, given its weight, it is possible to do it alone. After its installation, we will try to open and close. In the closed position, the gaps between the box and the door should be about 3 mm.

Repairs in the house will have an unfinished look without the installation of such an interior element as doors. They protect the living space from external negative factors, contribute to heat and sound insulation, bring coziness and comfort. Ordinary, at first glance, they differ in material, shape, color, design, have many classifications and types. Despite their differences, all doors require certain knowledge and skills to install them. This is a very painstaking and precise work for a team of two people. Despite the complexity of the work, installing doors with your own hands is quite within the power of anyone who skillfully handles the tool. The main thing is to do everything gradually, measuredly, without haste, observing the rules for installing doors.
- Measurements, selection, purchase of doors.
- Preparation of the opening for the installation of a new door.
- Installation of hinges and lock on the door leaf.
- Assembly of the door frame.
- Installation of additional elements.
- Fastening the door frame in the doorway.
- Connecting the door leaf to the frame.
- Fixing the structure with mounting foam.
- Fastening fittings and platbands.
To perform the work you will need a certain tool:
- a hammer;
- chisels 16 and 20 mm;
- roulette;
- crowbar;
- level;
- screwdriver and screwdriver;
- wood saw with fine teeth;
- miter box;
- drill and perforator;
- if possible, a milling machine, circular.
Materials for door installation:
- door leaf and door frame;
- door fittings (handles, hinges, locks);
- mounting foam;
- wedges;
- nails, screws and dowels.
Plastered and prepared door slopes
Before you install the door, you should prepare the installation site. If there is an old door, then we will dismantle it. To do this, with the help of a crowbar, avoiding strong and abrupt movements, we first remove the trim. Carefully lift and remove the old door leaf from the hinges. With the help of the same crowbar, we dismantle the door frame, to facilitate the process, we file the frame in several places with a hacksaw. Quite often in houses, the door frame was cemented. And to take it out, you have to break the cement with a hammer.
To facilitate the installation of the door, the slopes can be leveled and plastered. At the end of the preparation, we clean the doorway from construction debris. If the doorway has never been used, then you can immediately start measuring it.
Taking measurements, choosing, buying
To purchase the desired door, you will need dimensions in height and width, as well as the dimensions of the slopes of the doorway. Since in most cases the doorway has uneven edges, you should take measurements in several places and choose the smallest size.

We lay the floor covering for the correct installation of the box
Important! When taking measurements, you should take into account the gap between the door frame and the doorway. It should be 10-15 mm. The installation of doors is recommended to be done after laying the floor covering, if there is none yet, then the height of the floor covering and the gap between the floor and the door should be included in the dimensions. For a more visual measurement, you can put parts of the floor covering in the doorway. This is necessary in order to know the exact level of the floor, the free movement of the door depends on it. The gap between the door and the floor is usually 10 mm.
Now that the old doors have been dismantled, dimensions have been taken, and the slopes have been leveled and puttied, you can order doors. As a rule, doors have standard sizes, but if necessary, you can make an individual order based on the size of the doorway.
To choose the right doors, you need to know their types and purpose. For installation in the house, you should pay attention to the entrance, interior and, if necessary, kitchen doors.
We also choose according to the opening method. The most popular option is swing doors. Doors are made using approximately the same technology - this is strapping and internal filling. The power structure or skeleton of the door, where the lock is inserted and the hinges are attached, is sheathed with fiberboard, MDF or other material, and the internal space is filled.
There are several designs of doors - solid, paneled and smooth.
smooth doors, they are also panel doors, can be made with an outer layer of MDF and fiberboard, sometimes such doors are sheathed with plastic. They are usually painted, veneered or laminated. The price of such doors varies depending on the materials and method of sheathing. The most practical and affordable are the doors sheathed with laminate. Painted doors can be both cheap and expensive. It all depends on the type of material and the method of painting. The most expensive are doors lined with natural veneer.
Paneled doors are distinguished by their open construction and the presence of drawings, patterned carvings and stained glass windows. Such doors can be filled with glass, carved panels, and other materials. They are made from a solid array of precious woods or combined materials. Prices for panel doors depend on the type of materials. The cheapest and most affordable are made from soft woods, as well as from combined materials (MDF, HDF).
Solid wood doors made from precious woods. This affects primarily their price and weight, they are very high. The doors are covered with varnishes and various impregnations, thus they are well protected from damage by insects, fungi and mold.
Having selected the desired doors and received them, we proceed to the phased installation of the doors.
After the purchase, we unpack the door leaf, platbands, door frame, extensions, fittings. We carefully check everything for cracks, chips or other damage. As long as the lock, hinges or other door fittings are not embedded, the doors can be returned to the manufacturer.
Preparation of places for fastening the lock and hinges


Installing the door leaf on the floor for easy cutting with a cutter


Lock hole
Before assembling the door frame, mark and select with a cutter or chisel the place for attaching the hinges and the lock on the door leaf and vertical rack. To do this, we install the door leaf in a vertical position on the wide side in special stands. In order not to damage the canvas, the inside of the coasters is upholstered with fabric. We attach the lock and mark the place of its installation with a pencil. To make it convenient to use the lock, we install it at a height of 900 mm from the floor. To install the hinges, we measure 200 mm from the lower and upper edges of the door. We attach the loops and outline the place for milling. Using a hand cutter or chisel, we select the excess so that the hinges and the lock lie flush. We put them back and drill holes for self-tapping screws with a drill.
Finally, we apply the vertical post to the door leaf in such a way that there is a gap of 2-3 mm between the horizontal bar of the door frame and the door leaf. We mark the place where the hinges are attached and the place for the tongue of the lock and select the excess using a milling machine or chisel. Attach hinges and drill holes for self-tapping screws.
Important! Places for a lock and loops after sampling with a cutter or chisel must be varnished. In this simple way, the tree will be protected from moisture. It should be remembered that entrance and heavy doors are mounted on three hinges, and two hinges will be enough for interior doors.
Hinge and lock installation
When the places for the lock and hinges are selected by the cutter, you can proceed with their installation.
With loops, things are simple. They just need to be screwed to the door leaf.

mortise lock
Installing a lock, on the other hand, will require some effort. In order for the lock to become correct, it is applied to the side of the door and, as a stencil, holes for handles, valves and fasteners are marked. Using a cutter or chisel, we select a place for the lock to the desired depth. Then we put it in place and fasten it.
Important! When choosing a lock, you should take into account the width of the door bar. The depth of the hole for the lock should not exceed 1/3 of its width, otherwise deformation of the door leaf cannot be avoided.

Starting to collect the door frame, we measure the height of the vertical racks and cut them with a miter box. Horizontal bars are made to the size of the door leaf.
Since the collection of the box requires a large free space, the collection process itself is carried out on the floor. In order not to accidentally damage the door frame on the floor, we lay two or three wooden slats under the racks for the entire length of the door leaf.
We attach the horizontal crossbar to the racks. The joints can be lightly tapped with a hammer for a better connection, and with the help of a screwdriver we fix the box, screwing the screws into the corner joints.
Important! There are doors with a ready-assembled door frame. The installation of these doors is very simple. In this case, the door frame is simply fitted into the doorway and fixed in it.
Fastening of additional parts

In the event that the width of the door is several centimeters less than the door slope, extensions should be installed. You can do without installing them, but then you will have to completely make slopes, and over time chips and dirt appear on them. Therefore, the installation of extensions in such cases is the best way out of the situation.
As extensions, strips of the same color as the door are used, with a thickness of 8 to 12 mm. When fixed, they form a small portal, with edges matching the edges of the wall.
Installation of the add-on is carried out as follows. Using a cutter or chisel, a quarter of 10x10 mm or 8x8 mm is selected in the door frame, depending on the thickness of the trim strips. We do this along the entire outer contour of the door frame. We cut the vertical slats of the extension along the height of the box, as well as the horizontal slat of the extension. We install the door frame in place and fix it, then we install the trim strips in the trimmed quarters. We attach the planks to the slope with dowels and self-tapping screws.
Installation of the door frame in the opening
Having completed the assembly of the door frame, we proceed to install it in the doorway.

Fixing the door frame with wedges from above
We put the box inside the opening and fix it with wedges, 2-3 wedges for each rack and 2 for the crossbar. Align the door frame vertically and horizontally. You can adjust the level of inclination with light strokes on the wedges. Now you can fix the box. To do this, we drill holes in the rack and wall with a drill or puncher. It remains to put the dowels and fasten the box with self-tapping screws.
Important! Wedges are best made from wood of the same density as the door frame.
Hanging door leaf

After installing the box, we proceed to hanging the door. First of all, we fasten the loops to the previously prepared places. For this, the so-called card (plate) detachable hinges with a removable rod or a rod embedded in the hinge are usually used. There are also one-piece hinges, but they are used less frequently. In the case of a hinged rod, the door leaf can be installed or removed by just gently lifting it to a small height of the rod. If the design of the door frame does not allow lifting the doors, one-piece hinges or hinges with a removable rod are used. To install one-piece hinges, simply fix them on the box, and then screw them to the door leaf. To install or remove a door leaf from hinges with a removable rod, you must remove the rod from the hinge and then insert it back.
Now that the hinges are hung, you can put the door leaf in place. It is best to do this together, when one person holds the doors in the air, and the second fixes the one-piece hinges with self-tapping screws or directs them into place in the case of collapsible hinges.
Important! When choosing hinges, you should pay attention to which direction the doors will open.
We fill the gap between the doorway and the frame with mounting foam, which increases the heat and sound insulation of the doorway. This material allows you to fill all the small cracks and crevices. The foam is easy to work with and easy to apply to any surface, and thanks to its astringent properties, the structure will be stronger.

Before filling the gap between the doorway and the door frame, the door frame should be protected from foam accidentally falling on it. To protect the box, it is pasted over with a film or masking tape. If, nevertheless, the foam has got on the door frame, then fresh foam can be cleaned with any alcohol-containing solution or solvent. But the hardened foam can only be removed mechanically, which is fraught with scratches and scuffs.
Mounting foam has the ability to increase in size from 50% to 250%, which can lead to deformation of the door frame. To prevent this from happening, spacers are installed between the vertical posts or thick cardboard is laid between the already installed and tightly closed door leaf and the door frame. Shake the bottle thoroughly for at least one minute before filling with foam. For better adhesion of the foam to the surface, the opening and the outside of the door frame can be slightly moistened with water. The main thing is not to overdo it, otherwise the effect will be exactly the opposite.
For reinsurance against deformation and distortion of the door frame, it is better to apply mounting foam in two stages. For the first run, the foam is applied pointwise. After allowing the foam to harden, after 1-3 hours, you can fill the remaining voids. We cut off the excess mounting foam after it has completely hardened.
Important! In the case when the gap between the opening and the door frame is too narrow, the tube of the foam sprayer can be flattened a little, this will make it more convenient, and most importantly, fill all the voids with high quality.
If the gap between the doorway and the frame is large, 8-9 cm or more, then we lay the free space with a suitable material (wood, drywall, etc.) and only then fill it with foam.
The vertical gap should be filled with foam, starting from the bottom and gradually moving up. Thus, the foam will create a support for itself. If there are extensions, additional spacers should be installed on them to avoid deformation.
Installation of platbands and door fittings
At the final stage of the door installation, the platbands are installed. First, we cut the platband in height, then we cut the upper edge of the vertical platbands at an angle of 45 degrees. We make the same trimming at 45 degrees for the horizontal casing at both ends. For these operations we use a miter box. You can fix the platband with small nails or universal mounting glue.

Applying glue to the trim

Installing a trim on a door frame
During repair work in the apartment, new interior doors are often mounted. This process is not so complicated, so installing interior doors with your own hands is feasible. The main thing is to study the nuances and installation technology.
Do-it-yourself installation of interior doors
When installing an interior door yourself, there are many nuances and features. The most common of them will be announced in the instructions.
Definition with dimensions
 The main thing to do before installing an interior door is to determine its size. Mistakes are not allowed here.
It is best to measure the prepared doorway when the old canvas along with the box has already been removed. Only in this way will the correct result be obtained. To measure, it is necessary to determine the narrowest point and measure the width and length of the opening along the wall. So, the dimensions outside the door frame should be less than the value obtained during the measurements. If, for example, a value of 78 cm is obtained, then the block is installed with parameters of 70 cm, since the wider version will no longer fit into this opening. Usually, in apartments, builders immediately set standard sizes, so it will not be difficult to choose a door from the assortment presented in the store.
If it is necessary to install a door in a non-standard opening, an individual order will be required.
Preparation of tools
 After the desired door is purchased, you must immediately prepare the tools that will be needed during work:
- or a drill with 3 and 4 mm drills;
- drills for a concrete wall at 4 and 6 mm;
- wood screws;
- saw or jigsaw;
- building level and plumb;
- roulette;
- pencil;
- assembly foam.
Box assembly
 The technology for mounting an interior door involves the initial trimming of the racks to the length of the doorway. The evenness of the floor is measured by the level, if the characteristic is satisfactory, then the racks are the same. When calculating, it is important to understand that the racks are always 1–2 cm longer than the canvas itself, taking into account the cuts, and there is a gap of 1 cm under the door.
After determining the length of the racks, a lintel is sawn off, longer than the width of the door leaf. Additionally, a clearance of 7 - 8 mm is included in the length, which is distributed:
- 5 - 6 mm - on the design of the loops;
- 2, 5 - 3 mm - compensation type gaps.
Since the doors are made of wood that changes its original dimensions, the gaps will allow the canvas to open freely under any conditions. Then assemble the box. Ways to connect the planks to each other:
- At an angle of 45°. This solution is the most correct and aesthetically correct, but also difficult to perform due to the high cutting accuracy to avoid cracks. You can make such cuts using a carpenter's miter box. An unpleasant moment can be the occurrence of chips, so the tool is used only as sharp as possible. Next, drill three holes on each side. So, it turns out that 2 holes are on top with an indent of 1 cm from the edge and 1 on the side in the middle. Self-tapping screws are twisted perpendicular to the connection.
- At an angle of 90°. In this option, it is more difficult to make a mistake, but you need to remove the protrusions at the junction of the lintel and racks. To do this, they put a lintel in the corner with a fairly large margin. Remove everything superfluous with a chisel. Set an even angle. In a fixed position, holes are drilled, a few millimeters smaller in diameter than a self-tapping screw. Clearly observing the angle and excluding the relief, connect this knot.
 If a threshold setting is implied, then the box turns out to be similar not to the letter P, but to a rectangle. For the threshold, you need to correctly determine the place. This is done after collecting the U-shaped box and attaching the canvas to it. 2.5 mm recede from it and a threshold is attached to this place.
Assembly of parts is carried out on the floor.
Inserting hinges and installing fittings
 Do-it-yourself installation of an interior door involves inserting 2 hinges, but in some cases there may be 3. They are placed at a distance of 20 - 25 cm from the top and bottom of the door leaf.
The attachment point should not contain knots if the door is made of solid wood.
To begin with, the hinges are mounted on the door leaf according to the following algorithm:
- Attaching loops to the desired places, outlining their contour with a well-sharpened pencil or blade.
- Carrying out a recess with a milling cutter or chisel along the contour.
- Installing the hinge in the recess exactly with the surface of the canvas.
- Fixing the loop with self-tapping screws.
After the canvas is placed in a box, the necessary gaps are set on the side of the hinge mechanisms at 6 mm, in the upper part and on the opposite side - at 3 mm, fixed with wedges. Mark the places on the box where the second part of each loop will be located. After that, a recess for the hinges is created on the door frame.
As a rule, interior doors are sold without handles. Therefore, in the process of installing an interior door with your own hands, you will have to think about this. The location of the handle is determined by the owner depending on his height and ease of use. As a standard, a handle and a lock, if it is supposed to be, are attached to the canvas at a distance of 0.9 to 1.2 m from the floor. This is the most convenient place for the average person to use.
Box installation
 Before installing the door frame of the interior door, you need to knock out everything in the opening that can interfere with installation or fall off. In the case of problematic walls, they are pre-treated with deep penetration primers. If there are large holes, they are sealed with a plaster mixture. The prepared opening is a step towards the correct installation of the interior door.
After preparation, the door frame is exposed with a check of its verticality not only by level, but also by a plumb line. Its installation is carried out in such a way that the canvas subsequently creates a single plane with the wall. If the wall is not even, then the door frame is not set along it, but vertically.
In order to avoid distortion, before putting the door on, temporary spacers are mounted on the floor in the door frame, giving it greater rigidity.
After the selected position of the door frame, it is fixed with mounting wedges made of wood or plastic, which are placed on both sides of the lintel and above the racks. Check the verticality of the fixed door frame. At this stage, the canvas is inserted into the box and the possibility of unhindered opening of the door is checked. If everything suits you, then you can start mounting.
 There are several ways to attach a door frame to an opening:
- through to the wall;
- mounting plates.
The first type is more reliable, but leaves behind visible fastener caps on the box. To fix the interior door, it will be enough to install two self-tapping screws in the recesses for the hinges in the box and the area for the lock on the other side. In this case, you need to make sure that the head of the screws is buried in the material and does not interfere with the installation of the hinges. Door frames are now also available with decorative strips that hide the fixing points.
To install an interior door in this way, you will need to drill holes for the screws with a drill on concrete. If desired, you can drill through-type holes in other parts of the box, and cover their location with matching overlays.
The second way is to pre-fasten the mounting plates on the back of the box, which help to fix the door. This option allows you not to drill the door frame and wall.
Canvas hanging
 Thus, after installing the box, you can start foaming the gaps between it and the wall. Before this, the wall must be moistened with water for better polymerization of the mounting foam. You need an amount of material that fills the space by no more than 2/3. If you squeeze out more, then the foam can blow the box inward.
To avoid deformation of the box during foaming, it is worth installing spacers.
The polymerization time of the foam is indicated on the packaging and may vary from manufacturer to manufacturer. As soon as the substance has completely hardened, the spacers are removed, the door leaf is hung and the operation of the new door is checked.
Finished door finish
 The doorway after installing the doors in the apartment requires additional finishing to make it more decorative. There are several options here:
- With a thin wall - installation of platbands covering the foamed area. They are fastened with nails without a hat or screws with special plugs.
- With a wide pier - the installation of platbands and an additional strip, which is cut off in width and mounted on building silicone. Platbands in this case are installed in the same way as in the previous case.
Installing an interior door according to step-by-step instructions is a difficult process that requires some skill. But, if all the features are taken into account during installation, then it is quite possible to do this without the need to contact specialists.
Video instruction for installing interior doors


 in the near future - forecasts and expert opinions")


