The path in the country house performs many functions, including connecting the entrance to the house, the house to the garden, etc. Therefore, when arranging it, it requires due attention to the choice of materials and the process of its installation. The optimal material for laying on the path for giving is tile. We will consider how to lay tiles in the country house below.
Options and materials for the construction of the path in the country
There are many options for arranging a track in a summer cottage. The choice of one or the other depends directly on the desires of the owners, the general exterior of the building, the type of soil on which the path is being built.
The use of natural stone makes the exterior noble and truly beautiful. Although the cost of this finishing material is very high. Curved paths are made with the help of natural stone. The location of the stone elements is chaotic, so with their help it is excellent to build a beautiful bend.
When making a country path in country style, it is possible to build it from wood. By applying special impregnations and varnishes, it turns out to improve the natural texture of the tree. Such a path looks extraordinary.
If the cottage is built of brick stone, then brick is also suitable for the construction of the path. Its combination with pebbles will improve the appearance of the path. In addition, the use of ordinary brick is impractical, it is better to use a brick adapted to the tile, as it has a high level of moisture and frost resistance.
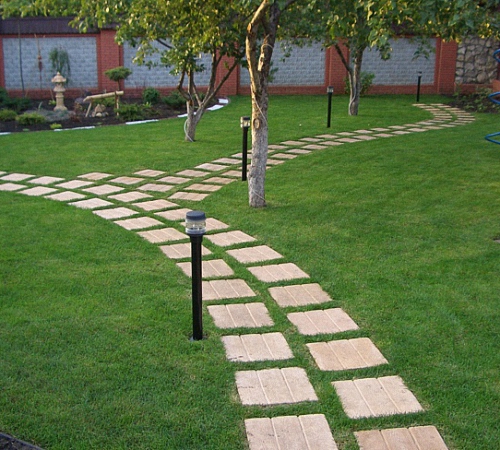
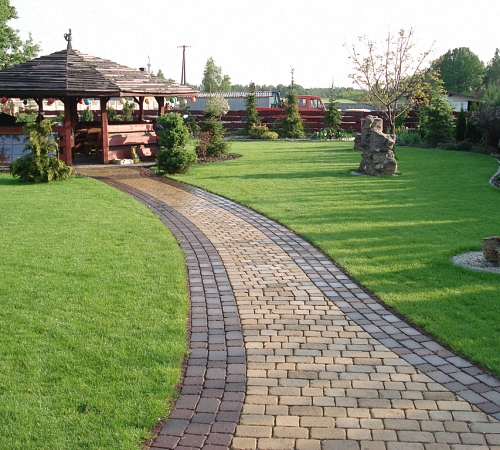
The longest service life is different paving stones or paving slabs. With the help of multi-colored paving stones and a certain scheme for its installation, a variety of drawings or ornaments are made that fit the individual style of each garden.
A more budgetary and inexpensive option is the construction of a gravel path. Its installation is appropriate in the wild or in the design of a naturalistic cottage.

In addition, for the construction of the path, which will be unique and chic, ordinary concrete is used, which is poured into special silicone molds. A combination of several materials will also serve as a good way to experiment in the country.
Tiles in the country: features of choice and application
The country path is constantly exposed to the influence of the environment, so the material for its decoration must be of high quality in order to serve its owner for many years.
The path in the country is under the influence of people who move along it, garden carts and equipment, they spill water on it, bring dirt or dust from the garden plot, in addition, there is a constant effect of rain and snow with ice, which periodically need to be cleaned. Therefore, the requirements for the construction of a summer cottage are very high.
Tile in the country house photo:
As well as possible, material in the form of paving slabs is suitable for finishing a garden path. Let's take a look at the features of her choice below:
1. Pay attention to the material from which the tile is made. Since the main components of the solution greatly affect its durability. In addition, the technology of its manufacture plays an important role. This information, without fail, must be owned by the seller. Otherwise, look elsewhere to buy it. In addition, we recommend that you examine the certification of products and documents confirming their quality.
2. The size and thickness of the tile also plays a role in its operation. If the garden path is intended for pedestrians, the recommended thickness is three centimeters. When installing platforms for the location of vehicles, choose tiles with a thickness of five centimeters or more. You should not choose tiles that are too large, as it has been practically proven that the smaller the tile, the more resistant it is to mechanical damage and cracking.
3. The appearance of paving slabs will also help determine its quality. If the tile has a bright color and a smooth surface, this does not mean that it is of high quality. It is the smooth texture that indicates a large amount of water in the solution, and the brightness indicates the use of cheap synthetic dyes that improve friability and reduce the strength of the material. In addition, it should be noted that a too smooth tile surface leads to slipping injuries, especially in winter or in the rain. Therefore, before buying a tile, you should clearly define its texture, color and pattern. To test the tile for strength, you should hit one tile against the second, if there is a sonorous sound, the tile is strong, otherwise it is loose.

4. It is possible to purchase one tile that you like for a thorough inspection. If there are various kinds of stains on the reverse side, it is better to refuse the purchase. Since in the production of such tiles, sand with a large amount of clay was used, which significantly degrades the quality of the tiles. Clay is never combined with cement mortars, as it degrades its quality and leads to friability. Next, you should split the tile into two parts in order to inspect the uniformity of the texture on its inner part. In the absence of paint stains, clay or sandy areas and pores, feel free to buy tiles for the construction of the track.
The path is an important part of the cottage, so it is better to think about its location even at the stage of building the building itself. To facilitate the calculations, it is better to make an approximate drawing using special online programs. After identifying important points, connect them using straight or curved paths.
It is advisable to place on the diagram all the objects present on the territory. These include a garden plot, a vegetable garden, a greenhouse, a bathhouse or a gazebo. Tracks provide a connection between these objects.
As the material used to build the walkway, choose a finish that blends with the environment. You should not make all tracks of the same kind. It is possible to combine solid tracks with step-by-step ones, curved ones with straight ones.
When designing a site, you should indicate the location of the future location of plants and bushes. If you live in a climate zone with heavy rainfall, take care of arranging the drainage system, which involves the construction of drains, on the sides of the path. With their help, water will be removed and stagnation will not appear. In the process of building a country path, it should be remembered that the water that freezes on its surface reduces the life of the coating on the path several times. Avoid planting powerful trees near the path, as their root system will destroy their integrity over time.

Laying tiles in the country: the technology of the process, the initial stage
After purchasing a high-quality tile for a summer residence, a series of works should be carried out to install it. If you take this procedure lightly, then even the best tile will require replacement over time, due to non-compliance with the technology of its installation.
Before laying paving slabs in the country, it is necessary to study the instructions from the tile manufacturer for its installation.
The initial stage of the work is the design and marking of the territory for the construction of the track. All calculations from a pre-prepared project should be transferred to the surface of the earth. To markup, you will need to measure the width and length of the track, gradually setting the pegs in the marking places. A tension thread is pulled onto the pegs, a slope, if any, and turns are affixed.

You should decide on the type of tile you buy in advance, but buy it only after the markup is ready. Since it is with its help that it will be possible to calculate the required number of tiles for laying. It is preferable to take a tile with a margin of several pieces in order to replace the material in case of accidental crumbling.
The next stage is based on earthworks to remove the soil layer before laying the tiles. The thickness of this layer is influenced by factors such as the size of the tile, the drainage pad and the amount of concrete required to reinforce the base. In addition, it must be taken into account that over time, soil shrinkage will occur, and the installation height of the tile will decrease. The correctness of these calculations depends on the type of soil located in the summer cottage, the size of the track and the base under it.
The most accurate calculation is made by a specialist who is directly at the installation site of the tile. The interval between the values of removing the soil layer is from 8 to 40 cm. The first number determines the thickness of the tile, for example, 5 cm, the second - the sand cushion - 4 cm, if necessary, in arranging paving with increased bearing capacity, it makes a recess by another 8 cm.

We should not forget about the arrangement of the rain slope, which is being built at the work site. Its value is one centimeter per 1 m². In addition, there is a need to make lateral indents of 8 cm on both sides. They are necessary for the installation of curbstones.
The third step in laying tiles is the installation of borders. The main requirements for them are evenness and uniformity. In addition, they must be set at a certain slope. The installation of the stone is carried out using a liquid solution. Try to strictly adhere to the markup.
Continues the installation procedure - filling the base pad. Crushed stone is used as the bottom layer, with a fraction of two to four centimeters. After its laying, tamping and leveling of the first layer follows.
When creating a surface with increased bearing capacity and strength, the pillow has a slightly different look. Sand is poured onto the crushed stone, then a non-woven geotextile is laid, which improves the quality of the pillow and prevents the sand from shrinking. Then another sandy layer, 10 cm thick, is laid on the surface. A vibrating plate or a skating rink is used to compact it. Then another layer of sand is poured, 4 cm thick, it does not require tamping. Directly on this sand begin to lay tiles.
The final process is the direct laying of tiles. To do this, a rope is pulled along which the installation of the first row is equal. Start laying solid stones, leaving gaps of a few millimeters between them. When laying each brick stone, it is required to hit it with a rubber mallet for better compaction in the sand cushion.
The laying of the next row is carried out not with whole, but with half stones. Thus, a beautiful decorative pattern will turn out. In order to achieve even seams between paving slabs, it is recommended to purchase special crosses installed in the gaps between each of the tiles.
Once the tiles are laid, backfill the joints between them with sand or a sand-cement mixture. Thus, their reliable sealing will occur. Several times it is necessary to wet the seams with water, and wait for them to dry completely.
- when carrying out work, use only special tools, because there is a risk of damage to the tiles;
- be sure to buy tiles with a small margin to compensate for damaged material;
- if it is necessary in standard bearing capacity, the tiles are laid on the surface with a dry mix or sand cushion;

Path of tiles in the country - an extraordinary solution
A simple and budget option is to independently make a path in the country from old tiles.
To create it, you will need:
- old ceramic tiles or new tiles of the cheapest cost;
- cement;
- sand;
- gravel;
- mixing tank;
- peg;
- cord;
- shovels;
- roulettes;
- level.
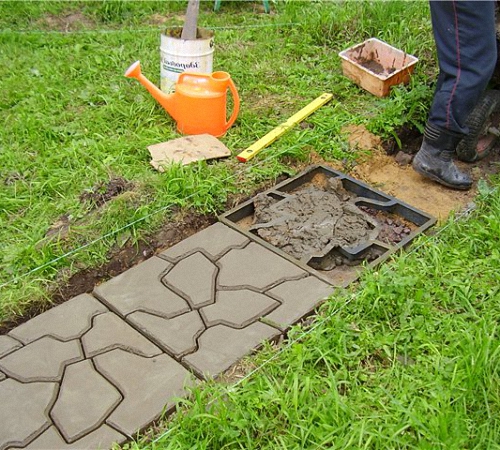
For self-production of such a track, first of all, it is required to make markings according to its width and length. According to the previously done markings, it is necessary to dig a trench, its depth is 15 cm. The trench should be sloping by one and a half centimeters. On the sides of the future path, attach a wooden formwork. Pack the bottom of the trench and level with a roller. Note that the slope must be maintained.

Pour sand into the bottom of the trench, with a layer of 5-8 cm, then crushed stone, by 6 cm. Start preparing the concrete solution, watch its consistency. It should be mushy. The surface of the track should be several centimeters higher than the surface of the ground. Level the concrete surface, get rid of excess air. Break the ceramic tiles into pieces, if desired, and install them based on your own preferences and imagination. Wait for the concrete mortar to dry completely, it will take about 6 days and use the track for its intended purpose.
Please note that this version of the track does not imply too much load on its surface, and serves more as a decorative element.
Paving slabs in the country house video:
In AllBrick you can buy paving slabs for paths to cottages at prices below the manufacturer, produced in two ways - vibropressing and vibrocasting. If you choose a product for laying paths in the garden, use a vibro-cast base, about 40 mm thick.
The most popular among customers when buying paving slabs for paths in the country are:
- snake. Moisture resistant, environmentally friendly, will last for many years. Its wavy edges are responsible for a rigid, reliable coupling with other elements of paving slabs for paths. Performs an anti-slip function, which is ideal for a hiking trail. It is easy to wash, sweep away debris.
- Classic. Squares with rounded edges, differing in thickness, shape. You can create architectural twists and turns. Differs in special durability that is suitable for any roads.
- Lawn grill. Paving slabs in the form of a lattice are suitable for decorating areas with vegetation. Such rings protect green spaces without obstructing the passage of cars. The design looks stylish and modern.
Why, having a country house or cottage, should you give preference to paving slabs?
- It is based on natural raw materials without harmful additives.
- Toxic components are not released during combustion. Also, the material does not overheat in the heat.
- A sharp change in weather will not affect the surface.
- Withstands severe frost, does not deform.
- You can make your own design, choosing the style of the design of your territory.
- Elements are easy to assemble and disassemble if you need to dismantle or lay communications.
- The gaps formed between the tiles serve as natural drainage. There will be no puddles on the road.

Our online store presents certified paving slabs for paths in the country, the prices for which do not bite, as we work directly with manufacturers. We carry out fast delivery to the place of order due to the presence of our own fleet of vehicles.
If your territory of residence is Moscow and the Moscow region, you will receive products as soon as possible.
Pay in a convenient way and only upon delivery after checking the goods.
You have the opportunity to get professional advice for free! Fill out the online form below and we will answer your questions!
The final stage in the design of any personal plot is the laying of beautiful paths. Such products carry both functional and aesthetic meaning. There are a huge number of variations in the arrangement of paths in a summer cottage, and among them you will definitely choose the most ideal option for yourself.

Features and Benefits
Tracks in the country are constantly subjected to mechanical influence, and therefore the material for their creation must be as durable as possible and sufficiently resistant to any load and abrasion during operation. It is for this reason that certain requirements are imposed on the tile:
- Its thickness should start from 3 cm, and if you are going to transport garden equipment along such paths, then from 4 cm and even higher. You also need to pay attention to the parameters of the product. The smaller they are, the stronger your tile will be. For large slabs, the possibility of rapid cracking is quite high, unlike small ones, so it is best to choose the latter option.


- The source material of the product is of great importance. It is necessary to carefully familiarize yourself with the composition of the tile itself, as well as clarify the technology of its production.


- Pay your special attention to how the tile looks, which is designed for paving paths in the country. If it is excessively bright in color, then it is quite possible that a lot of dye was used in the manufacture, which usually makes this kind of product quite loose and prone to rapid cracking. And a very smooth surface of a tile (for example, concrete) can lead to the fact that such a path on the site will become extremely dangerous in the rain or in the winter season. Excessive smoothness is usually obtained by increasing the water content in the concrete solution, which also negatively affects the quality of such a street surface.


- The styles of paths that are created from tiles can be the most unimaginable. The main thing is that they should be successfully combined with all the buildings on the site and fit perfectly into the overall design of the space.


- To highlight the natural grace of the site, the paths are best created taking into account all the plants and in harmony with all the uneven terrain. Then they can be laid in any possible direction, beautifully skirting the flower beds and surrounding small architectural forms. The versatility of such a product will allow you to decorate your backyard as stylishly as possible, and sometimes even exclusively.


- It is also best to lay country paths in the autumn season. At this time, the earth in the garden becomes dense, so it will not need to be rammed for a long time.

Kinds
There are 3 subspecies of tiles suitable for laying in the garden:
- Vibrocast. Cast paving stones are great for paving paths, but they are not able to withstand heavy loads, so they are most often used as a street pedestrian surface. During production, it can be painted in various colors, as it is made of white cement.


- Vibropressed. Such a tile is significantly inferior to vibrocast in a variety of colors and shapes, but significantly surpasses it in strength. Most often used as a road surface.


- Hyperpressed. The method of production of such tiles has a high productivity, almost entirely automated, which reduces the cost of production. This is the cheapest tile.


In addition to tiles, for paving paths in your backyard, you will also need to purchase a border to give the flooring a finished look. You will have to choose between two main types of curb tiles:
- Traditional;


- Pencil.


The traditional border is a product in the form of a rectangle of small length. They are used for horizontal mounting.
A pencil border is placed at the junction of 2 materials to create a smooth transition from one to another.
Forms and design
For the installation of neat paths on personal plots, different types of products are used. You can become the owner of a colored or one-color product, purchase embossed tiles, with outlandish patterns or perforated (with holes), with a very smooth surface or matte.
The most popular options include such types of products as:
- Paving stones. It differs from other types in ease of installation and practicality. Over time, this material will definitely acquire an interesting “aging” effect, which will look great when decorating a country-style area. Tiles of different colors will allow you to create original ensembles with intricate patterns.
- "Gzhelka"- This is an unusual model with a beautiful repetition of patterns that change in size.


- "Scales", as well as mesh and cobweb - the most original options
- "Cloud" has a pattern that copies the earthen surface.


- classic look Tiles can be either smooth or rough. The image consists of 4 sectors, which are separated by stripes. Patterned paths that pass through alleys and arches of properly selected vegetation will give a fabulous atmosphere to the entire space of the site. The area around your home, laid with symmetrical tiles, guarantees it the effect of amazing cleanliness and accuracy.
- Caso option will help create an image in the popular Gothic style.


- Parquet element has a relief surface.
- "Honeycombs" in the form of a hexagon, they require a lot of time to install, but the end result is very pleasing to the eye.


- "Wave" has a wavy carved surface and is very similar to slate.
- "Fleece" stands out with an unusual, but elegant ornament.


When installing and decorating the track, you need to consider a number of rules:
- It should be fully combined with the uniform style of the suburban area and be the main component between the various elements of the backyard area.


- Each coating has its own specific length and width, which must be taken into account in the final selection.
- Smooth paths are far from suitable for any design. Winding paths can be the best option for decor.


- It is best that the paths are set at the same level with the flower bed, lawn, or even slightly lower. Near them you can put benches and stylish lamps.


- Sculptures of birds and animals will significantly enliven the summer cottage. Also, flowerbeds or stylish borders of small flowers are used to decorate the paths.

- The tile installation scheme can be in a checkerboard pattern or in the form of a neat Christmas tree. Laying chaotically suitable for decorating the landscape in a popular rustic style.


To give a special look to your site, the paths on it should be planned and created in a well-thought-out design. You should know that the decoration of the territory around all kinds of architectural or unusual objects will look very original. For example, a platform that bypasses a small pond, laid with neat tiles, looks quite catchy in combination with pebbles.

Patterned paths that pass through alleys and arches of properly selected vegetation will give a fabulous atmosphere to the entire space of the site. The area around your home, laid with symmetrical tiles, guarantees it the effect of amazing cleanliness and accuracy.


Modular slabs can be mounted even on a regular road, and despite the fact that they will feel the load and different climatic conditions every day, such as precipitation, UV radiation, their appearance will not deteriorate even after many years of constant use.


The cost of the work may depend on the choice of a particular design style. Laying country tiles with different artistic subtleties can be called a creative matter, it requires careful development of a landscape design project. Therefore, the price of such projects is quite high.
materials
Nowadays, there is a huge amount of materials with which you can equip paths in your summer cottage. The most requested of them:
- natural stone,
- wood,
- paving stones of various types and colors,
- plastic,
- concrete,
- brick (clinker),
- gravel.

An experienced designer will tell you that you need to choose the material from which the tiles for your site will be made, taking into account the unity of the decorating style. If your dacha is made of brick, then lay a path of the same material towards it. And if you want to embody the idea of eco-design, then use wooden flat saw cuts paved against a green lawn. If you dream of creating an alley with unusual decorations, then choose multi-colored paving stones for it.
from gravel
You can start with one of the simplest ideas - laying country paths from gravel. The advantages of this option include a huge selection of fractions and colors with a minimum of costs and labor efforts.


From stone
The most versatile of all the materials presented is stone. It will suit all styles of decorating a garden plot. The most important condition is that at least one of its faces should have a flat surface. The stone alley is very durable, and this is its most important advantage.
Natural stone tiles stand out for their excellent durability and density. The most commonly used granite and marble. The "glowing" product consists of a stone with a built-in LED lamp. Such elements can easily withstand heavy loads.


from wood
Wood can also be used as a country tile. Tightly stacked wooden saw cuts look very stylish. You can use circles of different sizes. Another interesting idea is to use boards large and small. They can be painted, and if necessary, you can update your site every new season without any problems.


From paving stones
The best option for mounting the track is paving stones, which can withstand different temperatures, high humidity and significant loads. Its main advantage is the creation of beautiful patterns on the track. But if you want to save money, paving stones will definitely not suit you, since this material must be purchased with a large margin. The thing is that if a crack appears on any tile, it can no longer be used. Even an imperceptible crack will give a significant deformation, which will spoil the appearance of the track.


from brick
If you like patterned alleys, you can use ordinary brick as a building material. Such a “tile” for a path in the country is installed on a solution, which distinguishes it from other types. Without fail, it will be necessary to install a curb on the sides of such an alley, otherwise it will “disperse” in 2-3 years. Another option is to use clinker bricks. This is a very popular material for country paths: it costs a little, is easy to install and has a pleasant range of colors.


Made of rubber
In the production of rubber plates, raw materials from the processing of tires from cars are actively used. Such tiles are distinguished by noise-absorbing qualities, and also have high frost resistance and resistance to moisture. Since rubber is considered a highly paintable material, different types of crumb rubber tiles can have an extensive color palette.


Concrete
Concrete is a truly versatile material from which you can make amazingly beautiful things. To create a garden path from unusual concrete slabs, you only need cement mortar and an ordinary form with a unique decor. Special forms for creating concrete garden paths can be purchased today at many hardware stores. With their help, you can arrange comfortable paths throughout the garden or house adjoining area with your own hands.


Made of plastic
Plastic tiles are produced from a mixture of sand and polymers. The material has excellent strength and anti-slip characteristics.
On the modern market there are several types of plastic tiles for paving paths:
- perforated (lattice) plates;


FORUMHOUSE users are well aware that life outside the city is not only a pleasant pastime in a hammock in the garden, but also constant household chores. Everyone equips their "ten acres" to their liking. And if the creation of landscape design is a matter of personal preference, then garden paths are simply vital in any personal plot and in any country house. Indeed, in addition to purely decorative purposes, it is the paths that allow us to move freely around the site, regardless of the season.
Therefore, the materials for paving garden paths are subject to increased requirements, such as durability, safety, environmental friendliness and presentable appearance. All these requirements are met by paving slabs. Expert advice and step-by-step instructions from users of our forum in this article will help you lay tiles for the path in the country on your own!
How to make a tile walkway. Planning.

Any construction should begin with careful planning of all works. The laying of paving slabs will not be an exception. First of all, you should pay attention to the following points:
The total number of tracks and their location on the site. Tiles for the path in the garden.
The key rule can be formulated as follows: "The central path in the garden should lead from the entrance to the site to the house." If there is a garage, a workshop or a gazebo on the site, then you should put paths to them. Thus, you can ensure the zoning of the site, ensuring unhindered access to each building.
Pavement Width

The path leading to the house should be so wide that two adults walking towards each other could easily pass each other on it. On average, this value is from 1 to 1.5 meters.
Paths that are not used so often and lead to flower beds or beds can be made 0.5 to 0.8 meters wide.
You should also clearly define the functional purpose of the tracks.

Denis Bogdanov Landscape improvement specialist, nickname on the forum Denis Vlad-ch
- For myself, I clearly divide the paths into decorative, leading to the gazebo, and functional, which are under heavy load and lead to the house or garage.

Paths that are under heavy load require more careful preparation of the base than those tracks that are used from time to time.
Denis Vlad-ch
It is also necessary to consider how you will care for the garden path in winter and autumn.
Unlike a bulk path, paving slabs are easier to care for. When removing snow and fallen leaves, you will not throw rubble aside.


The second most important, after functionality, characteristic of a garden paving path is how pleasant it is to walk on it. And in order to understand this, you can use the secret of landscape designers.


Vladimir Petriv Director of Petriv Landscape Design
I always advise you to first walk along the pre-marked paths and make sure that everything is comfortable, and it is convenient for everyone in the household to move along them. I can say that after such a “walk”, you almost always have to make adjustments to the original plan for marking the track.
In addition to determining the functionality of the garden path, you must choose the thickness of the tiles. And here it is better to adhere to the following rules.
How to make a sidewalk: step by step instructions
In addition to determining the functionality of the garden path, it is necessary to choose the thickness of the paving slabs. And here it is better to adhere to the following rules.

Konstantin MerzlyakovExpert of the plant "Factory GOTIKA", Moscow:
For garden paths and the adjacent territory, where passenger vehicles do not drive, the paving slabs of the path can be no thicker than 40-50 mm. And for a path that provides passage for a passenger car and parking, the thickness of the tile must be at least 60 mm.


Vladimir Petriv:
The initial preparation for laying garden paths is usually associated with excavation, and this should be linked to the geoplastics of your site. With large elevation differences, slopes, etc., it will be necessary to move and remove large masses of land - a very costly event that requires the use of construction equipment

Geoplastics is the artificial formation of the relief and architecture of the site.
How to lay a tile garden path. Recommendations of experts.
Paving slabs are an environmentally friendly and durable coating for a garden path. And its durability and beauty, first of all, will depend on the quality of paving slabs and compliance with the laying technology. Tiles on the tracks can be done with your own hands.


Konstantin Merzlyakov
Modern paving slabs are made of concrete. The shape of the tile can be absolutely any, which allows you to successfully fit garden paths into the landscape design of any site.
The service life of concrete vibropressed tiles is on average 15 years, provided that the base is properly prepared.
And, like any coating, paving slabs require care during operation (cleaning, the use of water-repellent coatings, etc.).
The first stage of preparatory work for laying paving slabs is the breakdown of the contour of the area to be laid and the setting of control "beacons". The corners of the territory, binding to the available areas, slopes are taken into account. After the work has been done on the breakdown of the contour, they begin to prepare the base, which includes the following types of work: layout, installation of the carrier layer, installation of borders and the installation of a leveling sand layer under the tile.
Sidewalk paths with their own hands

We make a path from paving slabs in the following step-by-step sequence:
- Earthen boxes are torn off under the side stone;
- A side stone is installed around the perimeter of the site. The curb stone is necessary for a strong fixation of the paving slab web;
- The underlying layer is poured;
- The foundation is being laid;
- The tile covering is laid;
- The tile joints are filled.
It is also necessary to remember that when laying tiles, the following standards should be followed.

Alexander LoginovTechnical director of the company TD BRAER
Work on the installation of pavement should be carried out in accordance with SNiP 3.06.03-85 "Motorways" and SNiP III-10-75 "Improvement of territories".

And the independent laying process can be divided into a number of successive stages.
- Planning and designing a garden path. It is necessary to determine the type of soil on the site. Then develop the layout of garden paths, choose the design and pattern of the tile layout;
- Calculation of the cost of the necessary materials;
- Carrying out work on laying a garden path.
 Tiled garden paths.
Let's consider each of the points in more detail.

Alexander Loginov:
The choice of tile laying method depends on the state of the country soil and the subsequent operating conditions of the site: the blind area of the building, the pedestrian zone, the area for driving and parking cars, etc.
It should be remembered that the result of your work, first of all, will depend on the thoroughness of the preliminary marking and preparation of the base for laying tiles.
Planning includes the following:

- draw the layout of the area to be paved;
- measure the area in order to apply dimensions to the plan;
- based on the above points, calculate the required number of tiles for laying, as well as the amount of materials for preparing the base of the track from tiles with a border.
After developing a plan, they begin marking future tracks.

Alexander Loginov
First of all, determine the direction of the water flow. Please note that water should go along the blind area of the building or along the path to drainage wells or lawns. The slope can be made longitudinal, transverse, longitudinal-transverse, but not less than 0.5%, that is, 5 mm per meter.
The direction of the slope must be such that water flows from the paving into the drainage systems or onto the lawn, but not towards the building!
After the place for laying the tiles is determined, the boundaries of the track are marked. To do this, pegs are driven in along the boundaries of the site, along which a cord or fishing line is pulled. After that, you can start excavating the soil, adhering to the following recommendations:
- Excavation is carried out so that after laying the front surface of the tile reaches the specified level of your site;
- The platform formed after excavation is leveled and rammed;
- If the soil is soft, it must be moistened (spill with water from a hose) and compacted.

Vladimir Petriv
Drainage and drainage into a stormwater or storage well must be thought out and installed at the preparatory stage of laying garden paths.
Tiling garden path

Konstantin Merzlyakov
When laying paving slabs on a complex curved surface and with a large difference in height, it is necessary, when planning, to lay a larger percentage on the consumption of tiles (cutting, fitting, etc.).
Pavement base preparation
The most important step in laying paving slabs is the preparation of the base. The right foundation will not allow the track or platform to “sag”, ensuring their longevity. It should be borne in mind that, despite the tight seams between the tiles, the base is still saturated with water. Therefore, a permeable drainage bearing layer (gravel, crushed stone) is needed at the base. Then part of the water from the surface will be diverted through the paving stones and the carrier layer into the soil.
 How to make paths from tiles.
It is also important to understand what layers the correct version of the tile base pie consists of.

Alexander Mishin Expert of Wienerberger Brick
The cake consists of several layers: a natural soil base, a subbase, an underlying layer, a “bed” and, in fact, a “sidewalk”.
"Bed" is a layer of sand or fine gravel. The subbase is a bulk layer of soil, and the underlying layer consists of gravel or crushed stone.


Alexander Mishin
The thickness of the "bed" for any type of soil base is on average 3-5 cm. The thickness of the remaining layers should be formed based on such indicators of the soil base as moisture, density and composition.

Alexander Loginov
For the main carrier layer, a frost-resistant, homogeneous material (crushed stone, gravel) is used. This material must be laid evenly in height and with the required slopes.
To build an ordinary pedestrian country path, you will need to make a carrier layer 10-20 cm thick. When arranging platforms for driving and parking cars, a layer of 20-30 cm is used. Under heavy loads, the carrier layer increases and is placed in 2-3 layers, each layer is compacted vibrating plate or vibrating roller.

As mentioned above, the method of preparing the base largely depends on the expected load on the garden path. It is also necessary to take into account the bearing capacity of the soil.
 Oleg Novitsky, a user of our forum, advises how to build a pavement path from tiles with difficult soil: if there is so-called heavy or clay soil under the base, or you have a swampy summer cottage, then the thickness of the crushed stone base must be made at least 10 cm.
Then the geotextile is laid.
Geotextiles pass water well and do not allow materials to mix (mixing of materials leads to the formation of voids and dips in the coatings).
Alexander Mishin
The use of geotextiles is appropriate when the natural soil base is located in a swampy area and has high humidity. A layer of geotextile is arranged over a natural soil base.

The next layer of our “pie” is sifting on a geotextile base.

Oleg Novitsky
We fill the area with screenings (or sand). The screening layer must be at least 10 cm. This layer must be very carefully compacted. At this stage, it is necessary to accurately level the entire base for laying using a rule or other tool.
Screening has a not very good property - caking. This means that over time the base becomes almost monolithic, and then, due to its low strength, it cracks, and cracks and shells form in the coating. To avoid such a nuisance, use a vibrating tool for compaction and ramming and do not work in rainy weather. The best screening for such work is dry.
Then we proceed to create the foundation level, guided by the following algorithm:
- The boundaries and center lines of the site are marked with a rope;
- Loose sand can be leveled just below the edges of the curb;
- We compact the resulting pillow with a vibrating plate.


Oleg Novitsky
An electric or gasoline vibratory rammer with a rubber sole is well suited for compacting a layer of sand. Using it, you can not only prepare a gravel-sand cushion with high quality, but also avoid further subsidence and soil collapse under the laid tiles.

Alexander Loginov
It must be remembered that all layers of the base are poured, leveled and compacted, taking into account a 0.5% slope!

The preparatory stage is completed by backfilling with river sand or a cement-sand mixture. To do this, a layer of clay-free river sand 1-2 cm thick is poured onto the base without compaction, the layer must be loose.
CPS (cement-sand mixture) is taken in a ratio of 1:8-1:10, because cement is needed to bind the sand so that it is washed out with water.

Alexander Mishin
The use of a cement-sand mixture as a "bed" is justified only if heavy traffic is expected on the surface of the tile. The garage and pedestrian zone of a private house does not belong here, because. traffic and load are not so intense here.
Paving slabs
In order for the garden path to be durable, and the tiles on it lie evenly, its laying by the summer resident must also be divided into several successive stages. 
Laying starts:
- from the bottom point;
- from optically important boundaries;
- from conspicuous elements: a porch, the main entrance to the house;
- manual laying of tiles is done diagonally away from you, so as not to disturb the prepared top layer.
Before starting the laying of the first row of tiles, in order to maintain the exact location of the joints, it is necessary to stretch the cord over the entire length and width of the object. After that, adhering to the cord, proceed with the installation.
It is recommended to check the location and straightness of the joints every three rows of laid paving slabs. Laying is carried out using a rubber mallet (mallet) with light blows on the tile. Every 3-5 sq.m of laid, but not yet compacted paving slabs, its surface is controlled using a two-meter rule or building level.


Alexander Loginov
Curb stones should be used as framing paths on a suburban area. These fences must be made before laying the outer part of the path to prevent transverse displacement and settlement of the tiles.
Along the edges of the marked area of the trail, along a stretched cord, dig a trench of small size and depth (so that the curb enters this trench to the required level). The base of the trench must be tamped, backfilled, and the curb placed on concrete.
The border can be visible or hidden - it depends on the desire. If the border is hidden, then it must be placed so that the top of the tile exceeds the top of the border by the height of the chamfer.

Oleg Novitsky
To reduce the number of tiles to cut, start the longest row from the curb, laying whole tiles right up to it. The resulting voids should be exactly half of the tile. When cutting from one whole, you will get two necessary halves, and, I believe, waste can be completely avoided. This technique can be used for curly symmetrical tiles.
The biggest enemy of any paving slab is freezing water. Therefore, it is impossible to lay tiles on monolithic, waterproof bases, concrete screed. In the open air, it is forbidden to lay tiles on the mortar.
Sealing and vibrotamper
After laying the tiles, the coating is compacted with a vibrating plate. After the first vibration compaction of the coating, dry, sifted clean sand is poured onto the surface in such a way that the sand is easily and densely poured into the gaps between the tiles. Scattered sand is spread evenly with a brush over the entire area and hammered into the seams, “tying” the entire coating into a single whole.

And in order to build a durable coating, when working, you must adhere to the following recommendations:
- Do not lay tiles in rainy weather without a special canopy.
- Do not fill the joints with a mixture of sand and cement.
- If the site has a "complex", heaving soil, it must be borne in mind that its displacement can deform the tile. Then a more complex laying is carried out - with a phased preparation of a concrete pad as a base, which guarantees durability.
Thus, when laying garden paths on your own, you need to take into account every little thing and carefully plan all stages of work. After all, the path to your home begins with a garden path made!


 chancre look like?")
")


