The basement is one of the most important parts of a private house: it is designed to protect the house from deformation, withstanding temperature extremes, as well as numerous climatic precipitation. Therefore, the lining of the foundation plays an important role in the construction of the house. In this article, we will give instructions on how to finish the plinth with your own hands.
Finishing material

For the design of the basement are most often used:
- Artificial or natural stone.
- Siding.
- Tiles or panels for facade decoration.
- Professional sheet.
- Special coatings.
The choice of this or that finishing material is determined both by the preference of the owner of the house and by his financial situation.
Artificial or natural stone

It is made from concrete mortar using certain dyes, as well as additives that allow the finishing material to withstand temperature changes. Facing the basement with artificial stone has several advantages:
- The effect of finishing with natural stone.
- Inexpensive cost of finishing materials.
- Long service life of artificial stone due to the increased strength of the material.

Natural stone is much more expensive than artificial, but it itself has a higher strength than artificial. Most often used in decoration:
- Granite.
- River (sea) stone.
- Sandstone.
- Marble.

siding finish
Recently, such a finishing material as siding has become increasingly popular. It is a panel made of pressed polymer composite with the inclusion of various additives that give strength to the material. Siding has a number of undeniable advantages:
- Increased strength.
- Resistance to various climatic precipitation: rain or snow, and temperature extremes.
- Not demanding to care.
- Allows installation in any weather on any type of plinth.

If necessary, you can carry out preliminary work on the insulation of the basement.
Tiles or panels

Tiles or panels for exterior walls provide a wide opportunity not only for finishing, but also for decorating a private house. Such a finishing material is made of dense concrete with small pores, which significantly increases the strength characteristics of the tile. A wide selection of colors allows you to choose the right shades suitable for this home.
profiled sheet

Profiled sheets are often used in decoration. However, in no case should it be used if the house is built of wooden beams. Since the profiled sheet is susceptible to corrosion when moisture gets on it, it can contribute to the rapid decay of the wooden basement of the house.
Finishing process

Depending on the type of foundation and the selected finishing material, the finishing technology may vary.
The plinth, made of natural stone, does not need finishing. However, the foundation of concrete or brick requires finishing work. The pile foundation needs a reinforced frame on which the finishing material will be laid. A wooden house cannot be finished until it shrinks.
If a pile foundation was erected during the construction of the house, you first need to build a frame around the base. To do this, you can use both wooden slats and galvanized metal profiles.
Wooden slats are short-lived. Therefore, making a choice in their favor, you need to understand that in a few years you will have to repeat the finishing work along with the replacement of the frame.
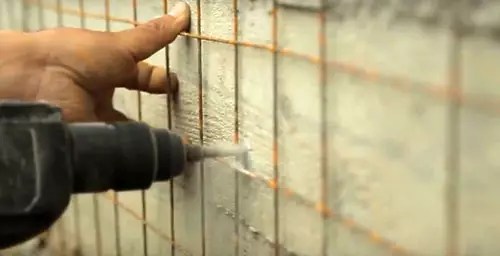
The frame is fastened on piles using self-tapping screws. A heat-insulating material is attached to the frame, which is primed with a special moisture-proof finishing material.
A concrete or brick foundation needs preparation: it must be cleaned of dust and dirt; its surface must be leveled with a special mortar. Only after that a moisture-proof primer is applied, on which the selected finishing material is subsequently laid.
Each finishing material for the foundation of a private house needs a proper fit on the basement of the building. For example, tiles or panels for the facade require the use of a certain type of adhesive solution. Natural or artificial stone is "planted" on a concrete solution. The siding can be attached with either glue or self-tapping screws. Some types of panels or tiles for facade decoration have special grooves and ridges with which the elements are mounted with each other. In order for the finishing material to be kept on the plinth, it is necessary to support it with the help of special rails or overlays.
If finishing is planned, it should be borne in mind that it is desirable to make the plinth in a darker color than the main color of the facade. Some materials - for example, natural stone, need additional treatment with water-repellent agents that will extend the life of this finishing material.
A photo


Video
From this video you will learn how to finish the plinth with siding.
What material is best for facing the basement of a house? This question worries many who are faced with the need to finish this design. The plinth encircles the entire house and is an important element that protects the building (especially its lower part) from the harmful effects of the environment. In addition, it plays an important decorative role.
There are several types of basement at home, each has its own characteristics. Various forms are shown in the photo:

- sinking. This variety is a structure that is located with an offset inward in relation to the main facade. The recess is most often at least 50 mm. Such a device allows you to perform work at low cost, as well as make the drain less noticeable.
- In one plane. This option requires complex sealing, so the drain system must be fixed at the stage of general construction. This will avoid further problems.
- Speaker. To sheathe such a basement at home with your own hands, it is necessary (as in the previous version) to think over the drain system in a qualitative way. If it is not installed correctly, water accumulates in the area where the foundation and wall are separated. To avoid such troubles, moisture removal is planned taking into account the finishing of the facade.
 Drain device for a protruding plinth when finishing the facade with siding
 On a note! When choosing a material for cladding, one should take into account the design features.
The need for finishing
If the finishing of the foundation of the house has not been completed earlier or the old cladding has become unusable, then the outer cladding must be made. Its main functions:
- Protecting the foundation of the house from environmental influences (precipitation, sunlight, wind). This allows you to significantly increase the durability of the entire structure.
- Additional insulation. If required, a layer of thermal insulation is created, which can be associated with the insulation of the blind area. This procedure not only improves the energy efficiency of the building, but also saves it from many problems. The top facing layer will hide the insulation and serve as an additional barrier against the penetration of cold.
- Decorative. An area finished correctly and with suitable material can emphasize the overall direction of the design.

Based on these parameters, the building products necessary for the work are selected.
How to sheathe the foundation of the house outside?
The material for the base is purchased taking into account the following factors:

Also pay attention to the manufacturer of the product and the place of purchase. It is better to give preference to trusted brands and specialized outlets.
Types of finishing materials for the plinth and features of their installation
When choosing a material, you need to consider the method of its installation. There are options that are mounted directly on the walls, but there are also those that require the construction of a frame.
Materials for finishing the foundation, installed on the crate, are relatively new products. This list includes types that differ in technical characteristics.

Panels
This includes panels made of different materials, it is customary to include siding and corrugated board in this group. When choosing, it is better to give preference to options that are made specifically to finish the base. They have more stable characteristics and may include an additional layer of thermal insulation.
 Plinth cladding with decorative panels
 Among the advantages of the products are:
- Availability. Indeed, it is this variety that makes it possible to perform work inexpensively. This option allows you to get a balance of price and quality. But it is necessary to refuse products with too low cost. Most likely, they are made of low-quality plastic, which will quickly become unusable.
- Ease of installation. Paneling occurs with the help of a tool that every home master has, so you do not need to involve specialists for work.
- Possibility of additional thermal insulation. Installation on the frame solves two problems at once - ventilation and insulation. This will save the coating from freezing, reduce heat loss and the likelihood of mold and mildew.

- Decorative. Panels, especially plinth ones, have a well-defined imitation of natural materials. That is, the lined area fits perfectly into the design idea and the environment.
Attention! The choice of inappropriate products can greatly spoil the result. For example, corrugated board for such a process must have increased rigidity, that is, have a durable top coating.
Porcelain stoneware and types of tiles
Porcelain stoneware and clinker tiles in the form of large parts are mainly used for plinth cladding. The second option can also be laid by the wet method, then fragments of the material are used. Porcelain stoneware, due to its large weight, is installed only on the crate, while it must have increased reliability.

Advantages of porcelain stoneware and tiles:
- Small load on the building. This effect is achieved due to the frame, which takes on the main pressure.
- Fast installation. It is possible to revet the foundation of a house in a short period of time, but it is extremely problematic to do this without a certain experience. Porcelain stoneware needs to install special fasteners, which is not always possible without understanding the process. The tile is fixed much easier, for this there are special metal ears.
- Durability. The service life of such materials for the foundation is calculated in decades.
- Moisture resistance. Parts do not absorb water well, so they are not subject to deformation.
Such materials for the foundation have a significant disadvantage - high cost. You do not need to purchase cheap tiles, as this often indicates poor quality. For work, a variety for the street with the "Snowflake" icon is used.
An alternative to tiles can be artificial stone. Elements are installed on the crate through special holes or directly.
On a note! At the moment, thermal panels are becoming increasingly popular, which combine the advantages of panels and tiles. They are a base with insulation, on which clinker tiles are applied.

How to sheathe the foundation using crates
All options for finishing the plinth, which involve installation on the crate, have a common technology for sheathing the structure:
- Work begins with the preparation of the foundation. It is cleaned of dust and dirt, all cracks are carefully covered with putty. If there is serious damage, then before finishing the basement of the house, it is advisable to strengthen the foundation.
- Due to the fact that this part of the building is exposed to more moisture, it is treated with antiseptics. It is better to impregnate in several layers.
- After preparing the surface, the frame is erected. For this purpose, a wooden beam or a metal profile can be used. It is important to consider that wood needs to be treated against rot, and metal parts cannot be cut with a grinder, this leads to corrosion.
- Racks are installed perpendicular to the direction of laying the material. If the products have the same sides, then the vertical method is considered preferable.
- A heater is placed in the resulting cells. It is fixed on special anchors.
- Vertical connections are mounted between the racks of the frame and a place is left for installing a low tide.
- The material for finishing the plinth is laid in several ways: overlapping, by means of a tenon-groove connection, on special brackets or clamps. Fixation is made on self-tapping screws. If the products are subject to thermal expansion, then the fasteners are loose.
- The tide is installed.
For the foundation trimmed with panel elements, additional moldings are used. They are installed at the corners for a better decorative look.
Frameless way
It is possible to clad the basement of a house without the help of a frame; for these purposes, different product options are used.
Brick
Features of the material application:
- Great for pile or block foundations. But for the installation of brickwork, it is necessary to create a reliable support.
- The resulting coating has good resistance to external influences.
- Products with low moisture absorption are used for work. If this parameter is not taken into account, then the surface is deformed.
- This type of plinth finish does not differ in affordable cost, and certain experience is required for work.

Masonry creation algorithm:
- The coating is being prepared.
- If there is no reliable support, then a foundation block will do. He burrows into a prepared pit. This is especially true for pile foundations.
- Waterproofing is laid on top of the base. In this capacity, roofing material can act.
- The first row is mounted after a thorough level check. In this case, the spoon version of the masonry is more suitable.
- To ensure reliability, a bunch is arranged. For this, anchors are installed in the foundation. If this method is not possible, then a wire with fixation on piles is used.
- The tide is installed.

The difficulty lies in the need for reliable laying of bricks.
Artificial and natural stone
Facing the foundation with artificial or natural stone is not an easy task, especially for the second option. Both varieties have excellent technical parameters in terms of durability and reliability, but natural products need more careful maintenance and are expensive.

Laying natural stone is carried out as follows:
- Regardless of the type of finish, the surface must be carefully prepared.
- Due to the heavy load, the foundation should be covered with a reinforcing mesh and covered with a layer of plaster.
- Laying of parts occurs after drawing up the markup. If the fragments are irregular in shape, then they are first laid out on a flat area.
- Fixation is carried out on a special glue, which is applied to the surface, the wrong side of the parts is slightly moistened.
- A small gap must be left between the fragments, it compensates for thermal expansion.
- If required, the joints are grouted and the tide is installed.
According to a similar principle, the basement of the house is finished with artificial stone and tiles.
Plaster
Plastering is the most economical option that allows you to perform work without the involvement of specialists and sophisticated equipment. For this process, a special type of mixture for external use is used.

On a note! Finishing the foundation with your own hands using plaster is carried out in two ways: without additional thermal insulation and with insulation.
General technology of work:
- The surface is being prepared.
- A layer of glue is applied on which the heat-insulating material is fixed.
- After the composition dries, the insulation is additionally strengthened with special dowels.
- Next, a small layer of mortar or glue is applied to the surface, after which a thin reinforcing mesh is stretched. It should be completely covered with the mixture.
- The surface is left to dry.
- The final layer is plaster. A spatula is used for its application, and a rule for leveling.
- At the end of the work, the surface is covered with a protective layer of paint.

This method allows you to bind the insulation to the thermal insulation of the blind area.
Plinth decoration
Decorative finishing of the foundation is considered an integral part of the process. The following options apply:
- Coloring. It is carried out even after the passage of time. You can choose a shade that is most suitable for the cladding of the house and favorably highlights the plinth.
- The use of decorative or textured plaster. Such material is tinted and may include a fraction of natural stones or sand. It gives an unusual effect when applied correctly.
 Decorative plaster in the design of the basement
 - Creation of a relief surface. For this, simple facade plaster is used, on which an imitation of stone or brick laying is formed. Additionally, staining is carried out in different tones.
- The simplest is the use of materials with the desired imitation.
Working with a plinth is a rather complex undertaking, the basis of which is the correct choice of products.
The basement is the lower part of the facade of the house. The main purpose of the plinth is to provide reliable protection of the facade from all kinds of pollution and various kinds of damage. It is for this reason that the structural element in question must be made of reliable and durable materials. At the same time, the lower part of the house should be beautiful. To solve this problem, you can use a wide variety of materials. At the same time, finishing the base without any problems is done by hand.
Regardless of which material you decide to use to finish the plinth with your own hands, before starting work, the base must be cleaned of any kind of dirt and carefully leveled. To eliminate depressions, use a special leveling solution. Knock down the protruding parts in a convenient way.
The surface of the base must be impregnated with a primer emulsion. Without such treatment, the plinth will absorb moisture from the adhesive solution, which will not have the best effect on the reliability and quality of the cladding.

Some finishing materials, for example, artificial stone, must be treated with special water-repellent compounds before installation. They will help to reduce the water absorption index of the finishing material and increase the resistance of the cladding to various contaminants.

A large selection of water repellents is available for sale. These are colorless solutions that can be applied with rollers, brushes and other convenient tools. On the lining treated with a high-quality water repellent, moisture will simply flow down without being absorbed into the finish and leaving no marks on it.

A plinth with a similar cladding looks very much like a wall laid out of simple clinker bricks. But the tile has a significantly lower weight and is much thinner compared to the mentioned brick. The thickness of the tiles usually varies from 8 to 20 mm. The width and length are most often the same as those of clinker bricks.
First step. Determine your starting level. To do this, add the value of the width of the future seam to the width of the element, and then divide the height of the finished plinth by the resulting value.
To make the calculation principle more clear, consider the following example. The height of the plinth of the house is 400 mm. The width of the tiles used is 65 mm. Seam width - 6 mm. In total, you will need to stick 6 rows of clinker tiles. The starting level must be set aside 26 mm below the planned ground level.
As a result, there will be approximately a 6 mm gap above the last top row of cladding. You will fill it with polyurethane or acrylic composition.

Second step. Lay the cladding over the entire surface. Lay out in even horizontal rows. For fixing, use an elastic adhesive solution with frost-resistant properties. Apply the solution with a notched trowel to both the plinth and the tile.
Do not cover a large area with glue at once. It dries on average in 15-30 minutes. Usually, during such a time, it is possible to veneer about 1 m2 of the base. Leave the finished lining to dry for about 2-3 days.


Third step. Fill the joints with an elastic mortar specially designed for jointing clinker. The composition must necessarily have frost-resistant properties.
Such tiles do not require treatment with water repellents and.
The finished cladding will be somewhat recessed into the surface (after the appropriate finishing of the outer walls), so there is no need to equip a molding cornice.

Stone cladding has a chic appearance, but requires significant financial costs. Most often, limestone or sandstone is used for plinths. The most expensive and luxurious option is marble or granite cladding.
Finishing elements can have a variety of sizes and textures. At this point, focus on your taste. Sandstones and limestones require pre-treatment with water-repellent compounds.

The procedure for stone cladding is very similar to tiling and is done in a few simple steps.
First step. Determine the lower level of the stone attachment. The calculation is the same as in the case of the facing of the previously considered tiles.
Second step. Apply a mortar for gluing the stone to the pre-cleaned base. The same solution must be applied to the reverse side of the cladding elements. Use strictly glue to fix the stone. The use of other compounds will cause the formation of cracks in the finish and very quickly lead to peeling of the tiles.

Choose the width of the joints according to the size of the tiles. Between the small elements of the cladding, leave seams of half a centimeter. A 2 mm joint is sufficient between large tiles.

Third step. Fill the seams with a special compound for jointing. Make sure that the composition is frost-resistant and elastic enough.

If the plane of the base protrudes against the background of the general plane of the house, be sure to install a protective molding cornice. Without it, your lining will begin to crumble after the first frost.
Externally, such material is as similar as possible to its natural counterpart. Special additives and various kinds of aggregates make it possible to obtain a finishing material with excellent performance and properties, and dyes - to choose a lining that fits perfectly into the landscape.
A large selection of materials is available for sale in various forms, imitating a variety of materials.

Facing is carried out in almost the same way as in the case of tiles.
First step. Apply adhesive to the previously cleaned surface of the plinth and directly to the cladding. Glue can be used elastic or regular. Select the specific composition in accordance with the recommendations of the manufacturer of artificial stone.

Coat the entire surface. You can make the seams as narrow or wide as you like.
Second step. Fill the seams with a solution specially designed for this.

Third step. Coat the finished cladding with a water-repellent compound. Also, the cladding elements can be subjected to such processing before they are mounted on the wall - there is no difference. Thanks to this treatment, even after a few years, the finish will look almost like new.
In the end, all that remains is to install a low tide to protect the basement from precipitation.

This is a relatively new finishing material. Outwardly, it can imitate "torn" stone and decorative brickwork. Such a tile is characterized by a small mass, which allows it to be successfully used even for facing structures with a low bearing capacity.
The cladding under consideration is characterized by sufficiently good plastic properties, which eliminates the risk of cracking and various chips. The tile is resistant to moisture and negative temperatures. Pre-treatment with moisture-repellent compounds is not needed.

First step. Attach the elements of the crate to the previously cleaned base. Collect the crate from wooden slats. Choose the step between the slats in accordance with the dimensions of the cladding elements used.
Second step. Fill the cells of the crate with heat-insulating material. If the basement insulation is not included in your plans, you can also not do the crate. In this case, the tile will be attached directly to the wall.
Third step. Start fixing the polymer sand tiles from the bottom corner of the base. Use screws to fix. Attach the tile to the crate or wall material of the house, depending on the chosen installation method. Complete the cladding of the entire plinth.
An additional advantage of using polymer sand tiles is the possibility of laying insulation simultaneously with the lining.

Externally, this material can successfully imitate sandstone or clinker bricks. The big advantage of this tile is its surprisingly small thickness - 3 mm. The material is characterized by good flexibility, it can even be used for facing arched bases. Also, such tiles can be safely bent at the corner joints of the walls, which greatly facilitates the work.
If necessary, the tiles can be easily cut with scissors. It can be glued to plaster, concrete base and even to insulation. Tiles can have a corrugated and smooth surface. A good selection of colors is available.

First step . Determine the upper level from which you will begin the installation of the cladding elements. The best option is laying a whole number of tiles. Therefore, determine how many horizontal rows of tiles you can glue to your plinth, determine their total height, and then subtract the smaller value from the larger one. So you determine the desired gap.
Set aside the required clearance from the top of the base. Finally, you will fill the remaining gap with acrylic or other suitable compound.
Second step. Start gluing tiles. Start mounting the elements from the corner of the plinth. Apply glue with a notched trowel already familiar to you. Glue 4 rows of cladding at once in one go.
Seams may not be filled. The protruding glue will perfectly cope with the functions of the filler. You just need to carefully distribute it at the seams with a brush.
Third step. Protect tiles from rain. To do this, the lining can, for example, be covered with plastic wrap. The protection can be removed after the glue has completely dried, i.е. after 2-3 days.

Outwardly, such a lining practically does not differ from finishing with natural materials, while it costs much less. To protect the plinth, be sure to install a rain eaves (low tide).

Such plaster compositions have a granular structure. The grain size can reach 3 mm and even a little more. After applying the solution, a pattern is formed on the wall, similar to a multi-colored mosaic. The function of the binder is performed by the resin. Thanks to it, the finish simultaneously receives vapor-permeable and moisture-proof properties.

Mosaic plaster is not afraid of frost and various mechanical damage. It is forbidden to apply such a composition to heat-saving and lime plasters. The base of various artificial materials is also not suitable. The best base option is concrete and other substances based on mineral components, gypsum, cement and, of course, lime-sand plasters.
First step. Prepare the solution according to the manufacturer's instructions. Also prepare a tool for applying the composition - a stainless steel grater.
Second step. Start applying plaster from any convenient angle, preferably from above. The layer must have the same thickness. Directly the thickness of the finishing layer should be equal to the size of the grains contained in the plaster.
The applied composition must be smoothed with a grater until it dries. The plaster is applied and rubbed in exactly the same direction.

Third step. Treat the coating with a quality water repellent.
Up to 8 kg of plaster mass can be used to finish 1 m2 of basement. The specific consumption depends on the size of the crumb.
Thus, the finish of the plinth can be made using a wide variety of materials. At the same time, there is absolutely nothing complicated in arranging any available cladding. You only need to follow the instructions and be attentive to the procedures performed.

PVC panels are great for facing small cottages and country houses. In particular, plastic blends well with siding. PVC panels are lightweight, easy to process and do not cause any trouble during installation.
First step. Fix the crate on the wall. It can be metal or wood. Choose the material with which you are more comfortable and easier to work with. The wood must first be impregnated with an antiseptic. Choose the step of the crate according to the dimensions of the panels.

Second step. Start attaching the panels. Start trimming from the bottom of the plinth. To fasten the cladding panels to the crate, you can use self-tapping screws or even liquid nails. Between themselves, adjacent strips are fastened with factory ridges and grooves. Coat the entire surface.

Siding (PVC wall panels)
Third step. Close the upper border of the base with a special patch profile.
Fourth step. Cover the corners of the plinth with corner pieces.
Additional processing of the cladding with a moisture-repellent composition is not carried out. For cladding, you can use panels of different sizes, choose to your taste.
Successful work!
Video - Do-it-yourself plinth finishing
usually protrudes above the ground. This part needs to be finished not only for aesthetic purposes, but also for practical purposes. We will look at six of the most popular options with detailed installation instructions.
The strip foundation is a concrete mix with metal or crushed stone and gravel filler. Firstly, such a surface looks unattractive, even if its edges are perfectly even. And they are rarely even - depending on what kind of formwork was used when pouring. Usually there are traces of shields and.

Based on this, we designate the tasks of finishing the basement:
- it must protect the surface of the fill from and, the scorching rays of the sun and winds;
- cladding hides not only all the flaws of the foundation, but also a layer;
- and finally, decorative cladding should match the general and decorate the building.
The basics of self-finishing the basement of a private house
Before talking about how to sheathe the basement of a house from the outside, let's dwell on the basics. First, the installation of the cladding can be dry and wet. In the first case, the material is attached to or directly to the concrete surface using fasteners. The second option requires the installation of battens and the use of building mixtures.
The second essential point is to take into account the climate of your region.

It is important that the plinth sheathing does not absorb water and does not let it through to the surface. Another nuance - the cladding should not lose its qualities under the influence of reagents that are used in winter.
Advice! Considering the operating conditions of the facing material, its choice must be approached with all responsibility, trusting trusted manufacturers who guarantee the quality and durability of the product.
Features of the choice and use of natural stone for lining the basement
The most respectable and expensive in decoration is natural stone. Construction professionals recommend not using loose rocks, such as shell rock and limestone, to decorate the basement. They will soon lose their presentable appearance.
For this purpose, dense frost-resistant material, preferably dark in color, is suitable.

Magmatic gabbro and granite are best suited in this regard.
Important! In finishing with natural stone, an important condition is reliable sealing of joints and seams. If marriage is allowed, moisture will seep behind the cladding and destroy the base.
Features of choosing natural stone for outdoor decoration
Natural stone must match in color and texture. But besides this, there are other requirements. If the stones themselves are very heavy, they need additional fasteners for a strong fixation. It is also important to know that silicate rocks (quartzite and sandstone) are incompatible with carbonate rocks (marble, limestone). Their chemical components react with each other. The result is gradual mutual destruction.

Master class on facing the basement with natural stone
Now let's see how the whole process looks in practice.
| Illustration | Action Description |
 | A metal mesh must be fixed on the surface of the base. It will firmly fix the solution. |
 | Lay the broken plinth stones on the ground first in the order you will place them on the vertical surface. Natural stone does not have two identical parts, so you need to assemble the cladding, as you assemble a puzzle. |
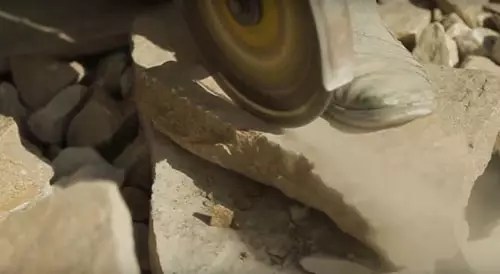 | The details that will be below and above need to be cut off so that there is a straight line. Use for this with a special stone-cutting wheel. |
 | To clad the basement with natural stone, prepare a solution of sand and. The consistency should be fairly thick. It is better to wet the stones before installation. |
 | To form gaps between stones, insert wooden or stone chopsticks. Start laying from the bottom up. |
 | After the stones are firmly fixed on the plinth, remove the chopsticks and fill the gaps with mortar. |
The nuances of facing the plinth with artificial stone
Artificial stone will cost you much cheaper than natural. This feature attracts a lot of developers. In addition, the artificial material has the correct geometric shapes, and this greatly simplifies the laying. All you need to do is cut the tiles a little in the corners with a grinder.
Attractive variety of shades, shapes and textures:


Such a stone has less weight compared to natural, so less mortar is required. Modern artificial materials are not inferior to natural ones in moisture resistance and durability. Their only drawback is a slightly unnatural look. But now you can find collections that can only be distinguished by closer inspection.
How to choose an artificial stone for the plinth
Don't try to buy the cheapest stuff. As a rule, its quality leaves much to be desired. It is best to use stones cast in silicone molds, they most accurately imitate the natural texture. Before paying for the lot, study the colors of the stones: the paint should not overlap with other shades. The stones should not have holes or cracks, interspersed with foreign particles.
On the inside of the stones there should be grooves for adhesion to the mortar, and the edges should have clear contours for quality joints on the wall.

Advice! Take cladding collections that have corner stones. This will greatly simplify installation.
Video instruction for finishing the basement with artificial stone
The technology for decorating the facade with artificial stone is not much different from working with natural stone. But there are some nuances, and you can learn about them in this video - how to finish the basement of a house with your own hands:
What is the finish of the basement with plastic panels under the stone
Plastic is now quite able to compete with natural materials. Modern components make it strong and durable. This material quite successfully imitates natural stone, and the ease of installation allows even a beginner to decorate the facade.

Advice! When choosing plastic panels for outdoor use, give preference to well-known brands. Cheap goods quickly fade and crumble from temperature changes.
How to make a plinth lining around the house with your own hands from plastic plinth panels - in detail in this video:
Finishing the plinth with siding and its nuances
Siding can be made from vinyl, polyvinyl chloride or propylene. All three of these varieties are suitable for plinth decoration, as they are resistant to external influences and temperature changes. There is also metal siding on sale, but it is the least suitable, as it is not resistant to prolonged exposure to moisture.

How to finish the basement of the house with siding - in detail in this video tutorial:
The use of facing tiles for the basement of the house
If you have not yet decided how to decorate the basement of the house inexpensively and beautifully, pay attention to the facing tiles. Not all tiles are suitable for outdoor use. It should have a non-porous structure that does not absorb moisture. You can choose the color and shape of the material that best matches the design of the facade.
An interesting point: it is not necessary to decorate the plinth with thick tiles. A standard thickness is enough, and you do not have to additionally strengthen the base.

The only drawback of this design is that it is not possible to additionally insulate the foundation with mineral wool. But there are other options, which we will discuss below.
Note! For outdoor tile laying, the temperature during work is important, it should not be lower than minus five degrees. Do not be fooled by the advice to use winter mortars for masonry - the tile will quickly fall off.
In the photo, options for finishing the basement of a private house with tiles:


Finishing the basement of a private house with do-it-yourself tiles
If there is a need to additionally insulate the foundation, use this master class:
| Illustration | Action Description |
 | Fix a solid insulation on the outside of the foundation, for example, penoplex. |
 | Install a metal mesh on the surface of the insulation. Fasten it firmly with special fasteners. |
 | Start laying with corner elements. Position them with the desired gap of at least 1 cm. |
 | After the corners, start fixing the rest of the elements. Make light vibrating movements when pressing the tile so that the solution penetrates through the cells of the grid. |
 | After the masonry has become, fill the seams with mortar and decorate with a jointing tool. |
Cheap and cheerful: finishing the basement of a private house with a profiled sheet
Is there an answer to the question of how inexpensively to finish the basement of the house from the outside? For budget construction, profiled sheet is an indispensable material. It will reliably protect the foundation from moisture and temperature, and also hide
The plinth is the part of the foundation that rises above ground level. Therefore, the same requirements are imposed on its finish as on the entire base. It consists of a whole range of activities - the arrangement of the blind area, preliminary plastering (not always), waterproofing and a number of others. The nuances are determined by the characteristics of each structure and local conditions.
But when all the work is completed, the question arises - how to presentably finish the basement? It is desirable that it is beautiful, and not too expensive and complicated. There are more than enough materials for finishing the basement. But the price of some products is such that not everyone is able to "lay out" that kind of money. In addition, the installation of some products requires experience, special equipment, which is also associated with additional costs. And from this point of view, there are not so many options for inexpensive finishes.
Plaster
This design is suitable for buildings built from almost any material (cellular concrete, brick, and so on), with the exception of wood, since it is unlikely that the plastered foundation will be in harmony with it.

pros

Minuses
- Insufficient strength and, as a result, a short operational period.
- The need for frequent renewal of the paintwork (in the case of surface application of the composition).
- The complexity of care. It is quite problematic to wash pieces of dirt that has got in - basically, only “dry” cleaning. In terms of maintenance, decorative plaster mixtures are preferable, but they are quite expensive.
Finishing Features

There is another opinion - to paint "on top", since such a treatment will clog all pores and prevent moisture from penetrating. But the question arises - what about vapor permeability? If there is a basement, and even intensively used, the question is important.
Siding panels
Naturally, this does not mean all that are commercially available, but only those that are designed specifically for the base. By the way, they can also decorate walls.

pros
- Durability and reliability of facing. It protects the base well.
- Care is not difficult - the panels are easy to clean.
- The ability to quickly replace a damaged product.
Minuses

Finishing Features
- The crate is pre-installed. Since the plinth is finished outside the building, it is advisable to use a metal profile as rails, and not wood - it is subject to decay.
- It is necessary to ensure the sealing of all joints, as well as correctly calculate and maintain the necessary gaps (in case of thermal deformation of products).
Stone (artificial)
In principle, the method is also relatively inexpensive and effective if the type of product is chosen correctly (temperature of use, strength, and so on).

pros
- Artificial stone is easy to make at home -. This will slightly increase the time for the production of work, but significantly reduce their total cost.
- Variety of cladding options (appearance).
- Durability, long service life.
- Good maintainability.
- Light weight and easy to mount. Artificial stone can simply be glued to the base.
Minuses

Finishing Features
Much depends on the material on which the imitation of natural stone is made. Practice shows that not everyone will be able to independently perform such work - finishing. Most likely, you will have to pay for someone's services.
It makes no sense to compare materials at prices. They depend on so many factors that it is simply impossible to take into account everything. We must not forget a simple truth - it is not always possible to put an equal sign between the concepts of "cheap" and "quality".
Conclusion
Plastering the plinth - the most economical option which does not require the involvement of professionals. But if financial possibilities allow, then it is better to stop at the 2nd or 3rd options.
- If the house is built on a pile foundation, then a supporting frame is pre-mounted, which is sheathed with any material. The main requirement for it is moisture resistance.
- When calculating the cost of work, it is necessary to look not only at the price of the material, but also take into account what the costs of its installation will cost. In addition, an important factor is the service life. It is wiser to buy a product for decoration that is more expensive and durable than to regularly repair the lining of the basement and at the same time spend money again.


 chancre look like?")
")


