Each dacha begins with buildings. I don’t want to carry garden tools with me every day, it becomes necessary to rinse after work, and there is nowhere to hide from the rain in the “open field”. Therefore, not a single site is complete without outbuildings in which you can store working equipment, crops from a personal plot or firewood. In the end, you may want to have chickens or rabbits, they also need somewhere to live. The solution to these problems is designed to perform wooden or metal hozbloki.
The purpose of the hozblok
Hozblok is a non-residential building, traditionally - a room for storing various property. Country household blocks are usually small in size, they are universal or designed for specific needs. If you do not have enough free space for inventory in your house and want to put all the tools in a separate room, it is recommended to build a utility block.
Few people refuse to take a refreshing shower on a hot summer day. And for this purpose, it is customary to install a small building under the shower in the hozblok, which combines the shower stall itself and the necessary fixtures and furniture for a comfortable bath. Another direction is utility blocks-toilets, which are carried out taking into account sanitary and hygienic standards and do not spoil the general view of the estate or summer cottage with their design.

Hozbloki in the form of change houses are intended for those summer residents who, for some specific reason, do not want to build a capital structure on their site, or are just in the process of building a garden house. A well-equipped wooden hozblok will be able to satisfy modest living needs or help to hide from bad weather. In addition, such a building will become an auxiliary building and a temporary shelter for employees.
Hozbloki, of course, will be useful for any family that lives in the country in the summer. Such a building can also play the role of a storage of vegetables and fruits, act as a workshop, pantry or summer kitchen. Firewood for summer cottages is most often stored under a shed or in a woodshed, which is often an extension to the utility block. Another typical part of the hozblok is a barn, which is necessary for keeping poultry and rabbits.
The design of the country hozblok
The utility blocks installed on the site most often consist of container blocks. Such a structure is a fairly simple structure of a frame-modular type, the basis of which is a frame made of a channel or corner, which is sheathed with wood boards. Such hozbloks are very mobile, do not require the construction of a foundation, and it does not take much time and participation of qualified specialists to design a building.
As a rule, wooden utility blocks are covered on the outside with a galvanized profiled sheet, and sheet iron is laid on the roof. At the request of the developer, blind or opening windows can be installed. If the household blocks for a summer residence consist of several container blocks, depending on the purpose, it is possible to install internal partitions, as in the photo of the household blocks with your own hands.

If it is planned to use hozbloki in the cold season, its floor, shelves, walls, windows and door are insulated with the help of heat-insulating materials, mainly improvised ones. To protect yourself from moisture, you can use a special moisture-proof material, and the use of disinsection and fire-retardant impregnations make household blocks invulnerable to various kinds of pests.
Space planning
When choosing a location for a utility block, the requirements of SNiP 30-02-97 and the purpose of the building should be taken into account. If you keep livestock, poultry or equip a toilet in the building, then the minimum distance to the residential building from its wall is 12 meters, to the border of the neighboring site - 4 meters. If it is planned to equip a shower room in the utility block, the minimum distance to a residential building should be at least 8 meters, to the border with neighbors - 1 meter.
Please note that even if one meter remains to the neighbor's site, you can put a ladder, firewood, remnants of building materials behind the utility block, and water from the roof of the building will not fall on the neighbor's things during rain. The best thing is to place the hozblok next to the neighbor's household block in the "back to back" type, then all his "beauty" will not be visible behind the neighbor's barn, and yours to the neighbor.

In the garden plots you can find a great variety of outbuildings. The disadvantage of such buildings is the significant consumption of building materials for their construction. And most importantly, all these buildings take away such a scarce area from the garden and the garden! This problem can be solved by combining several rooms in one building. A typical drawing of a utility block is a combination of a summer shower, a toilet and a utility room located between them.
In order to save free space on the land, it is customary to build a multi-storey utility block. The underground floor can be used as a cellar and a compost pit, above there will be a pantry and a workshop, a bathroom and a summer kitchen, as well as a small rooming house. As an extension, a barn for birds and livestock, as well as a firewood shed, are being built. In the attic there is a place for hay, dovecote and seedlings.
You can solve the above problems if you attach a hozblok to a garden house. It is best to attach an outbuilding to a blank wall of a house without windows, which is located on the north, northeast or northwest side.
Foundation laying
So, you have already decided on the location of the future utility block, now you can start building the utility block with your own hands. It is necessary to first cut off the fertile soil layer by 150-200 millimeters, compact and place the sand in a layer of 100 millimeters. Then you should mark the perimeter of the base and mark the points where the columnar foundation will be laid - in the middle and at the end corners of the wide sides of the building.
The foundation usually requires 6 pillars, for each drill holes with a diameter of about 200 millimeters and a depth of 1200 millimeters, while each pipe section for the foundation pillar should also be 1200 millimeters long. Pour 100 millimeters of sand or fine gravel into the bottom of each hole, then tamp. Lower the segments of the asbestos-cement pipe into the prepared pits, set their vertical position according to the level. Pour and compact sand between the walls of the pits and pipes to fix them.

Inside the exposed sections of asbestos-cement pipes, it is necessary to pour cement mortar, but only 1/3 of the volume of the pipe. After that, lift the pipe up by 100-150 millimeters, fix it in level and wait 2-3 days until a concrete base is formed at the bottom of the pits, the diameter of which is larger than the diameter of the pipe, thanks to which, during winter heaving of the earth, the columnar foundation of the utility block will not rise with your own hands.
Then prepare 4 pieces of reinforcement that have a diameter of 10 millimeters, a length of at least 350 millimeters, of which 150 millimeters are immersed in the solution, which will fill the pipe sections, and 200 millimeters protrude. After that, prepare the solution, completely fill the capacity of each pipe, accompanying the casting with the bayonet procedure and placing the embedded reinforcement in the center. The complete hardening of the foundation takes two weeks, during which time the pillars should be hidden from sunlight and periodically moistened with water.
Frame erection
It is customary to assemble the frame from a bar, which has a section of 150 by 150 millimeters. Connect the beam forming the frame to each other with a “half-tree” groove and fix with four galvanized self-tapping screws. To install the frame on the foundation pillars, grooves are marked and drilled in it. Between the pillars and the frame on the foundation, you need to lay a layer of roofing material, bend the protruding edges down so that moisture does not accumulate under the timber.
The wooden frame before the final installation, like all other wooden elements of the hozblok, treat with an antiseptic and two layers of drying oil. Three lags from a bar are installed along the length of the grillage perimeter in increments of 1350 millimeters. To build a frame, prepare a beam with a section of 100 by 150 and 100 by 100 millimeters.
It is convenient to lay the frame beam of different lengths, as shown in the video of the hozblok with your own hands - on the front side with a length of 3000, on the back side with a length of 2400 millimeters, thereby greatly simplifying the procedure for manufacturing single-pitched roof rafters.

First, assemble identical end frames, each of them will have an opening for a window. All joints of the grillage frame and vertical posts are made on reinforced galvanized corners and self-tapping screws. Set up the front side stand first. At a distance of 1000 millimeters from it, two racks are attached with a distance of 600 millimeters between them. The last rack 2400 mm long completes the installation of the end of the utility block.
To achieve greater diagonal rigidity, install struts with a section of 100 by 100 millimeters between the first and second, third and fourth racks. Cut the ends of the struts at an acute angle of 45 degrees, bolt them to the frame and uprights. Between the second and third racks, set the window crossbars. In the same way, you need to assemble the second end frame of the hozblok.
Then you can start assembling the frame of the front facade - set the main racks, which have a length of 3000 millimeters. Two of them were already set when the end frames were assembled, two middle ones need to be installed, the step between the near posts should be 1800 millimeters. In order not to “walk” the racks, temporarily connect them with a board to self-tapping screws or nails.

Since the internal area after the construction of the utility block will be divided into several separate rooms, it is required to arrange a window opening and doorways in the front facade. The width of each of them can be made the same. It may also differ. Between the third and second racks, counted from the front frame, you need to set diagonal braces.
The frame of the rear facade is carried out in the following sequence: there are already end posts, you need to set 2 intermediate ones 2400 mm long in increments of 1800 mm and install braces between the first and last two posts. Perform the upper trim from a beam at a height of 2000 millimeters from the frame of the grillage. It will consist of segments that are equal to the distance between the vertical posts, and be fixed on self-tapping screws through a reinforced steel corner.
Vertical racks are made of 2 boards that have a section of 40 by 120 millimeters. One board is attached to the inside of the harness with screws, the other is attached to the first one on the frame of the harness, either overlaid or with an emphasis. Each composite rack must be fastened with nails through 400-500 millimeters. After checking the verticality of the rack, it is necessary to strengthen it with struts. The work on the construction of the hozblok can be completed by attaching the upper trim, which will be based on external racks for strength.
Assembly of rafters and roofing
The assembly of the rafters is carried out on the ground, the installation on the racks of the economic unit is already done. Rafters with a length of 5000 millimeters are made of timber, which has a section of 100 by 50 millimeters, they are interconnected by a crate of a 30-mm edged board with a pitch between the rafters of about 850 millimeters.
The distance between the crate will depend on the weight of the roofing material with which you plan to cover the roof - for example, when using metal tiles, there is no need to create a continuous crate. Conversely, when using a soft roof, it is better to use a solid crate.

At an angle of 10 degrees, it is necessary to cut grooves in the racks where the rafters will rest. Its overhangs and cornices should be sewn up before installing the roof; for this, a 30 mm edged board is used. To install the rafters on the racks, you need to pre-drill holes in them for self-tapping screws. Then place the structure on the logs behind the household block along them and with the face up, using the stops, lift to the place of placement.
Create a crate with an uncut board along the rafters after 0.8 meters and overlap with roofing felt - at least 100 millimeters. Lay slate sheets from bottom to top along the roofing material. Cover the sidewalls of the sheets by one wave and attach with screws to the crate, having previously drilled holes in the ridges that have a diameter of 2 millimeters more than the diameter of the screws. Be sure to place rubber washers under the screw heads. If desired, a heater can be placed in the interstitial space. Hem the ceiling with hardboard or planed wood.
Final work
So you built a hozblok. After carrying out these works, you should do the wall cladding from the outside. To do this, you can use lining, edged board, OSB boards. For wall insulation, it is best to take mineral wool. Between the insulation and the outer skin, it is also customary to lay glassine, which serves as a waterproofing layer. It is undesirable to lay glassine on the inside, as it does not have a very pleasant smell. For hydro and vapor barrier of internal walls, it is recommended to use foil, which can improve the thermal insulation of rooms.
It is customary to make floors in the hozblok from planed 40 mm boards. When working on flooring from unplaned boards, it is necessary to additionally polish them or cover them with linoleum. Wiring can be carried out outside or hidden in the walls, but it must be enclosed in special insulating boxes to protect against fire.
In the shower room, a place should be provided in the floor for fixing the tray with the installation of a shower drain device - approximately 800 by 800 millimeters. Around lay a clean floor flush with the equipped pallet. The walls of the locker room and sink are sheathed with unplaned tessellated and upholstered using hardboard. Between the sink and the locker room they put a partition with an opening, but without a door leaf. Frame-panel partitions for use inside the utility block are formed by a “half-tree” connection and fastened to self-tapping screws.

After you have built a hozblok and a shower room, you can do the restroom. The toilet in the hozblok is made without a cesspool. If you wish, you can install a dry closet in this room or make a drain to the septic tank - a special plastic tank that is installed at an angle to the block and cleaned as it is filled. You can put both, although a dry closet for the first time will be quite enough.
Doors and windows are installed before the start of the final finishing work inside the utility block. All cracks and joints must be blown out with mounting foam so that a draft does not walk. Windows and door frames are certainly the easiest to buy at the nearest building market, but you can build them yourself.
Boxes should be made from boards that are close to 40 millimeters thick. The overall dimensions of the boxes are 1.9 by 0.8 meters, on the back wall in the toilet it is recommended to provide a small window under the ceilings in addition to the front one. It is customary to assemble door leafs on mortise dowels or planks from boards, which differ in a thickness of about 40 millimeters.
After we built the hozblok with our own hands and finished the building, there were still a couple of working moments left. If expensive tools and equipment are stored in the dacha hozblok, you should protect yourself from thieves by additionally equipping the windows with special bars. Although it is not a residential building, you still need to take care of the integrity and safety of its structural elements. When it rains, you can see how water flows from the roof of the hozblok to the ground and splashes the walls. The design is damp, over time, the walls begin to rot. To divert water away, it is recommended to use gutters.
Special hanging gutters are made rectangular or semicircular. For a semicircular gutter, it is necessary to determine the diameter, adding about 3 centimeters on each side to beat off the stiffeners. Round the gutter on a firmly attached pipe. To hang the gutter, it is customary to install two extreme brackets, then a cord is pulled between them and the remaining brackets are mounted along it. Strengthen the gutter in such a way that a slight slope is obtained for the drain.
Now you know how to make a hozblok at their summer cottage! All construction work usually takes from one week to 30 days. Therefore, building a hozblok with your own hands is more profitable than buying a ready-made solution.
Well, if the change house became the first building on a personal plot or summer cottage. After the construction of a residential building, it can easily be converted into a utility block for storing tools and keeping pets and birds. Otherwise, you will have to build a barn with your own hands from the materials that are available. Let's look at how this can be done quickly and inexpensively.
We are developing a farm building project
In order to properly design and locate the structure in the local area, you need to determine its purpose. For example, for storing tools and various utensils, an outdoor mini-shed 2 x 2 m, shown in the drawing, is suitable. It is built of wood using frame technology and is placed in any convenient place in the yard, so long as it does not interfere with passing or passing.
When it comes to premises for livestock, poultry and other living creatures, strict sanitary requirements are imposed on the construction of a utility block. After all, animal waste products, especially pork and chicken, emit a large amount of ammonia (hence the “strong” unpleasant odor) and are chemically aggressive. So at the design stage, the following recommendations should be taken into account:
- The shed must be located at a minimum distance of 12 m from a private house or gazebo and no closer than 25 m from a source of drinking water, as shown in the diagram. But a country toilet with a cesspool can be built nearby.
- Building materials must be chemically resistant. Wooden beams and boards are best suited for the quick construction of walls, since the metal frame will have to be well protected from corrosion. The capital structure is built from foam blocks, aerated concrete or brick, followed by insulation.
- To keep a cow or a bull, it is necessary to provide entrance doors of appropriate sizes, as well as durable floors and partitions. Please note that the average weight of a bull is about 500 kg per 4 hooves with a total footprint of less than half a square meter.
- Piglets and goats do not load the floors too much, but they love to gnaw on wood, and sometimes tear off poorly fixed elements. The ideal pen indoors is with a partition made of bricks or logs that are not treated with antiseptics and other compounds that can harm the health of animals.
- For chickens, turkeys and other birds, you will need to equip perches and a separate exit to the street in the outer wall.

An important point. Livestock rooms should be well ventilated and, if possible, a liquid waste gutter.
For the construction of a barn, you can use the drawing below as a basis. The structure with dimensions of 3 x 4.5 m under a gable roof has 3 rooms - a pantry for tools, a poultry house and a large room that adapts to any need - a workshop, a pigsty or a stall. If necessary, the roof is converted into a shed, for which one of the walls rises 0.4-0.5 m higher than the opposite.

How to make a wood shed
We will divide the entire construction process into several stages:
- Choice of building materials.
- The device of a columnar or strip foundation.
- The construction of the frame and its sheathing.
- Roof installation.
In order for the outbuilding to turn out to be as cheap as possible, it should be made from improvised materials or those that remained after the construction of a residential building. The best option is a shed for giving from lumber - timber, unedged boards and slabs. Such a structure will turn out easy and will not require a serious foundation. As a roofing material, corrugated board, ondulin or a simple roofing material, nailed with planks, is suitable, as is done in the photo.

Advice. To sheathe the frame from the outside and give it rigidity, you can use OSB moisture-resistant plywood boards.

If you have enough aerated concrete or other blocks left from building a garage or a garden house, then they will turn out to be a capital barn where you can arrange a workshop, a pigsty or a chicken coop, only in the latter case it is better to insulate the walls from the outside. But keep in mind that the building will turn out to be heavy, which means that it must be placed on a foundation in the form of a tape or a solid slab, which will be expensive. In addition to the listed coating options, slate will also fit, you can use it.

Considering how much metal costs now, a steel profile shed is not the cheapest solution. On the other hand, a prefabricated structure lined with painted or galvanized corrugated board looks quite nice and fits well into the landscape of the yard. This is easy to verify by looking at the photo:

Reference. An inexpensive shed for storing firewood and various utensils can be quickly made from wooden pallets, and then sheathed with OSB plywood. Due to its low weight, the structure can be easily moved to any place and placed on aligned rows of cinder blocks. How to build it yourself, see the short video:
Foundation laying
The optimal solution for a light wooden building is the columnar base shown in the picture. In order not to mess with concrete work, which takes from 7 to 14 days (this is how much concrete needs to set), it is easier to build block or brick columns.

The work order is as follows:
- Mark the site by pulling the cord between the pegs, determine the location of the supports (at the corners of the future building and in the middle in increments of 1.5 m).
- At key points, dig holes 500 x 500 mm to a depth of 1 m. Having tamped the bottom, make sand filling to a height of 10-15 cm.
- Lay out pillars of red brick or cinder blocks 20-30 cm above ground level. More information about laying a columnar base is described in.
Advice. Hozblok is rarely the first structure on the site. Therefore, you can judge the nature of the soil and the depth of the foundation by the previous buildings - a country house or a bathhouse.
If you are dealing with heaving or swampy soils, then the best solution for a barn is to install a pile-screw foundation. Instead of brick pillars, piles of iron pipes are screwed to the required depth, resting with a wide blade on a stable soil horizon. A specialized firm will do a similar job in 1 day.

For the construction of capital walls from blocks, it will be necessary to pour a reinforced concrete tape, again, if soils allow. In this case, the zero cycle of work is carried out in the same way as during the construction of an extension, which is described in detail.

Floor and wall installation
The first operation is the binding of foundation columns and the installation of floors. For its implementation, you will need a beam with a section of 10 x 15 cm and a board 150 x 50 mm (for logs). The thickness of the flooring material is selected depending on the load on the floors - from 20 to 50 mm. Before you build a barn, strapping beams and the rest of the wood, do not forget to impregnate with an antiseptic composition.

Strapping beams and logs are laid on poles with a lining of roofing material
Attention! Let us remind you once again that it is extremely undesirable to treat wooden elements used in the construction of livestock pens with chemicals. Instead, it is better to take lumber of a larger section.
The step-by-step sequence of work looks like this:
- Lay waterproofing of 2 layers of roofing material on the foundations, and place the beams on top and fix them with anchors. Connect the strapping to each other in half a tree or with the help of steel corners and self-tapping screws.
- Install the logs in increments of 0.7-0.8 m, attaching them to the harness in the same way - on metal corners. In the section for pigs or cows, put the logs more often - with an interval of 0.5 m.
- Lay the floors from the boards, screwing the latter to the strapping with self-tapping screws or nailing them. Cut timber to length flush with the outer edge of the tie beam.

Scheme of docking and fastening of bars
The easiest way to build walls using frame technology is with an assistant. The technique is simple: the wall frames are assembled from a 5 x 5 cm beam on a flat area, and then they rise to the finished base and are fastened with slopes. The distance between the racks of the frame is 0.6 m, except for those places where it is planned to install doors and windows (cheap plastic ones can be used). Framing window openings should be made of horizontal lintels, fastening - steel corners on galvanized screws.

Advice. If you want to make a warm shed, then a layer of insulation (usually mineral wool) should fit between the frame racks. Therefore, use wider boards - 4 x 10 or 5 x 10 cm. Do not forget that for a shed roof, one wall must be higher than the other.

When all the walls are raised and fixed, it remains to be fastened together and sewn up from the outside with any available material - from slabs and unedged boards to vinyl siding. From the inside, line the frame with OSB sheets and, if necessary, lay insulation inside. The construction process is clearly shown in the next video:
Roof installation instructions
The crate of the shed roof structure of the barn is made of boards, whose cross section depends on the length of the span. To block a room with a width of up to 4 m, it is quite enough to lay lumber 50 x 150 mm in increments of 0.6 m. support.

To make the roof of the barn yourself, we suggest using the following step-by-step instructions:
- Install and secure the rafters in such a way as to provide roof overhangs of at least 200 mm in each direction.
- Lay the sheets of wind insulation from the bottom up, letting them overlap by 10 cm. Attach them to the beams with a stapler or nail them with planks.
- Mount the crate of boards or slabs 2-3 cm thick, nailing them to the rafters.
- Cover the roof with corrugated board or ondulin. The sheets are screwed to the crate with self-tapping screws, and the latter must pass through the ridges of the profile (and not the depressions) and be equipped with rubber gaskets.

At the end of the beams and battens, peeking around the entire perimeter of the building, sheathe with suitable boards, and put a gutter on the low side of the roof. When the barn is closed from precipitation, proceed to the installation of windows and doors, as well as interior work. Outside, the hozblok can be decorated in any way possible - painted in the desired color, trimmed with clapboard or profiled sheet.

Reference. It is noteworthy that the assembly of the utility block from the metal profile is carried out using a similar technology, only the connections are made by welding, and the frame racks are attached to the strapping beams in place. For more information about the construction, see the video:
Conclusion
This publication is a guide to action when building a barn in one of the most common ways. The list of materials may vary depending on your stocks and financial capabilities. A simple example: if there is cement and brick available, then it is cheaper to build a utility block from them than to buy timber specifically. True, a capital construction will take more time, and subsequently it will have to be legalized and documented.

Structural engineer with over 8 years experience in construction.
Graduated from East Ukrainian National University. Vladimir Dal with a degree in Electronic Industry Equipment in 2011.
Related posts:

With any construction on your land, whether it is a large cottage or a simple country house, several buildings appear in the depths of the site economic purpose. Household blocks (sheds) are small unheated multi-purpose buildings. In most cases, summer residents build a barn with their own hands. The article presented to the attention of readers will tell about the construction of a frame barn with their own hands, step-by-step instructions are also presented.
 All buildings are planned when drawing up a construction project as soon as the developer has acquired a land plot for a summer residence. Usually inexpensive barn for a summer residence is built with your own hands. In the case when the barn is located near a residential building, it makes sense to use the same materials that were used in the construction of the house itself. For example, if the house is sheathed with siding, then you can use it for a barn so that it does not differ much and stands out. Can shed can build like a house.
But still, the main materials are wooden timber, edged and unedged boards, roofing material, ondulin or slate. It is not at all necessary to build a barn from expensive materials. Depending on the desire and ability of the developer, the hozblok can be built on a foundation or without a foundation. There are ready-made designs on the market. You can also build sheds from a pallet with your own hands. But this will take a lot of time, since any business executive will sell a pallet beyond repair.

Regardless of which option of the outbuilding is chosen, you must have the following set of tools: a hacksaw, a set of drills, an electric drill, a shovel, an ax, a planer, a screwdriver.

Planning
 The construction of a utility block on your site will help solve several problems:
- The shed will be the storage for all the tools and inventory.
- It will become a place to store small-sized equipment.
- If desired, you can build a shower with a separate entrance.
And yet, how to make a barn with your own hands? To achieve everything you want, you need careful planning. You can build three separate buildings. You can combine everything in one building. It all depends on the desire of the owner of the land. Your cottage is a place for both rest and work. Therefore, the project needs o be sure to turn on the shower. This is in the event that the shower has not already been built earlier.

When building a barn in the country with your own hands, you should not proceed from the fact that the barn must be made inconspicuous. No need to strive to build a barn with the least amount of labor. Thanks to work and diligence, you can build a wonderful hozblok in a summer cottage, which will not yield in beauty to the house itself. But the first step is to draw up a project for a barn, in which to provide for all sizes. This is necessary in order not to buy excess construction materials.

When drawing a drawing, you need to think about the number of necessary separate rooms with their own autonomous entrance, the size of these rooms and the height of the barn itself. In addition, it must be remembered that the structure must meet the following requirements:
- It should be at least one meter from the border of the site.
- Convenience of electricity, water supply and sanitation. Water supply and sanitation is necessary if the developer planned a shower.
- Reliability and durability of the structure.
In the case when the developer for some reason cannot draw up a plan for the future building, then you can use the Internet. There he will find drawings of sheds for every taste. There, especially for those people who cannot draw a plan, many place ready-made drawings. It is necessary to choose from the whole variety of plans, only the one where there is no toilet. When planning building it is recommended to place an outdoor toilet in the far corner of your site.

Choice of hozblok options
 The easiest way is to build a wooden barn without a foundation with an earthen floor. Cheap and fast. It is only necessary to dig six or eight pillars around the perimeter of the structure. Nail the upper and lower veins of the boards with a section of 150 mm by 50 mm. Sheathe with "inch" boards. Mount the roof with a slight slope, cover with roofing material. And finally, make and hang the gate for the barn. This type of shed is more suitable for storing machinery such as walk-behind tractor, wheel mower, concrete mixers and so on.
To store household property, inventory and tools, a summer shower device, a hozblok should be erected using frame technology on a light, shallow strip foundation. On sandy soils, the foundation can be made columnar or from several reinforced concrete blocks. On a strip reinforced foundation, you can about to assemble a frame hozblok even on loose soils.

Before the construction of the foundation, it is necessary to clear the site of debris and vegetation. Dig a trench if a strip foundation is planned. When constructing a foundation from individual blocks, it is necessary to dig holes larger by ten to twenty centimeters of the blocks themselves. In trenches or pits arrange sand cushions about twenty centimeters thick. Sand must be carefully compacted. The next step is the construction of the formwork. For formwork, boards with a thickness of 50 mm should be used. For reinforcement, rods with a diameter of 10 to 14 millimeters are used. For pouring the tape, concrete grade B-20 is recommended.

The procedure for assembling a frame barn
 On the finished foundation for waterproofing, roofing material is laid in two layers. Then the lower rectangular frame (lower trim) is assembled from a 10 mm by 15 mm beam. The bars are connected to each other in half a tree with the help of nails. The frame is attached to the foundation with anchor bolts.
Next stage- fastening lags for the floor. Edged boards with a section of 50 mm by 150 mm are laid on the edge with an equal spacing. They are attached to the bottom trim with metal corners.
The frame of the walls of the barn is assembled using the "platform" technology. The floor is laid on the logs and the frame is already mounted on the platform. The floor can be made of thick moisture-resistant plywood, boards, OSB. The assembly of the frame frame is made on the floor, and then rises. It is recommended to install corner frames first. To stiffen the entire structure, the corner frames must be reinforced with jibs.

The entire frame is assembled from boards with a section of 150 mm by 50 mm. You can also use boards with a section of 100 mm by 50 mm. Distance between posts over 600 mm. The raised walls of the house are firmly nailed to the strapping beam with nails no shorter than 200 millimeters long. Vertically installed walls from above are tied with boards in two rows. Openings for windows and doors are made of double boards, since the load on the racks in these places is greater.
The walls outside are recommended to be sheathed with a board, the thickness of which is not more than 25 millimeters or clapboard. Can be sheathed with plywood. Porches-steps are made before each entrance to the barn. In front of the opening into the room, where, according to the project, a room for storing wheeled vehicles is planned, instead of steps, a rise from the ground to the required height is constructed. Then doors and gates are hung.

Roof device
 During the construction of a barn house it is not necessary to make a ceiling. It is enough to mount the roof. They are made for the country barn mainly lean-to. You can also build a gable roof.
Easier build a pitched roof, since here the truss system is simple for installation. Before the construction of the truss system begins, to create a slight slope, two boards must be nailed to the upper trim. The boards selected for the rafters are laid on edge. It should be noted that the overhang must be at least thirty centimeters. The rafters are attached to the upper trim with metal corners. They are mounted on a crate of edged boards with a thickness of 25 mm in increments of forty centimeters. And the final step is the roof. Ondulin is better suited as a roofing material, as it is lighter than slate.
Outdoor wooden toilet
 The toilet on the site can be built of various types. There are quite a few options, so you should proceed from the following criteria. Design is influenced by:
- the size of the developer's budget;
- estimated operational load of the toilet;
- ground water height.
Building an outdoor bathroom with your own hands is not so difficult. Here the sewer system is replaced by a pit of the appropriate depth. In it, waste is disposed of by absorption through the soil and evaporation.
Many developers of their sites prefer structures made of wooden boards. The construction of a wood frame is simple and the cost is small.
In the selected corner of the summer cottage, a hole is dug at least two meters deep. When choosing a place, one must take into account the fact that, according to SNiP, all outbuildings in the country should be one or more meters away from the border of the site.

Pit walls reinforced with wooden shields. This is done so that the earth does not crumble inward. Along the edges of the pit, a base is constructed from a beam with a section of 15 cm by 15 cm. Logs for the floor are mounted on this kind of wooden foundation. The whole technology of building a toilet cabin is identical to the construction of a frame house. Only the materials are smaller. For cross-beams and racks, boards with a thickness of 25 millimeters can be used. Make jibs from a bar with a section of 20 mm by 50 mm. You can also sheathe a booth from a thin board.
When living in a summer cottage, the first thing they do is build a utility block from various materials, of different sizes. In many cases, this is just a change house or temporary hut until a permanent structure is built, but some people strive to create amenities almost like in an apartment.
Hozblok options - we select for our needs
To build a hozblok with your own hands after acquiring a site is the next task for its owner. Why on your own, because you can buy a change house or order construction? There are several reasons why many people prefer to build themselves. First, there is the financial issue: after purchasing a plot, not everyone will have the money to purchase a utility block or pay for construction by contractors.
Secondly, many change houses available for sale often cause dissatisfaction with those who bought them because of their too short service life. And thirdly, if you have construction experience, the remnants of the material, you can build a household unit yourself not of a standard type, but based on your needs. It will serve economically for a long time, and the experience gained during its construction will be useful in the future.
Having bought several acres, summer residents strive to immediately build a reliable hozblok for various purposes:
- as housing, until a house is built, in order to be later converted for other needs;
- an outbuilding for inventory and other property;
- as a locker room, pantry, bathroom, summer kitchen;
- as sheds for rabbits, poultry, livestock.
Hozblok is a universal room, everyone can adapt it to their needs. If the owners spend a lot of time at their summer cottage working on the ground, then they will think about a rest room, a bed in it to spend the night. A small compact structure can look like a simple barn or a house from a fairy tale. It all depends on the needs, opportunities, priorities of the owner.
Materials and projects - from what and what to build
Construction begins with a foundation and ends with a roof. There is no particular choice in the materials here. The foundation is made tape or columnar. For tape, you need sand, cement, crushed stone or concrete blocks. Columnar is made of brick or stone. Recently, asbestos-cement pipes are used, which are poured with concrete. The hozblok is usually covered with inexpensive material: slate or corrugated board.
The erection of walls often poses a summer resident with the problem of choosing a material. It follows from several factors: cost, labor intensity, thermal protection, if they are going to live in the hozblok in the winter. Cheap material will save money, and light (panels, aerated concrete) will allow you to arrange a cheaper foundation. Large blocks, shields, sip panels, boards, wall decking will significantly speed up construction.
To build a hozblok, one of the simplest schemes is increasingly being used - a wireframe.
Having dealt with the material, we determine the purpose and, accordingly, with the dimensions, we make drawings. The smallest change house-pantry, which can also serve as a temporary shelter, has dimensions of 3.5 × 2.5 m. m. In both cases, it is impossible to find a place for a bathroom, you will have to arrange a toilet and a shower in the yard. Hozblok 6 × 3 will allow you to place everything you need for living with minimal amenities.

Frame project 6 × 3 - how much material is needed
Consider how to build a 6 × 3 m hozblok, how much and what material will be needed. We stop at one option, because it is impossible to consider the whole variety. If the dimensions of your frame structure are different, it is easy to calculate the amount of material by increasing or decreasing it.
Starting construction, be sure to draw a drawing, as best we can, focusing on it, draw up a list of materials. You should not rush into this, it is better to think carefully about everything until you find the perfect option.
You will need bars 100 × 100 mm:
- for the lower and upper frame 6 m long - 6 pieces, three-meter - 8;
- for vertical supports - 2.4 m - 11 pieces;
- 2 pieces of 6.6 m for rafters;
- plus horizontal bars on doors and windows.

Boards needed:
- on the floor 20 pieces 25 × 150 mm, the same amount on the ceiling or replace with other material (plywood, fiberboard, etc.);
- on the crate - 7 pcs. 25×100 6 m long;
- for wind deflectors the same 2 pieces, but 3.6 m long;
- for fastening rafters - 50 × 100 × 3600 - 6 pieces.
If you make a metal frame of the building, we focus on the length of the lumber. We calculate the amount of material for the foundation, coating, focusing on the size of the building. If the foundation is tape, you will need quite a lot of sand, cement, gravel. Columnar will cost much less; for a frame hozblok, it is a good option.
We begin construction - the foundation and the lower trim
We make a columnar foundation from asbestos-cement pipes with a diameter of 150 mm. First, we mark out a place for the foundation: we remove the sod and a layer of earth to the depth of the shovel bayonet. We fall asleep 10 cm of sand, ram it well. At the place where the pipes are installed, we dig holes with a depth of 1.2 m, fill the bottom with sand, and ram. We place pipes of the required length in the pits.
With a building level, we check the verticality, horizontality and the correct location along the perimeter of the building. We fix the position by filling the space between the solbs and the ground with sand. We fill the pipes inside with concrete or cement-sand mortar. First, fill in a third of the length, slightly raise it so that the solution goes into the pit and forms a solid base at the bottom. We fill the pipes to the top, compacting the concrete so that cavities do not form. In the center of each pipe we put anchors for fixing the frame frame.
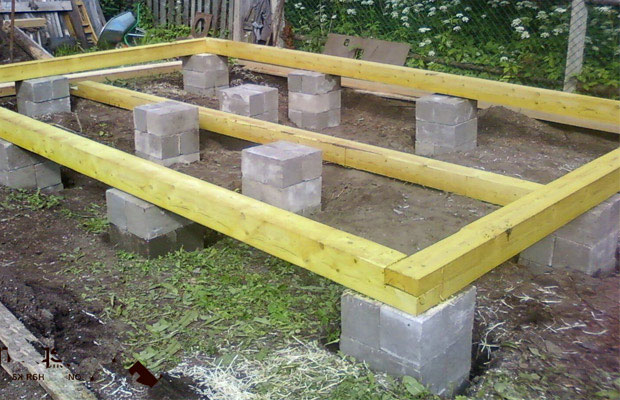
While the foundation is gaining strength for several weeks, we are preparing the frame. From the bars 10 × 10 cm we make a rectangle, fastening the corners to the half-tree, fixing with nails and self-tapping screws. To strengthen the frame inside, we install logs across. The wood for the frame, as well as for the entire structure, is treated with antiseptics or twice hot drying oil. At the top of each column we lay roofing material for waterproofing. We lay the frame on the anchor, lightly tap to mark the places for the holes. We drill holes, install the lower trim on the foundation, fixing it with nuts on the anchors.
Continuation of work - we build the frame, assemble the rafters and the roof
We start assembling the frame from the ends, we fasten the building material to the bottom trim with metal corners. To strengthen the fixation, you can install struts of bars diagonally or temporarily fasten with a board on self-tapping screws. We assemble the front part of the frame by installing vertical racks, then the back. The distance between the uprights is 1.8 m. We reinforce the frame with diagonal struts from the bars.

Do not forget about windows and doors, making openings in the places of their installation. The size of the doorway is 2 × 0.85 m. We install crossbars for windows: the lower horizontal is at a height of 80 cm from the frame, the upper one is 1 m from the bottom. If we plan to arrange several sections inside, we install partitions. We finally fasten the frame racks at the top with bars.
We make the roof depending on the method of assembling the frame. If the building has front and rear sides of different heights, we install rafters on the longitudinal bars of the walls, we attach the crate to them. If the walls are the same height, we assemble the rafters on the ground, and then we install them ready-made at the top. We create the necessary slope by raising the front part by 50 cm. But it should be borne in mind that one person will not be able to lift them, therefore, if there is no assistant, we collect them at the top.
We cover the roof, lay the floor, sheathe the walls
Immediately after assembling the frame, we cut the roof. The list of available roofing material is large, respectively, we make the crate for large sheets rare, for roll material - solid. Before laying the floor, it is desirable to insulate the subfloor: we fill the openings between the pillars with any material, fastening with cement mortar, inside we fill it with expanded clay. On the logs we lay the floor from the boards.
We sheathe the walls, starting from the front wall, we go from bottom to top. The material can be different: boards, lining, siding, corrugated board, etc. We insulate with glass wool, it is undesirable to use polystyrene foam - mice adore it. from the inside, we make partitions, install windows, hang doors - the utility block is ready and, undoubtedly, will become an adornment of the land plot.

Are you a suburban owner? If yes, then you know that in the country it is simply impossible to do without a utility block (or barn). In it you can store auxiliary materials, various tools, agricultural implements and garden items. This is a necessary building, and if you do not have it, you can think about building it. Moreover, you can build a do-it-yourself hozblok for a summer residence, since special labor and special skills are not required. We suggest you study the material that will help you make a barn from start to finish.
Stage 1: design
 Hozblok drawing for manufacturing
Building a hozblok can help you solve several problems:
- the room will serve you as a workshop and storage for tools and equipment;
- the building may have additional areas, such as a shower and toilet;
- it can be equipped not only with a bathroom, but also with a place to relax - a room with upholstered furniture and amenities.
All this can be achieved through planning. The barn can be one of the 3 types of buildings listed above, or it can include all of them. It all depends on your needs and desires.
Do not assume that the barn should be inconspicuous and ugly. You do not need to set the task of doing it at minimal cost. Thanks to the efforts and work, you can make a wonderful hozblok that will not be inferior in beauty and functionality to your country house.
When making drawings, think about the size, height and number of compartments you need. Moreover, when designing a building, remember that it must meet the following criteria:
 Hozbloki from a bar
You will not spend a lot of money on the construction of such a change house, therefore, when choosing a material, stop at a wooden beam. This is the most common and suitable material. For example, buildings from an ordinary board will not stand for a long time. But the hozblok on a foundation with a frame made of timber meets all the requirements and will serve you for many years.
If you can not draft your change house, use the World Wide Web. Especially for those who do not know how to make projects, people put up ready-made drawings. They can be downloaded for free or purchased for a nominal amount.
To create a hozblok, prepare the following tools and materials:
- ax, shovel, screwdriver, hacksaw, electric drill with a set of drills, planer;
- beams, cladding boards, metal anchors;
- finishing material for roofing and walls, sheathing panels, thermal insulation (if necessary).
Stage 2: procurement of material
 Acquired lumber
To make a utility block, the dimensions of which are 6 m long, 3 m wide and 3 m high, with a shed roof and two internal rooms, you need to prepare the following materials:
- plywood - 28 m2;
- roofing material - 28 m2;
- timber 150 × 150 mm - 0.65 m3;
- timber 150 × 100 mm - 0.37 m3;
- timber 100 × 100 mm - 1.2 m3;
- timber 50 × 100 mm - 0.15 m3;
- edged board 30 mm - 2.2 m3;
- floorboard 40 mm - 0.37 m3;
- asbestos-cement pipe Ø 150 mm - 6 pcs. 1200 mm each;
- gravel, sand, cement;
- fittings - Ø 10 mm, length 350 mm, 4 pcs.
This completes the preparatory work. The next step will be the correct location of your change house.
Stage 3: choosing a place
 The layout of the suburban area
Definitely, in order to build a hozblok on your own, you will not need special financial contributions. But be prepared for the fact that the construction process will take your time and effort. To get the job done faster, ask for help from family members or neighbors. However, right before construction, you need to choose where to place the barn in a way that is convenient and meets the requirements. Building codes and regulations (SNiP) in paragraph 30.02.97 state that:
- in the case when the household block will contain pets, birds, or it will serve as a restroom, it must be placed at a distance of 12 m from the walls of a residential building and 4 m to the border of the neighbors' plot;
- if it will be used as a shower cabin, it must be placed at a distance of 8 m from a residential building and 1 m to the border of the neighbors' plot.
If you ignore these requirements, you may be in serious trouble when you want to sell your property. In this case, the state will refuse to execute a sale transaction with buildings until their placement complies with the standards that are in force on the territory of the Russian Federation.
Having chosen the optimal place, we smoothly moved on to the main question, how to build a hozblok in the country. Let's find out.
Stage 4: laying the foundation
 Column foundation from the inside
So, our goal is to build a building 6 × 3 × 3 m. Since the building itself will not produce a special load on the foundation, it can be made columnar. To make it easier for you, we will divide all the work into separate stages.
This completes the foundation work.
Stage 5: assembly and installation of the grillage (frame)
 Assembly and installation of grillage
The frame must be assembled from bars, the cross section of which is 150 × 150 mm, its size will be 6 × 3 m. The frame will consist of four sections, 1.5 × 3 m in size. The bars that form the frame are connected to each other by half-tree grooves. They need to be fixed with special two (if the frame is installed on an anchor) or four (if installed on reinforcement) wood screws. To install the frame on the foundation, holes should be made in the right place for the protruding reinforcement or anchor.
In order to ensure sealing, 1-2 layers of roofing material should be placed on the pillars so that its edges protrude by 10 cm. They need to be bent down so that the water drains and does not accumulate under the wooden beam. Before placing the frame on the foundation, the wood should be coated with an antiseptic - apply at least 2 layers of drying oil. The frame is then installed and attached to the foundation. Along the length of the frame, you need to install three “half-tree” logs from a bar 100 × 100 mm, in increments of 135 cm.
Stage 6: frame of the utility block
 Frame manufacturing
To build a frame, you will need wooden bars with a section of 100 × 100 mm and 100 × 150 mm. For the convenience of further roofing work, it is necessary to mount the frame timber of different heights. The front side of the frame will be 3 m high and the back side will be 2.4 m high. In this way, it will be easy for you to install rafters for a shed roof.
 End frame assembly The first step is to assemble the same end walls. Each of them will have an opening for a window. Racks are fastened vertically to the frame using galvanized steel corners, 130 × 10 mm or 105 × 90 mm in size and self-tapping screws. First you need to put a corner post, the height of which is 3 m, and the section is 150 × 100 mm, with the narrow side towards the end. To do this, it is necessary to make a hole Ø10 mm and a depth of 50 mm in it from below in order to put the beam on the reinforcement that protrudes from the frame. The same holes must be made in the remaining three corner bars. Stepping back 1 m from the corner, you need to fix the other two bars, the cross section of which is 100 × 100 mm, and the length is 2.4 m. The distance between them should be 0.6 m. The last on the end wall will be the corner beam, which sits on the reinforcement. Its height is 2.4 m, and the cross section is 150 × 100 mm. All racks are attached with corners. And in order for the structure to be strong and rigid, between 1 and 2, 3 and 4 racks you need to make struts, the cross section of which is 100 × 100 mm. To do this, the ends of the struts must be cut at an angle of 45 ° and attached to the frame and uprights using a bolted connection. Remember to put a washer before tightening the nut. Between 2 and 3 racks, you need to insert window crossbars, the cross section of which is 100 × 50 mm. The first crossbar is installed at a height of 1 m from the frame, the second - at 1 m from the first. The second end frame must be assembled in the same way. As a result, you should get, as in the figure.
 Assembling the front of the frame Now you can assemble the front frame. Set up the main racks 3 m high. There should be four of them, two of which are already in the corners. It remains to install two middle racks. From the extreme racks you need to step back 1.8 m and fix them. So that they do not stagger, temporarily connect them with a board on nails or self-tapping screws to each other. Since the hozblok will be divided into two separate sections, you need to make a window opening in the middle and doorways on the sides. The door frame will be 2 m high and 0.85 m wide. Therefore, take a stand 2.4 m high, with a section of 100 × 100 mm and set it at a distance of 0.85 m from the end stand. Do the same on the other side. In order to strengthen the structure, place diagonal braces between the 2nd and 3rd rack. On the other hand, do the same. Next, you need to install window racks. Again, take a beam 2.4 m high with a section of 100 × 100 mm and fix it at a distance of 0.37 m from the third post (which is 3 m high). Then step back 0.85 m from the installed rack and set up a second one, exactly the same. It remains only to insert the horizontal crossbars. Fix the first at a height of 0.8 m from the frame, the second - 1 m from the first. Now the front side is ready, you should get it as in the picture.
 Top harness Now make the back facade. Since the corner posts with a height of 2.4 m are already standing, it remains to put 2 intermediate ones, with the same height and a section of 150 × 100 mm. The step from the end post is 1.8 m. Then install two braces between the 1 and 2 posts and 3 and 4.
It remains to make the upper trim, for which you need a beam of 100 × 50 mm. It must be mounted at a height of 2 m from the grillage (frame). To do this, the pieces of timber must be fixed vertically between all the posts around the perimeter. It is necessary to connect them end-to-end, securing with a reinforced steel corner and self-tapping screws. As a result, you should get such a wooden frame, as in the figure on the right.
Stage 7: attaching the rafters
 Rafter fastening and lathing
It is more convenient and easier to collect rafters on the ground. It turns out that you will mount them on the frame racks in finished form. In order for the roof to have a visor that will protrude along the perimeter, take rafters 5 m long with a section of 100 × 50 mm. They will be connected to each other by a crate of 30 mm edged boards. The rafters are placed in increments of 0.85 m. The crate does not have to be fastened tightly to each other. It all depends on the roofing material. If its mass is small, the distance may be greater, but if it is large, the boards are stacked more tightly.
To install the roof, the studs on which it will rest must be cut into grooves at an angle of 10°. Why 10°? Because the difference in height between the front and rear pillars creates exactly this angle. Before installing the roof, you will have to sew up its overhangs and cornices with a 30 mm edged board. After that, make the floor using a floorboard. You can use both nails and screws. Make holes in the racks for self-tapping screws. To lift the finished roof up, you can use logs that must be placed at the back of the building. According to them, the structure is lifted up, the rafters are installed in the grooves on the racks and everything is fixed with self-tapping screws.
Stage 8: sheathing and interior work
 Interior decoration
Now that the frame is completely ready, it remains to complete the outer skin. A lining is suitable for this purpose. After that, you need to lay the roofing that you choose, insert windows and install doors. To separate two sections inside the hozblok, make a frame-panel partition using a half-tree connection. The ceiling of the building is sheathed with fiberboard or plywood (you need to fix the materials with self-tapping screws). Optionally, you can sheathe the base using an asbestos-cement sheet. And if this is done from the inside and outside, filling the space with expanded clay, then it can be insulated with mineral wool or foam. Then the building will be much warmer, which will allow it to be used not only as a warehouse.
Watch a video on how to build a barn for a summer residence yourself:
This video shows the construction of a wooden hozblok:
 Production of a hozblok
 Barn in the country
 Hozblok with a toilet for a summer residence
 Firewood compartment included
 Hozblok with a room
 Hozblok at their summer cottage
 Building from foam blocks
 Hozblok for giving


