Often, those who decide to lay the tiles on their own do not think about which side to start laying the tiles. And this is a very important point.
Experienced craftsmen know that if you start laying tiles in the bathroom or kitchen correctly, then less material will be needed, which means less finance will be spent. It will also reduce the time for laying tiles and the design in the bathroom or toilet will look better.
By and large, the question: “Where should I start laying tiles” does not have a clear answer. But there are several points by which the master determines which side to start laying tiles.
First you need to decide on the sequence of laying tiles in the bathroom or kitchen. It is advised to start laying tiles from the walls, and not from the floor, because. during work, the material with which the tiler works may fall from the walls and the new tile on the floor will be damaged. Another reason why laying should start from the walls is the drying time of the tiles. In order for the tile adhesive to fully set, you must wait from several days to a week. At this time, you will have to stop repair work in the bathroom or toilet, and this is extra time.
Laying scheme
Before you start laying tiles in a bathroom or toilet, you need to decide on the location of the tiles. To do this, draw a design on paper and make the necessary calculations.
Next, you should make even markings on the wall, moving the tile from top to bottom without mortar. It is necessary to mark the position of each tile, thereby determining the future position of the tile. The bottom row will correctly be laid last of the chopped pieces.

How to lay tiles on walls
They begin to lay tiles on the walls from the corner that first catches your eye when you enter the room, usually this is the opposite wall from the front door. On the second row marked with a thread or level, you need to attach a rail to the wall, making sure that it stands level. Then you can start laying tiles on the wall.
To avoid slipping tiles, you can lay out no more than two rows at a time. You can lay two rows of tiles on each wall and so on in a circle. While the row will be laid on one wall, on the other it will already dry out. You need to start facing with whole elements, and the lower rows can be laid from damaged ones.
If a novice tiler wants to lay first one wall after another, we can safely say that nothing will work out - the tiles in the corners will not converge, and the seams will fluctuate from 3 mm to 3 cm, which looks very ugly.
It should also be noted that if there are external corners in the kitchen or bathroom, then the tiling takes place precisely from them, since it will not work to finish the row with damaged tiles on the outer corner.
The bottom row should be placed last. Most often, when laying the bottom row, the tiles have to be cut. This is done with a special tool - a tile cutter.
Between each row of tiles in the bathroom or kitchen, you need to put crosses - special accessories for working with tiles.
In the event that glue is accidentally spilled onto the finished work, it should immediately be removed from the tile to avoid solidification. After the laid tiles in the toilet or bathroom are completely dry, the entire lining should be wiped first with a damp cloth and then dry. After that, you can start grouting the seams.

Drawing on the wall
It should also be noted that if the owner is going to lay out a certain pattern in the toilet, then you need to start laying the tiles from the center of the image. If this is not done, then the drawing may end up in the direction of the wall.
To determine the center of the wall in the kitchen or in the toilet, you need to set the diagonals with a cord, where the diagonals will intersect, there is the center of the wall.
You should start laying tiles from the center of the image and continue the row in one direction and the other from the center. After the central row is laid out, it will become clear where to go next and the work will go faster.
Laying tiles on the floor
Where to start laying tiles on the floor in the toilet?
- There are three options by which experienced tilers begin laying tiles on the floor. Laying occurs from the farthest corner opposite the door. This is the standard method that is suitable for laying tiles in the kitchen, but if this corner is closed by a shower in the bathroom, then use this method makes no sense.
- Masonry from the threshold at the door. In this case, laying the tiles starts from the corner that is closest to the door. This method is used most often, since plumbing is usually located on the opposite side.
- Laying from the center of the room. Four tiles are laid in the center of the room, from which the laying of the floor continues.

There is one easy way to determine which of the three options to use. You should measure the length of the row and divide the result by the width of the tile. If the resulting balance is less than half, then you should start laying the floor with tiles from the beginning of the row. This method not only saves material, but the layout looks neater.
Before starting work, the floor is thoroughly cleaned and leveled. Next, you should create a waterproofing trough that will protect the floor from various kinds of leaks. To do this, use waterproofing - liquid or roll. On top of the insulating layer is primed to increase the adhesion of the tile adhesive.
Grouting
You can grout the seams after the lining is completely dry. All crosses should be removed and you can start grouting.
The grout is matched to the color of the tile, diluted in water to a homogeneous mass and evenly applied with a rubber spatula between the joints.
After some of the seams are rubbed, it is necessary to wipe them with a slightly damp sponge so that the seams are smooth and beautiful.

Saving
Many people think about how to save money during repairs. The first thing you do not need to save on is the quality of the tile, as in the future this saving can cost even more.
You can not lay tiles where it will not be visible, for example, on the walls where plumbing fixtures will be installed. Only at the same time, you need to remember that the walls will need additional protection from moisture - be sure to plaster, prime, and possibly also paint.
Also, you can not lay tiles under the bath, especially if the entire space under the bath is covered with a screen. The floor, where there will be no tiles, should also be protected from moisture.
In this article, we will look at the options for laying tiles on the floor and walls, give some installation tips and draw your attention to the intricacies of this work.
What is the best way to lay tiles so that the bathroom is pleasing to the eye? It is customary to make walls in bathrooms in two colors: light top, dark bottom, between them there is a border. The height of the dark rows is usually 80 - 100 cm. You need to navigate like this: from the edge of the bath up - one dark tile, then - the border, then - the light top. Moreover, decorative panels are best done on the wall where the bath is installed. On other walls, you can place single decorative inserts.
In small bathrooms, small tiles look good - 20x25 cm, in combined bathrooms - 20x30 cm, for large rooms you can use large tiles - 20x40 cm. Small tiles - 10x10 cm - are most often used in the kitchen, for the so-called "apron". ("Apron" is the distance between cutting tables and kitchen shelves.)
If the house is undergoing a major overhaul, the order of work is as follows: first a bath is installed, then tiles are laid out, then the rest of the plumbing is connected.
Now tiles are not laid on cement. To do this, there are all kinds of mixtures and adhesives, in which the proportions of the components are strictly maintained. You can use domestic mixtures or imported ones. For the bathroom, it is advisable to take solutions for wet rooms. For outdoor work, there is also a special glue.
If gluing tiles on hardboard, chipboard, drywall or a painted surface, you can use hot melt adhesive. It is convenient in that it instantly fixes the tile. At the same time, for greater reliability, you can use liquid nails. The seams are covered with grout to match the color of the tile.
If you invite a master to lay tiles, tools will “help” determine his qualifications. A good craftsman must have a tile cutter (and certainly not a glass cutter), a notched trowel (not a trowel), a level, crosses (so that the seams between the tiles are even) and a mixer (drill with a special nozzle) for mixing the solution.
Preparation of the vertical surface.
First of all, it is necessary to determine the local irregularities of the base using a two-meter rail. Surface deviations (bumps, depressions) should not exceed 10 mm.
concrete surfaces.
When preparing a concrete base, it is necessary:
Carefully align the concrete surface with a rail.
Depressions found on the wall should be leveled with wall leveling compounds. If there are depressions of 15 mm or more on the wall, a steel mesh is attached to the wall with dowels in this place, then it is covered with a layer of cement-sand mortar.
Bumps and bulges that may be present should be cut down, or, if possible, eliminated with leveling compounds.
Before applying the leveling composition, the surface to be leveled should be treated with a 10-15% solution of PVA and water (primed).
If there are oil stains on the wall, they are removed with a 3% solution of hydrochloric acid or a 5% solution of soda ash. After removing stains, the surface should be washed with clean water using a brush.
To ensure better adhesion of the tiles, notches are applied to a smooth concrete wall at a distance of 2-3 cm from each other. Notches are applied with a hammer and a chisel or an ax. After notching the wall surface, remove dust with a brush dipped in water.
brick surfaces.
When preparing a brick base, you should:
Carefully align the brick surface with a rail.
Cut down the protruding elements of the brickwork.
The depressions must be leveled with a cement-sand mortar.
Peeling surfaces of bricks and fragile areas of masonry should be beaten off with a hammer and leveled with mortar.
Remove dust from the surface with a brush dipped in water.
wooden surfaces.
Preparing a wooden base is a more time-consuming process than preparing other surfaces. When preparing a wooden base, you should:
Bars 2-2.5 cm thick are nailed onto a wooden surface at a distance of 40-45 cm from each other. Previously, the slats and the wooden wall should be treated with an antiseptic compound that protects the wood from decay.
Roofing felt sheets are attached to the rails, which serve as waterproofing.
A fine-mesh metal mesh is stretched over the roofing material and fixed with nails.
The grid plane should be aligned vertically and horizontally. The surface of the stretched mesh must be flat.
Next, a cement-sand mortar is applied over the mesh in a ratio of 1: 3. The surface is plastered. The thickness of the plaster layer should not exceed 20 mm. After applying the plaster layer, it is not necessary to apply a covering layer on it.
After the solution has finally set, the surface can be revetted.
Preparation of the base of the tiled floor
Floors made of piece and rolled materials are laid on a rigid base. As a rule, it is a concrete or cement-sand screed. The base under the tiled floor must be flat and horizontal.
Check the levelness of the floor. To do this, attach a two-meter rail to the floor surface. The gaps between the floor and the rail should not exceed 2 mm. The deviation of the base surface from the horizontal or the specified slope should be no more than 0.2% of the length or width of the floor surface. For example, with a length of 10 meters, the vertical deviation should not exceed 20 mm.
Cut off bumps and bumps on the floor surface.
Smooth out depressions on the floor surface with floor leveling compounds or cement-sand mortar.
It is necessary to cut out areas of the floor contaminated with oil or grease, and cover with cement-sand mortar.
Potholes and depressions with a depth of more than 15 mm should be cleaned from dirt and dust, be sure to prime with a plasticized PVA solution of 7% concentration. After that, cover with a cement-sand mortar, using a wide spatula.
If the subfloor has a rough or conchoidal surface, the floor should be puttied with a mixture of 600 Portland cement, platified PVA dispersion, fine sand and water. Putty is applied with a spatula on the surface to be leveled, the thickness of the putty layer should not exceed 1.5-2.5 mm.
The cement-sand base must be even and free from cracks.
The floor surface is primed with a solution of PVA and water of 8% concentration after the base of the floor is leveled, the cracks on it are sealed,
Before laying the tiles, they must be sorted by size and color shades. When sorting ceramic tiles by size, they are applied to each other, thus revealing non-standard tiles. This operation is called calibration. Tiles must be regular in shape, have right angles and flat edges. By color, tiles should be sorted in good light, preferably daylight. Also, when sorting, you should pay attention to the front surface of the tiles, it should not have cracks, bulges and potholes.
Often, when calibrating tiles, so-called templates are used, which help to sort the tiles with an accuracy of 0.5 mm (Fig. 1.). Sorted tiles are placed in a separate box. Non-standard tiles should be set aside for later use as non-standard tiles. Irregular tiles are obtained by cutting whole tiles.
Tiles should be cut with a glass cutter along the line marked with a pencil. The tile is cut along the front surface, the glaze and part of the shard of the tile are cut through.

After the cut line is marked with a glass cutter, the tile is applied to the edge of the table along the cut line and, pressing on it from above, is broken (Fig. 2). Also for cutting tiles, specially designed tools are used to facilitate cutting and breaking tiles.

Tiled floor markings.
After the surface of the floor base has been prepared and cleaned, you can proceed with the installation of support and intermediate beacons. Before installing the beacons on the wall adjacent to the floor, you should make notes that determine the height of the surface to be lined. Marks are made in opposite corners of the room along one wall at a given height. A chalked cord is pulled between the marks (a cord rubbed with chalk) and a horizontal line is beaten off. This operation is done around the entire perimeter of the room. The line should be maintained until the end of the flooring. With such a line, you can simply and quickly install reference beacons, which are used as mortar tiles. These beacons determine the level of the tiled floor.

Laying intermediate beacons, checking the lighthouse rows is performed using a building level installed on a flat two-meter rail (Fig. 2).
Intermediate beacons of tiled floors are installed along the reference beacons. To do this, the rail with the level set on it rests at one end on the reference beacon-tile laid with a given surface level. Under the opposite end of the rail, a tile is placed on the mortar. Gently pressing down on the rail, ensure that the level bubble is at zero. The laid tile is an intermediate beacon. When using the rail with the level repeatedly, it is necessary to ensure that the level on the rail is in the same place. To do this, marks are made on the rail with a pencil, between which the level is set.
Floor laying.
When laying tiled floors, it is convenient to use the Bolotin rail with a division value of 100 mm to determine the width of the grip and mark intermediate beacons (Fig. 1). Laying tiles on the floor should begin with a frieze row. The frieze row is laid with whole tiles along the walls, along the perimeter of the room (Fig. 2). In the wall part, you can use tiles cut in half. Initially, the frieze row is laid dry along a stretched mooring cord, which fixes the height of the frieze row. Simultaneously with a frieze row, transverse lighthouse strips are laid every 20-25 tiles of the frieze row. When laying lighthouse strips, it is necessary to ensure that the stretched mooring line does not sag.

Beacon strips ensure the horizontal surface of the main coating. After the installation of the frieze is completed, the laying of the main covering can begin. The main coating is laid in separate strips - grips (Fig. 2).

The gripping strips during laying on the one hand are limited by the wall of the room or the strip of the previously completed gripping, on the other hand, the gripping is limited by a mooring cord stretched at the level of the finished floor (Fig. 3).

The sequence of laying tiles in the grips depends on the location of the entrance to the room and should be such that the possibility of walking on freshly laid tiles is excluded. In figure 4, the arrows indicate the direction of laying the tiles.
When the surface cladding is completed, the tile joints are overwritten. Do this with the help of grout mixtures. Dry grout is diluted with water and, having applied it to a rag, is rubbed at the seams. If the seams of the white tiles are rubbed, you can use white cement as a grout.
surface cladding technology.
First of all, you should purchase the required amount of facing tiles. To do this, you should calculate the area of \u200b\u200bthe surface to be lined, based on the result obtained, you can purchase tiles. As a general rule, you should purchase 10 - 15% more tiles than you need for your surface.
Before proceeding directly to laying ceramic tiles, it is necessary to prepare the surface. The quality of the tiling will depend on how the surface is prepared.
Hanging walls.
After preparing the wall surface for laying, you should start hanging the walls.
Support beacons are attached to the prepared surface, aligning the plane of their installation with a plumb rule.
Walls and ceilings to be plastered are checked by hanging. (Fig 1) Hanging is done in vertical and horizontal planes with the installation of stamps or beacons. This operation is performed using a plumb line or level with a rail. Marks on surfaces are installed from a solution or metal. The distance between the rails or marks is made from 100 to 300 cm; from the ceiling, floor and corners they are installed at a distance of 30 to 40, see figure. Extreme nails 1 and 4 are driven in so that the distance between their caps and the ceiling corresponds to the thickness of the plaster. Nails 2 and 5 are hammered in according to the plumb line, intermediate nails 3 and 6 are hammered along a tightly stretched cord. After that, the curvature of the surface of the walls is checked. To do this, the cord is pulled diagonally from 1st to 5th and from 2nd to 4th. If the cord touches the bulges of the walls, then the bulges are removed with a hammer and chisel. If it is not possible to remove the bulge, then nails 1, 2, 3 or 4, 5, 6 of one of the vertical rows are pulled out in order to level the surface of the walls. Then, orienting, intermediate nails 7 and 8 of the upper horizontal row are hammered along the cord between nails 1 and 4, then nails 9 and 10 are hammered between nails 3 and 6, and nails 11 and 12 are hammered between nails 2 and 5.

Markup.
Having completed the hanging of surfaces and the installation of marks, they begin marking. With the help of a tape measure or a steel folding ruler, the rows of future cladding are marked out, the number of tiles laid in a row is determined. The characteristic points of the surface to be lined, for example, corners, are designated by reference beacons, which are used as facing tiles, which are installed on a gypsum mortar. Beacon rows are laid out on the walls of great length. The verticality of the installed lighthouse rows is checked by the rule with a plumb line (Fig. 2).

Wall cladding with ceramic tiles.
Wall surfaces are usually covered with partially or fully glazed ceramic tiles. The surface of the wall is lined from the bottom up in horizontal rows. Rows of tiles are installed on the surface to be coated in the following ways (Fig. 1).

* Razbezhku - tiles are installed with the offset of the vertical seams to the side, in each horizontal row.
* Seam to seam - tiles are installed with a rectangular grid of vertical and horizontal seams.
* Diagonally - the tiles are installed with a mutually perpendicular arrangement of seam lines running obliquely to the floor plane.
Before facing any surface with ceramic tiles, the tiles are immersed in water for 5-10 minutes. Immediately before facing, the surface of the wall must be moistened with water using a brush. This is necessary to reduce the absorption of moisture from the cement-sand mortar by the wall surface. In addition, wetting the surface increases the adhesion strength of the facing material to the base.
The correctness of tiling the surface with tiles vertically and horizontally is checked using a tightly stretched cord. Instead of a cord, a rail can be applied to the surface to be lined.
First of all, the tiles of the two lower rows are laid. The first row is set at the level of the finished floor. In a room where the floors have not yet been laid, the first row of tiles is installed, resting on a rail, the thickness of which should be equal to the thickness of the future floor (Fig. 2).

To determine the vertical contours of the surface to be lined, steel pins are driven in at opposite corners of the wall, above the level of the lining. From them, cords are pulled down the plumb line, which are attached to the surface of the base of the floor. Tensioned cords determine the direction of the vertical seam and the side edges of the cladding. It is recommended to keep them until the end of facing works. Tiles are laid along a horizontally stretched cord, called a mooring cord. It attaches to pins attached to the wall.
After checking the horizontality and verticality of the surface to be lined, beacon tiles are installed in the corners, stepping back from the edge to the width of one tile. If the length of the surface to be lined is more than 4 meters, intermediate beacons should be installed. As mentioned above, the tiles must be laid from the bottom up in horizontal rows. The cement-sand mortar is evenly applied to the tiles with a trowel so that the mortar lies on the surface of the tile in a slide in the form of a truncated pyramid. Then the tile is applied to the wall and, evenly pressing on it, is fixed on the wall.

If the tile is installed unevenly and, by pressing with your hands, it cannot be leveled, you need to tap on the entire surface of the tile with the handle of a trowel or hammer. The solution can be applied not to the entire surface of the tile, but only to its central part. When fixing the tiles on the wall, the mortar spreads over the surface of the base and fills the voids.
For more precise fixing on the wall surface, the tiles can be leveled with a flat rail. The rail is applied to the installed tiles and tapped along the entire length with a hammer or mallet (Fig. 3).
Ceramic tiles are one of the best materials for finishing rooms with special operating conditions. Such a lining is not afraid of exposure to high humidity, temperature extremes, abrasion load, in itself is very attractive in appearance, easy to clean. In a word, for kitchens, bathrooms, bathrooms - it’s better not to find it. And what is even more important - it is quite possible to cope with the process of laying it yourself.
Why does it make sense to try to do the cladding with your own hands? It’s just that even if the laying surfaces are perfectly even, you will have to pay about the same amount for the services of the master as the material itself costs, and this is even at best. Such expenses can be completely avoided. By getting to know our instruction article how to lay tiles on a wall, the reader will have a clear understanding of all stages of work, from surface preparation and tile selection - to grouting. And for sure he will be convinced that there is nothing supernaturally difficult in performing such a finish.
Preliminary steps
Preparation of surfaces for finishing
It is completely pointless to start facing work on an unprepared wall for this. Some novice home craftsmen naively believe that a layer of ceramic tiles will reliably hide all the "ugliness" of the surface, and as a result you will get a straight beautiful wall. They are sorely mistaken!
What does the preparation process include?
- It is imperative to get rid of the old wall decoration. Will not, for example, hold adhesive tiles on a painted surface. Or even their small fragments are completely excluded. If previously there was a tile on the wall, then after its dismantling, all sagging and drops of hardened glue should be removed.

- Be sure to check the quality of the plaster layer, if any. All problematic, crumbling areas are removed immediately. It is necessary to tap the entire area, to identify places of instability, which are also subject to removal. And most often it happens that if an exfoliating area is found in one area, then everything else will be pulled from it, that is, the plaster has to be knocked down completely.

- In no case is it ignored if traces of their biological damage are found on the walls - mold spots, fungal colonies, etc. Antiseptic priming is carried out on all surfaces without exception, but if this microflora has already settled, then you will have to carry out a preliminary “treatment” of the wall

- There should be no gaps or cracks on the surfaces. If they are identified, appropriate repair work is carried out to ensure their high-quality sealing.

- The wall must be flat, that is, it must be a plane, and not a twisted, littered, protruding or concave surface. On the aligned walls, the tiles fit without problems. Yes, there are methods for leveling walls precisely by installing ceramic cladding. But, believe me, not even all experienced craftsmen like to do this, since this task is extremely difficult. And if a newcomer has a "debut", but there is nothing to even think about it. It will be much easier to align - and the finish will definitely turn out to be of high quality.
There are many ways to level, and some of them, for example, using moisture-resistant drywall or gypsum fiber plates - are not so complicated and do not require much time.
Prices for moisture resistant drywall
moisture resistant drywall
How to independently align the walls for decoration?
Do not be afraid of this task in advance. There are many technologies available that are quickly mastered even by beginners. Moreover, the laying of tiles does not require the ideal smoothness of the surface - the correctness of the geometry is enough. are discussed in detail in a special publication of our portal.
- Ceramic tiles are most often installed in rooms with high humidity, so you should also think about reliable waterproofing. To a greater extent, this applies, of course, to the floor, but it also makes sense to provide for walls waterproofed"belt" at least 100 ÷ 200 mm high from the floor along the entire perimeter. In addition, it is desirable to reinforce with waterproofing sections of the passage through the walls of water and sewer pipes, the area around water outlets.

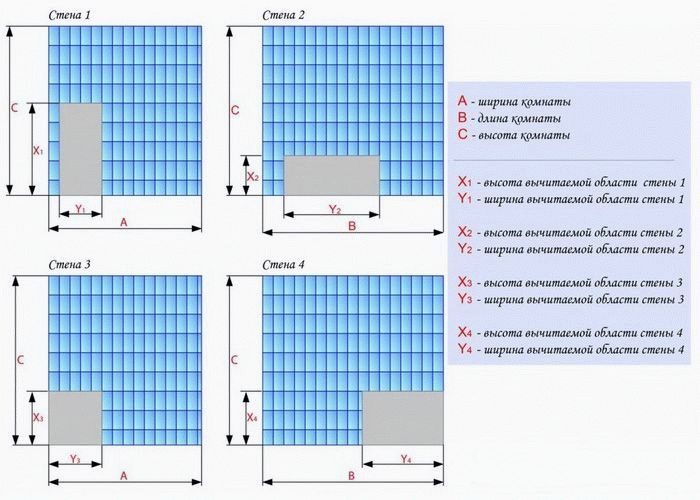
And in frankly “wet” areas of the wall, for example, around a bathtub, washbasin, shower stall, etc., it is generally better to perform waterproofing solid. Approximate dimensional standards for these sections are shown in the illustration:

- Finally, the wall must be carefully primed with a deep penetrating compound. This measure will completely remove dust from the surface, eliminate the phenomenon of moisture absorption. That is, the wall material will not take water from the tile adhesive, allowing it to harden in optimal conditions. Achieve the best adhesion performance. In addition, many primers also have antiseptic qualities, and such preventive treatment will never become superfluous.

If the absorbent qualities of the material are high, then the primer treatment is performed twice, always waiting for the first layer to dry completely. As a rule, the primer is applied immediately after the completion of the preparatory work. But if for some reason there is a significant time gap between this stage and finishing, then it would be desirable to apply the primer again - a day before the start of the installation of the tile. So a quality result will be guaranteed.
Wall primer prices
wall primer
Drawing up a project and choosing the necessary tiles
It is clear that these two issues are closely intertwined. In this publication, we will not analyze design approaches to choosing the interior of a room - we will focus only on some practical aspects.
Planning the location of tiles on the walls
Of course, the owners must already imagine what they want to see in the end. Surely familiar with the approximate range of tiles presented in the store. That is, they just have to “fit” the selected collection into the specific dimensions of their premises.
Here "by eye" should not be relied upon. The best option is to draw up a graphic diagram for each of the walls separately. Especially if it is not supposed to be a continuous cladding with one type of tile, but with decorative inserts or friezes, or with division into sections. Some material manufacturers offer online programs on their official websites that allow you to optimally place tiles on walls. If this is not possible, you will have to sit on your own or in a graphic editor, or simply over paper diagrams.

- In horizontal rows, you can start with a whole tile from one of the corners, that is, the cut edge will fall on the opposite side of the wall. Naturally, in this case, the least noticeable angle is chosen. But you should immediately figure out which fragment will remain in the corner? If it is too narrow, then it will be very difficult, if not impossible, to remove this area accurately. And on the front side of the room, that is, attracting the eye of the incoming, such an arrangement will also look very ugly. Therefore, it often makes sense to choose such an arrangement to start from the center of the wall - AThenfrom it is laid to the edges with the same trimming on both sides.

It all depends, of course, on the size of the wall and tiles. It often happens that the alignment seems to be optimal when the vertical axis of the wall coincides with the center of the tile, and then there is a wiring to the sides with, again, symmetrical trimming along the edges.
Undercut edges are easy to hide by laying solid tiles from a corner on an adjacent wall. If two cut edges converge in the inner corner, then this can also be solved by grinding one of them. On the outer corners, a decorative corner copes well with this task. More details will be discussed later.
- They also show the necessary "creativity" when planning vertical rows. So, the laying does not look particularly advantageous, which under the ceiling will end in a narrow section. It is better to plan a solid tile for this place, especially since its upper edge is very often covered by a suspended or stretch ceiling.

But it is quite possible to start a narrow section first from the floor - there it is hardly noticeable, and the cut edge of the tile will become completely invisible. visible in the corner between the floor and the wall. To be more precise, then this bottom row is generally recommended to be laid out last, so no problems with precise trimming are foreseen. All this will be shown below.
However, other circumstances may influence the choice of the starting horizontal line. These can be features of the design project (for example, the use of contrasting rows or friezes), and the placement of plumbing fixtures. For example, it is always recommended to place tiles near the bathtub so that the horizontal seam is hidden below the rim by 20÷30 mm. This will not violate the aesthetics of the installation, and will bring the vulnerable seam out of the most “wet” area.

- When planning the placement of rows, vertical and horizontal, do not forget about the thickness of the tile joints. Let this not seem like a trifle: when using not very large tiles, but on a large wall, the difference is considerable.

Excessively thick seams when laying on the wall are most often not required. Usually limited to gaps of 1.5 ÷ 2 mm. Moreover, after grouting the joints with a fugue, the visual effect of the thickness will change somewhat - the gaps will appear wider.
- It is clear that when drawing up schemes, it takes into account the number, size and location of inserts - friezes, borders and other decorative elements. If a fully-fledged plan for each of the walls is constantly at hand, then there is much less chance of making a mistake during the laying process.
Some nuances of choosing ceramic tiles for walls
With tiles designed for walls, it is much easier than with floor tiles. The indicators of its strength, abrasive resistance, roughness, etc. fade into the background, since they do not play a decisive role here. You can concentrate on decorativeness and, of course, the quality of the material.
We will not talk in detail about all the intricacies of the choice - this is a separate issue. But some important points still need to be emphasized.
Prices for ceramic tiles
ceramic tile
- There is a wide variety of formats available for sale. But you should not immediately chase large tiles. Firstly, it does not look appropriate everywhere. Secondly, when laying it, a lot of waste can remain, and since it is usually not cheap, it turns out to be expensive. And thirdly, the installation of such a cladding requires a certain amount of experience, and a novice master may not be able to cope with the task - any mistake will be in sight.

If the first independent laying of tiles is ahead, then it is better to proceed from its average dimensions, for example, up to 300 ÷ 400 mm along the long side.
- should have a water absorption of no more than 3% - this is usually indicated on its packaging.
- If wall cladding is planned in unheated rooms or even on the street, then you should look for a material marked with a snowflake pictogram - it is not afraid of freezing.
- Without fail, all purchased packages of tiles of the same type are checked for the same batch. The fact is that the same article, but released in different shifts, may slightly differ in tone of color. Visually in the store, this is most often not noticed. But after laying on the surface, even a small difference can spoil the overall look.

- Of course, they try to purchase tiles of the highest grade possible. Even at the factories, products are sorted, and products with shape distortions go on sale as second- or even third-rate. With them, you can be exhausted when laying.
- Manufacturers also sort tiles by caliber. It is clear that they always try to bring the dimensions of the finished product closer to the declared standard. However, the specificity of ceramic production does not yet allow achieving a unique match in the size of all tiles without exception. On the packaging of the tile, its caliber can be indicated - an alphabetic or numerical designation, and a plate with its decoding can be attached.

It is clear that tiles of the most accurate caliber have a higher price. But all preference should be given to her, since unjustified savings can lead to unsuccessful finishing, and in eventually the total costs will be clearly “in the red”.
- In any case, it will not be possible to do without tile waste. And sometimes it becomes impossible to acquire the missing quantity - the desired batch may not remain on sale. That is, the stock is made in advance. Usually they start from 10% - with a competent layout and high-quality cutting of the material, this is enough. If a diagonal layout is assumed, then the stock can be increased to 15% - there will be more waste anyway. But we note right away that it is not recommended to get involved with diagonal mounting without a good work experience. Therefore, in this article, intended more for beginners, it will not be considered.
- Feel free to ask the store to check all purchased tiles - there is no guarantee that they will not be damaged during transportation. Yes, and explicit marriage sometimes comes across.

- Even first-class tiles of the same batch and the most accurate caliber should still be carefully sorted into several groups at home. The highest quality, with perfectly matching dimensions, is best set aside for facing the most visible critical areas. The tile is a little worse - push it "to the periphery". And the one with the most significant size distortions or with minor defects should already be used for cutting to fill sections along the corners or the floor.
- The number of tiles is usually calculated by the piece. This can be done if a qualitative scheme is drawn up. And even more so, you will have to do this when you plan to use several varieties to create a special decorative interior.
But in the case when it is supposed to cover the entire area with one type of material, you can also use the calculator, which is located below. There it will be necessary to indicate the area of \u200b\u200bfinishing, the dimensions of the tile and the width of the tile joint. Reserve 10 or 15 percent will be taken into account when choosing the layout principle.
Before starting work, make sure that flat bathroom walls and are located strictly perpendicular to the floor, as well as have the right angles to each other. Otherwise, it will be quite difficult to complete the work.
In addition, before starting installation work waterproofing needs to be done.
This is necessary because the bathroom has high humidity.
For the performance of work, waterproofing is well suited, produced under the brands of such manufacturers as Ceresit and Litokol.
This waterproofing holds very well on almost any base, and tiles, in turn, lie well on it.
It is necessary to apply waterproofing in a thin layer over the entire surface of the bathroom, or on the surface of the floor and wall to a height of approximately 15 cm. From him.
The sequence of laying tiles on the floor or walls does not matter, although it is advisable to start work from the walls of the room, as this will allow protect the floor tiles from dirt and damage.
Main - choose the right color for the glue. In the event that light-colored tiles will be laid, then it is necessary to choose a white adhesive, and if you plan to use a warm floor, then the adhesive must have sufficient elasticity.
To perform the work, you will need the following tools:
- roulette
- building level
- Bulgarian
- diamond disc
- glass cutter
- notched trowel
- rubber spatula
- Master OK.
How are the walls prepared?
Now, after completing the initial preparatory work, it remains only to apply a primer to the walls and begin to prepare for laying the tiles.
Processing (priming) of walls before laying tiles must be carried out in any case., for this we dilute PVA glue in water in a ratio of one to two and apply this solution to the walls.
 After that you need to mark on the walls.
To do this, measure the height of the room. Based on the resulting size, calculate the number of whole tiles, which will be needed for laying in height.
All these operations are carried out in bottom left corner. Further from this mark around the perimeter of the room, using the building level draw a horizontal line. As a result, after we draw a line, it should close.
It is important to perform this markup correctly, because this ultimately quality will depend all work. So it's better count everything several times in order to do everything right.
After the markup is completed, all work will be done much easier.
wall technology
 Now you can start laying tiles.
To start we breed glue, the result should be thick creamy consistency.
With a spatula applying adhesive to tiles and put it in the left corner on top of the line obtained during the markup.
To apply glue, we use not an ordinary spatula, but notched spatula. In this case, the size of the teeth will depend on the quality of the wall.
The smoother the wall, the smaller the trowel's teeth should be.
Lay the first tile in such a way that it the lower edge was strictly parallel to the drawn line. The second and subsequent tiles are laid strictly along the line, with insertion into the seams of the crosses.
It is important to choose crosses depending on the size of the tile. Indeed, with the help of crosses, you can hide all the errors of the manufacturers of this material. The thickness of the crosses used should depend directly on the height of the tile. If the height of the tile is 25 mm, then the thickness of the cross is 2.5 mm.
Thus, the entire tile is laid along the surface of the walls.
The final step will be trimming the tiles and laying the bottom row, which remained after the markup.
However, everything will depend on how far it turned out, and what kind of tile will lie on the floor. It may happen that a small distance remains and it can be selected when laying tiles on the floor.
But it's too early to talk about it, because this row is laid after laying the floor tiles.
 When the tile is laid, it remains remove the crosses and grout the seams.
We produce grouting approximately after 14-16 hours after laying.
For these purposes use a polymer-based grout, as it washes well, does not allow moisture to seep in, and they are also produced in various shades and colors.
Grouting is done to remove shells, which are formed as a result of the removal of crosses and formed during installation. For this use a rubber spatula, on which the grout is applied and slowly carried out along the seams, while applying little effort.
In the event that a cement-based grout is used, then it must contain a latex additive.
After the completion of the laying of tiles on the walls you can start laying floor tiles.
You can find everything about how to soundproof entrance metal doors.
Floor preparation
One of the differences between wall and floor tiles is the difference in the force load on them, as well as the fact that the tiles used for laying on the floor less slippery.
When choosing tiles for laying on the floor, pay attention to its strength class. For styling in the bathroom suitable first class tile strength.
 Before starting work, you must level the floor, using the usual cement screed. And after the screed has gained strength, you can lay the tiles.
It is important not to forget before laying tiles waterproofing the foundation, but we have already talked about this above. However, this should not be forgotten.
Taking bathroom measurements in order to determine the necessary whole tile quantity, as well as the number of pieces for laying in those places where the whole tile will not pass.
Before starting installation, you must prepare the adhesive solution. This is best suited for dry mixes that contain a plasticizer.
It is necessary to dilute the dry mixture in water, according to the instructions on the package, and mix with a mixer.
Floor tile laying technology
The installation procedure is exactly the same like on the walls. The main difference is only that glue is applied not to the tile, but to the floor.
We cut the tile with a grinder, on which set diamond circle. Ideally, it is better to use a special tool called tile cutter, but it is unlikely that a non-specialist has it available.
We start laying from the corner farthest from the door where we put the prepared pieces.
We apply the solution to the floor and level it with a notched trowel. We press the tile, twisting it from side to side.
 During laying, it is necessary to monitor the evenness of the surface, using for this purpose building level.
In the event that it is necessary to upset the tile, then use rubber mallet. With its help, the tile is upset by lightly tapping on it.
Remember that the position of the tiles can be adjusted during about 20 minutes.
In the process of laying tiles, in order to avoid its delamination in the future, don't walk on it. During installation crosses must be used, the method of their application is the same as when laying tiles on the wall.
When the glue dries completely, which is approximately after 40 hours, it is necessary to grout the joints.
For grouting we use rubber spatula and silicone sealant. Such a sealant prevents the appearance of mold and fungus on the seams.
However, there was an unlaid strip of tiles on the walls, formed after the markup. To complete the work, we must cut tiles to size and lay it out using already known technology.
Self cut tiles should not stand out if the cutting is done correctly. But we will talk about this below. If this does not work, then you can apply plastic corners that will hide all the bumps.
How to cut and drill tiles?
 In the process of working with tiles, it almost always becomes necessary to cut them to size.
In order to avoid problems, certain rules must be observed when cutting.
First, before cutting you need to tile soak in water for about 40 minutes. Secondly, the cutting line must be at a distance at least 1 cm from the edge. Thirdly, and most importantly, cut tiles only once. This requires a glass cutter. roll towards you by applying a vertical load to it.
After making an incision, align the cut line with the edge of the table and break tiles.
If the incision is made correctly, then the tile should break perfectly evenly.
In the case when it is necessary to make a hole, do the following. Removing frosting from tiles using a tap or chisel. To do this, we make markings and already along it with the angle of the tool, with light tapping, we make the removal. After that we take hand drill and drill hole in ceramic tiles.
Remember that drilling must be done with a hand drill with victorious drill. This is due to the fact that the hand drill has a lower RPM. We bring the resulting hole to the required size with a drill, which we simply hold in our hand.
As you can see, laying tiles is not difficult, just a little patience is enough. Therefore, if you try a little, you can do all the work without the involvement of specialists. And your bathroom will delight you with its appearance for more than one year.
We suggest that you familiarize yourself with the video material, which shows how you can lay tiles in the bathroom:
Laying tiles on the floor with your own hands is a very time-consuming process that requires some accuracy. If you follow all the rules and technologies, you will be able to get a reliable and durable floor covering. It should also be borne in mind that self-made repairs can significantly save the family budget.
The work is long, it will be divided into several stages, which are completely interconnected.
Tool
First of all, they are determined with the necessary tool. You will need:

- Hammer and rubber mallet.
- Chisel.
- A set of simple spatulas, as well as notched ones.
- Trowel.
- Level and roulette.
- Tile cutter.
- Tile adhesive, grout and sealant.
- A set of crosses for creating even seams.
- Container for water and solution.
Of course, depending on the specific situation, other devices may be needed.
Material Quantity Calculation
It is better to do this at the initial stage. Many people think that it is rather difficult to calculate floor tiles, but in reality everything is different. This is done according to the following principle:
 The first thing that begins with the installation of tiles is the calculation of the number of tiles, so it is important to correctly perform this event
 - Define the parameters of the object. Its width and length. The total area is calculated.
- The resulting indicator is divided by the area of the selected tile (several options can be calculated at once).
- Ten percent is added to the amount received. This will be the necessary stock.
For example, the floor has a size of 3 * 3 meters. So, the area will be equal to nine square meters. A regular tile has a size of 30 * 30 cm. The resulting area of \u200b\u200bthe tile is converted into meters: 0.09 square meters. m. Total: 9: 0.09 + 10% = 110 pieces. When calculating trimming, the size of the seams is also taken into account.
On a note! Any large hardware store that sells tiles offers free services to calculate the required number of products.
Surface work
Laying floor tiles is possible only on a well-prepared surface. First, everything unnecessary is removed from the room. Removed old flooring. Communication is checked. This is what you should focus on. The fact is that all the water supply and drainage connections are done in advance. You should not engage in flooring until all problems in this area have been resolved. If possible, it is advisable to immediately hide the pipes.

When all technical procedures are completed, the surface leveling process begins. It is much easier to carry out work when it comes to new houses, apartments that have only screed-plaster. In old rooms - you have to try. The fact is that objects built many years ago can have a different basis. Sometimes you have to create a new surface.
On a note! When it comes to bathrooms that are located in old apartment buildings, they pay attention to the baseboards. They are made from a durable cement mixture. They will have to be removed completely, along with the coating.
Floor preparation before tiling
- After cleaning, there is a lot of dust and dirt that needs to be removed. Floor tiles - do not tolerate anything superfluous.
- The surface is measured. It is done in order to determine the existing curvature. Small differences are allowed - no more than 5 mm per 2 meters. Any defects that are larger than the specified parameters need a more serious approach.
- The situation will help to correct the leveling mixture. It is better to choose cement-sand compositions. This mixture is poured over the installed beacons. It turns out a flat and smooth base. But such a procedure is performed after all deep cracks and potholes are sealed.
- The wooden floor needs the same approach. The only thing is that the procedure will be slightly different. First, the reliability of the lag and boards is checked. Next, the wood is impregnated with oil paints. The cracks are pre-sealed with elastic putty. A layer of waterproofing will be laid on the dried surface. A reinforcing mesh is stretched from above. The prepared mixture is poured.
- Do not forget about priming with penetrating compounds.
 Priming the floor before laying the tiles ensures a stronger bond between the tiles and the floor surface.
 On a note! Rooms with high humidity require more care. A prerequisite will be -. Materials for this can be used different. Some can be laid (film, roll), others can be applied with a roller and brush (liquid).
Indeed, laying floor tiles with your own hands requires a balanced approach to the surface. It cannot be hoped that small imperfections will be corrected by the final coating.
markup
There are two main ways to tile a floor. Each has its own characteristics.
- The easiest option is that the installation starts from the far corner. The movement is towards the doorway. This method is suitable for small objects, as well as for rooms with complex geometry. Ideal for those who do not have enough experience.
- A more complex version can also be used. In this case, lining starts from the middle. The surface is pre-marked - you need to get four identical squares or rectangles. The lines will run through the center, forming four corners. You should choose one, it will serve as a starting point for work. The material laid according to this principle will require trimming around the entire perimeter. Therefore, such manipulations are carried out with sufficient experience.

It is recommended to start work with a preliminary arrangement of elements. That is, the laying of tiles on the floor is carried out on a “dry” basis. This will help you figure everything out right away. Especially if there is a pattern that needs to be adjusted. It is important to consider the presence of seams. This method allows you to re-evaluate the size of the crop, and, if necessary, make adjustments.
Advice! When making primary calculations, pay attention to the areas that will be located along the walls. To obtain a beautiful floor surface, one should be guided by the principle that tiles should not be cut into narrow strips. The size should be more than 35-40% of the total width.
Laying
Laying ceramic tiles on the floor begins with the preparation of the adhesive. Even if a ready-made composition was purchased, it needs to be thoroughly mixed. When a dry mix is used, the recommendations provided by the manufacturer must be followed.

Do not immediately prepare a large supply of glue. Please note that the process can take a long time. Then the composition will begin to lose its properties. It will just freeze.
The work is carried out according to the following principle:


On a note! The space near the walls begins to close up at the last stage. This approach will help to reduce time, since in this case it will be possible to trim all the material at once.
- It should be borne in mind that the technology of laying tiles on the floor does not allow the presence of voids. If such a defect is allowed to form, then the probability of damage to the coating is high.
- Immediately wipe off excess glue from the surface. Otherwise, the adhesive will have to be removed with a special scraper.
- The question often arises: how long does the laid material dry? It depends on the mixture used, but it is not recommended to walk on the floor for two days.
- At the last stage, rubbing of seams is used. This procedure allows you to get beautiful gaps. When the need arises, a sealant is additionally applied.
If you analyze all the requirements and rules, it becomes clear that laying tiles on the floor is a difficult task, but doable.


