In the garage room, the viewing hole becomes simply irreplaceable. With it, you can regularly carry out an almost professional technical inspection, make a planned replacement of parts, as well as repairs, if necessary. Of course, if a car enthusiast devotes enough time to his car, repairs and inspects it himself, he just needs to equip the room accordingly. Today we will learn how bricks can be built. We will define all the most important stages, useful tips, find out which algorithm to build a pit. In addition, we will consider a specific algorithm for building a viewing hole made of bricks.
First of all, you need to carry out complex preparatory work. Now we will highlight all the most important points.
ground water
One risk factor is of great importance - the level of groundwater rise. The final success of the work on the construction of the inspection pit largely depends on this. In some cases, it is necessary to abandon the construction of such a pit or cellar. You need to be prepared in advance for the fact that the water level will be critical.
Unfortunately, in some settlements there are no specialized geological services at all, where relevant surveys are carried out. But you can independently determine the level of groundwater rise with a fairly high accuracy. This is done in the following way. You need to dig a hole 2.5 meters deep. Watch how high the water rises. When the worst forecasts are confirmed, that is, the waters lie too close to ground level, it is better to refuse to build a viewing hole. Of course, purely theoretically, it is possible to provide waterproofing even in such a situation, but then the pit will look more like a bunker, it will take a lot of effort and investment in construction, and the danger of flooding will still remain.
Another option that will help to cope with the natural risk factor is the arrangement of drainage. It happens that a motorist takes care of his car professionally, he needs an inspection hole, but there is no opportunity to choose another site. In this case, high-quality groundwater drainage should be done. A special drainage well is dug outside the garage, where water is drained. But such work is laborious and requires significant investments.
Properly determine the size of the viewing hole
It is very important to immediately accurately determine the optimal parameters of the viewing hole. It should not be too large, but it is also inconvenient to work in cramped quarters. Everything must be correctly selected, of course, in accordance with the dimensions of the car.
Let us dwell on the methods for determining the key parameters.
- Pit length. Consider the parameters of the car. Typically, the standard length of a viewing hole for a passenger car is approximately 4-5 meters. To equip a convenient descent with an attached or monolithic ladder, you need to add one more meter. These are good parameters that are focused on comfortable, rational use of the viewing hole. You will no longer need to regularly move the car during repair work, as happens if the pit is too small, short.
- Width. Here the distance between the wheels of the car plays a key role for you. The standard parameter for modern cars is a pit with a width of 75-80 cm. This width will be quite enough, while it is not too large.
- Depth. Everything is strictly individual here. Of course, they work standing up in the inspection pit. Some dig shallow holes so as not to provoke pressure and groundwater leakage, but it is inconvenient to work while sitting on a stool. It is better to make a good deep viewing hole. Approximately 15 cm is added to the height of the motorist. When there are any doubts about the depth (for example, when several people with different heights are planned to work in the pit), of course, it is better to make it larger. After all, if necessary, you can simply make a small platform under your feet.
When the parameters are determined, it is necessary to make a drawing, and write all the exact dimensions on it. Then this scheme is transferred to the construction site, digging a pit.
Construction methods
The construction process will largely depend on the method of arranging the viewing hole. The best option is to lay the foundation immediately, even at the stage of erecting the strip foundation and the basement of the garage. In this case, the excavator also digs the pit. At the same time, work is underway to waterproof, ventilate and insulate the pit with the garage as a whole.
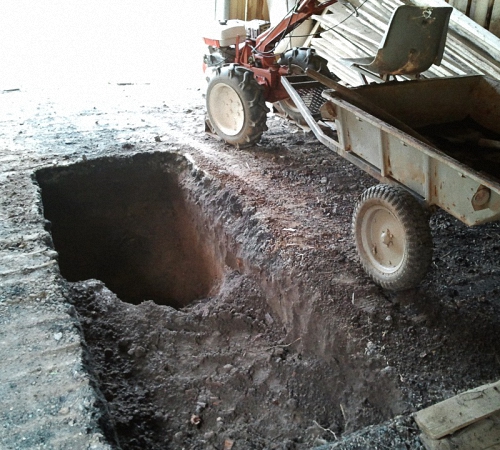
But quite often you have to deal with construction after the construction of the garage box. Of course, then you have to dig the pit manually.
Pay attention to one significant point. You will need soil from the development, so that later you can fill your sinuses with it, as well as raise the level of the floor in the room. The fact is that the floor of the garage is made at a mark higher than the road on which the car leaves.
Building a viewing hole
It's time to consider in detail how to build a brick inspection pit with your own hands. Let's start by clarifying some points.
Specify the size of the pit
We have already talked about the parameters of the viewing hole. But it is important to remember: the pit must be larger than the pit! Consider the following settings.
You have to lay out a leveling layer, which will consist of gravel, crushed stone and sand. The standard thickness of such a layer is 50-100 mm. This must be added to the depth.
The bottom is made of concrete with a grade of 150-200, the thickness of which is approximately 100 mm. This is also reflected in the depth of the pit.
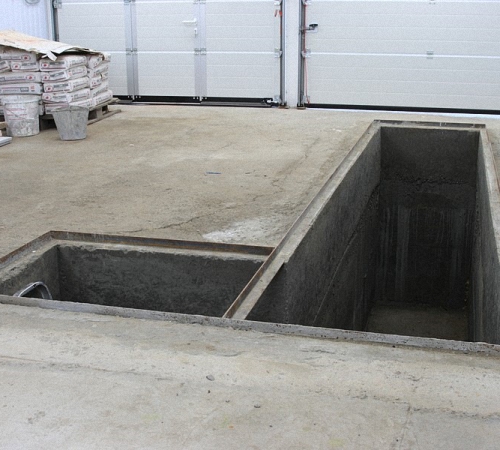
Width and length also increase, since the thickness of the brick walls is 250 mm when building in one brick. In addition, a gap of about 30-40 mm should be left between the masonry and the wall of the pit, in order to then make waterproofing from the outside and sealing backfill with soil.
Work algorithm
You will need crushed stone, concrete grade 200, cement, gravel and sand, as well as waterproofing sheet materials (izolon), plaster, brushes with shovels, a level, an attached ladder, a metal corner, boards, polystyrene foam for insulation, metal pipes and gratings for ventilation devices .
Let's move on to the step-by-step instructions.
- First of all, all the markup from the drawing is transferred to the garage floor in the place where you decided to make an inspection hole.
- Then you need to dig a pit. The bottom is carefully cleaned, after which the floor is arranged in the pit. In the process of working in the pit, it is better to go down the ladder.
- After leveling the floor, a horizontal waterproofing of the bottom is performed. Use roll materials, for example, the well-known isolon. The material is popular, proven. You can take roofing material, in extreme cases - a thick plastic film.
- Be sure to bring the edges of the waterproofing material 50 cm beyond the bottom of the pit. Then they are wrapped, attached to the outer surface of the brickwork.
- An important stage is the concreting of the bottom. Here it is necessary to immediately take into account the dimensions of the concrete base. If the pit is planned with a width of 75 cm, add the thickness of the brickwork (50 cm along the perimeter), and also make a margin of 5-10 cm. As a result, the width is 140 cm. The width of the concrete base is calculated in the same way.
- Reinforcement is optional, although for greater reliability and durability it is still better to lay a reinforcing metal mesh. If you took the concrete mix M-200, and the thickness of the concrete bottom is more than 80 cm, it is quite possible to do without reinforcement.
- Then there comes a time when it is necessary to allow the concrete to harden. This will take at least 3 days.
- Now it's time to start laying the brick walls of the inspection pit. Carefully make orders, use a level so that the masonry is adjusted horizontally. There are enough walls in one brick. Do not forget that you need to leave a gap between the walls of the pit and the masonry.
- Perform thorough plastering of the walls on both sides. A good solution is to plaster the masonry in parallel with the construction of the walls. So, having laid out 4 rows, it is necessary to cover them with a layer of plaster outside and inside.
- Pay more attention to the exterior wall decoration. High-quality coating waterproofing is required. Use bituminous mastic, hot bitumen. Such waterproofing is necessarily carried out in two layers. This is indispensable, since it is precisely such a measure that will prevent the appearance of dampness in the inspection hole. Otherwise, the walls will draw moisture from the ground.
- When the masonry is fully completed, external waterproofing is done, it is the turn of backfilling the existing sinuses. Here you will need the soil left over from digging the pit. It is covered with 15 cm, carefully rammed, then the next layer is made. This layer-by-layer ramming is also very important. The best solution is to add clay to the soil. The compacted clay layer will become a reliable additional barrier to moisture penetration, as well as a monolithic support for masonry.
If you want to conduct lighting in the viewing hole, immediately provide niches for lighting fixtures in the masonry. It is also worth making an additional large niche for storing the most popular tool, wrenches.
We equip a viewing hole
It is important to carry out a sufficiently voluminous additional work in order to fully equip the viewing hole in the garage.
niches
They are useful for lighting fixtures and tools. They need to be provided in the process of laying brick walls. The optimal dimensions for a standard niche are as follows: a depth of 12 cm, a height of 25-30 cm, and a length of about 50-75 cm.
Water collection
A pit is a very useful thing in a viewing hole. After all, even with impeccable waterproofing, you will need to somehow get rid of moisture that can be carried on the wheels, drip from the car. The best option is to make a liquid collector at the bottom of the inspection hole. To do this, a minimum slope is made to one corner. There is a small hole dug. It is also cemented so that the edges do not collapse. Since it is possible to accidentally step there, the pit is covered with a strong grate.
Ventilation
It is advisable to make forced or natural ventilation in the inspection pit. Use metal pipes, a small fan. Ventilation will help to quickly eliminate all harmful fumes from the pit, as well as prevent the formation of condensate. And it is much more comfortable and safer to be in such a space.
Strengthening the edges of the pit
The edges of the pit should be well reinforced. Be sure to do this so that the pit does not crumble, withstand the pressure of the wheels of the car. You will need a metal corner No. 45-50. A framing frame is welded from it around the entire perimeter of the viewing hole. In order for the frame to be securely fixed, anchor outlets with a diameter of 6-10 mm must be welded to the outer sides. They should be located every 25 cm. When the garage floor is additionally concreted, they enter the concrete base. 
We close the hole
To protect the pit from all external influences, it is desirable to close it for those periods when it is not in use. It is worth considering this point already at the stage of welding the corners for the frame. Weld them so that the boards fit comfortably into it along the narrow side.
Wheel stops
Consider the moment the car enters the area above the viewing hole. So that the wheels do not even accidentally fall into it, it is necessary to specially install limiters for them. To do this, take a metal profile: corner, channel or pipes. The metal frame should rise above the floor, protecting the pit from the arrival of the car.
Warming
A good solution is to insulate the viewing hole. For this, sheets of expanded polystyrene are suitable, which can simply be glued to brick walls.
Lighting
Take care of lighting the space of the pit. Install lamps in pre-prepared niches, run cables in plastic channels. Lighting will ensure comfortable work at any time.
Step-by-step instructions with a photo from the garage
A step-by-step instruction with a photo allows you to get a visual representation of the process of building a viewing hole made of bricks with your own hands.

- At first it was easy to work: there was sand digging.

- Then the clay went, so it became more difficult to dig.

- Made a waterproofing box out of isoplast. Temporarily laid the boards for fixing.

- Installed reinforcing mesh.

- Started laying brick walls.

- Made niches on the sides.

- Recesses of different sizes: for tools, for lamps.

- Nishi also decorated with metal frames.

- The niche for the lamp is small.

- I took a part of concrete, two parts of cement and gravel. Made a concrete pour.

- He poured concrete carefully: inside the floor, outside, around the pit, to further strengthen it.

- Carefully plastered the walls.

- I made a socket for a portable lamp in my pocket.

- Ran the cable.

- He inserted a lamp into the niche.

- This is what the finished pit looks like with lighting.

Video: learning to make a viewing hole
You will be able to better understand all the intricacies of building a viewing hole in the garage if you watch the following video material. You can make a hole with your own hands. The main thing is to remember all the important tips, the algorithm of work. A complete picture will be obtained after watching the following video: it describes in detail and shows with a specific example how to build a viewing hole in the garage.
Be careful, act carefully.
Arranging a viewing hole in the garage helps to carry out independent car repairs much faster and cheaper, without the involvement of specialists. In addition, with its help, periodic technical inspections of various types of equipment are carried out. Proper arrangement of a viewing hole has a lot of advantages, but for its implementation it is required to follow a certain technology, which we will talk about later.
Advantages and disadvantages of arranging a viewing hole in the garage
The arrangement of a viewing hole in the garage has both positive and negative sides. At a time when the network of service stations was poorly developed, inspection pits were in almost every garage. When a large number of service stations appear, many motorists refuse to build an inspection pit, primarily due to factors such as lack of time to repair a car, accumulation of excess moisture in the pit, additional time and material costs for building a pit.

In addition, increased humidity in the pit contributes to faster damage to the car, since moisture evaporating from the pit gets on the lower part of the body, thereby accelerating its corrosion.
Despite this, the viewing hole has a number of advantages in favor of its arrangement in the garage. First, the ability to self-repair or test the vehicle. This fact allows you to save on a trip to the service station. In addition, for some men, checking the car is a kind of hobby. Periodic oil changes in a garage with a viewing hole become quite possible at home.
Arrangement of the correct viewing hole in the garage
If you still decide to build a viewing hole in the garage, this is not always possible, primarily because of the height of the groundwater. If the water is located at a distance of about 200 cm from the garage, then the construction of a pit is unacceptable, since you will have to constantly pump water out of it.
Although with proper waterproofing and installation of a drainage system, this problem is quite solvable.
The arrangement and installation of drainage requires the advice of specialists, since even the smallest mistake will lead to the malfunction of the entire system. If the drainage system is laid during the construction of the house, then it is quite possible to build a viewing hole. Otherwise, this procedure will be too costly and troublesome.
If the groundwater is too high, then the only option would be to equip a viewing hole of a recumbent direction.
To check the level of groundwater, you will need to consult specialists, although it is quite possible to cope without them. To do this, you should dig a small pit at the location of the inspection hole and measure the level at which the water begins to rise. The water will begin to rise during heavy rains, so the pit is not concreted until this period.

The dimensions of the inspection hole in the garage: features of the calculations
In relation to the design features, the inspection pit is:
- complex, consisting of a pit and a cellar;
- narrow, in this case, in order to descend into it a fairly small staircase;
- the recumbent option involves staying in the pit, exclusively in the supine position.
In addition, these options differ in various modifications of the pits. The size of a standard inspection pit in a garage depends, first of all, on the number of people who will be in it, on the size of the garage itself, on the type of car or other equipment that will be in the garage.
If you have several cars, it is better to use the classic version, which involves the following dimensions:
- the width of the inspection hole in the garage - from 80 to 100 cm;
- the depth of the inspection hole in the garage is about 170-200 cm;
- the length of the inspection hole depends on the length of the garage and is at least 160-200 cm.
Before planning a viewing pit, individual structural features should be taken into account, which will affect the determination of the size and configuration of the pit. The pit is dug with allowances, which are about forty centimeters in length and width, and about twenty in height. If it is necessary to carry out wall insulation, the size of the pit should be increased by the size of the material from which the insulation will be made.

How to make a viewing hole in the garage: the initial stage
After arranging the necessary pit and after setting it up before the first rain, an important process follows - the construction of the floor of the inspection pit. If you adhere to all the technological points associated with the conduct of this process, then problems with the accumulation of excess moisture will not appear.
First of all, the inspection pit needs natural ventilation, so when arranging the floor, you should take care of the presence of a hole through which the hose will pass in the form of an air duct.
This hose is closed with a cap, and is inserted at least twenty centimeters. Next, the concrete pad is prepared, which consists of two layers. First, gravel is poured, at least ten centimeters thick, and then sand, about six centimeters thick. Thanks to this, a drainage system is equipped, which is responsible for removing moisture from the pit.
Each of the previously covered layers requires careful tamping and leveling. For these purposes, a special tool and water are used.
After that, metal reinforcement is laid on it, and the surface is poured with concrete mortar. When the concrete dries, another waterproofing layer is laid, and only after that, the pit is finished or treated with heat-insulating materials.
If the groundwater is too deep, it is possible to lay the floor in the inspection hole with bricks.
Waterproofing a viewing hole in the garage: features
The modern building materials market offers a huge amount of waterproofing materials of various shapes, sizes and purposes. The main requirements for the material for waterproofing inspection pits are efficiency and high quality work at a moderate cost.
Therefore, based on these criteria, we suggest that you familiarize yourself with the main options that help to waterproof the inspection pit:
- polymer single-layer membrane - the thickness of this material is about two millimeters, it is durable and highly resistant, but at the same time, this option has the highest cost, in addition, the installation of the membrane will require special equipment and tools to work with it;
- materials based on bitumen in the form of roofing material or bituminous lubricant - they are distinguished by affordable cost and ease of installation, the duration of operation of this waterproofing option is at least 15 years, but at the same time, you do not need to hire specialists, the material has a roll shape, it is easy to fit and cut, for gluing joints it is heated or a bituminous solvent is used;
- grease for waterproofing the inspection pit is notable for its low cost, ease of application, for its installation, the surface must first be moistened with water.
The choice of insulation for a viewing hole in the garage
The procedure for insulating the inspection pit is an uncommon option that needs to be carried out only if additional material resources are available, and when working in a heated garage room.
Insulation will reduce the amount of electricity required to heat the garage. The material in the form of insulation is glued to the wall and floor of the pit. After its installation, the walls are finished.
Among a large number of heaters, it is best to give preference to expanded polystyrene, which has the following advantages:
- duration of operation;
- high resistance to thermal losses;
- moisture resistance;
- affordable cost;
- Fire safety.
Please note that the material for floor insulation is chosen more dense than for the walls of the inspection pit.
How to build a viewing hole in the garage: wall technology
In the process of erecting the walls of the inspection pit, there are two options for further action:
- concreting;
- brick.
After that, tiles or other finishing materials are laid on the walls.
Before laying bricks or pouring concrete, a series of preparatory work should be carried out, which consists of applying clay to the surface of the walls, laying a dense film in the form of waterproofing, and installing formwork, the thickness of which is about 12 cm.
Please note the technological nuances associated with the implementation of these works:
- so that the car wheel does not accidentally fall into the inspection hole, you should take care of the presence of an insurance rail in it, in addition, it will prevent the ingress of moisture and dirt from car wheels;
- the viewing rail has a T-shape, its manufacture requires metal, which is fixed on the surface of the formwork, and is a supporting element on which the cover is put on;
- in addition, it will not be superfluous to arrange ledges and niches in the wall, on which various kinds of accessories will be conveniently located.
Do-it-yourself inspection pit in the garage - arrangement of lighting and covers
Lighting in the viewing hole is not necessary, as the use of a portable lantern or light bulb is sufficient. However, if the viewing hole is used too often, then it is better to foresee this moment in advance.
The maximum voltage of the outlet, which is installed in the inspection hole, should be 35V. In addition, due to high humidity, it must be of high quality and moisture resistant. The use of standard two hundred and twenty volt lamps in a viewing hole is prohibited, as they pose a threat to the life of a person who works in a hole.
When choosing a lighting device, one should proceed from the power of the outlet for which special types of lamps are designed.
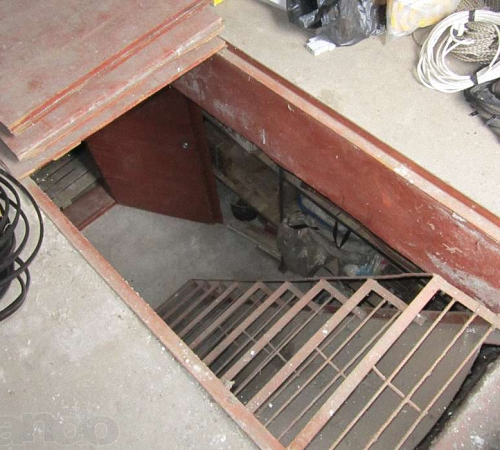
The installation of a cover, which is most often made of wood, completes the work on arranging the inspection pit. The minimum thickness of the material is 3 cm, as too massive boards will be difficult to lift.
There are several options for making a cover for a viewing hole:
- when using a metal corner, for the manufacture of the lid, several shields on small rollers will be required, it is with their help that the shields are shifted among themselves. A wooden plank is designed for each shield, the width of which is about 25 mm;
- if there are only two corners fixed along the contour, two shields are used to make the cover, which are located in different areas, rollers are installed on the movable shield, and limiters are installed on the extreme parts of the slats, thus, when the shield is shifted, the pit opens halfway;
- covers that open according to the roller shutter principle are made of wood, about 4 cm thick, and long, depending on the width of the pit, each board is processed in such a way as to build a groove hole on it, a metal cable is installed in them, between which installation is carried out springs, with light pressure on the handle, the pit opens, this cover is convenient, but in the process of its manufacture it should not be treated with an anti-corrosion compound and a waterproofing solution.

How to fill a viewing hole in the garage
As mentioned earlier, the walls of the inspection pit are made of concrete or brick. The first option is less expensive financially, but requires higher time investments. Concrete walls are distinguished by higher strength, durability, and reliability.
Inspection hole in the garage photo:

After compacting the rubble, the arrangement of the concrete floor begins, its height is about six centimeters. Previously, the floor needs to be reinforced. For these purposes, a wire mesh with a mesh size of 15x15 cm is used.
To prepare one cubic meter of concrete, you will need:
- three hundred kilograms of cement, more than 400 brands;
- 700 kg of sand;
- 200 liters of water;
- 1200 kg of crushed stone.
If the concrete mixture is mixed manually, then more water should be added. When using a concrete mixer, the proportions are preserved.
When increasing the water in the concrete mix, add a little cement. This type of concrete is characterized by good strength and durability.
The optimal thickness of the walls is about fifteen centimeters. To prepare the solution, you will need:
- 350 kg of cement;
- 660 kg of sand;
- 1200 kg of crushed stone;
- 210 liters of water.
For concreting walls, the technology of layering should be observed. That is, the concrete composition is applied in layers. The height of each tier should not exceed thirty centimeters. To compact the composition, use a bayonet shovel or a deep concrete vibrator.

The arrangement of the walls of the inspection pit requires reinforcement, using the same mesh as on the floor. The mesh is installed in strips, just like concrete is laid. After the work, the concrete is left for three days, and then the formwork is removed.
Inspection hole in the garage video:
Motorists "with experience", who are independently engaged in repairing their car, know how necessary it is to have an inspection hole in their own garage. This simple recess in the floor allows you to inspect and, if necessary, repair the lower part of the car, the exhaust pipe, muffler, gearbox, engine and other hard-to-reach places. If there is a hole, you do not need to pay for a simple oil change procedure in a car service.
However, the existence of such a structure in the garage inevitably leads to the appearance of high humidity. Therefore, if the size of the room allows, it is recommended to do it away from the place where the car usually stands. Otherwise, water vapor accumulating above the pit will condense on the bottom of the car and lead to its rapid corrosion.
Ideally, when they think about building a viewing hole before building a garage. But in an existing garage, you can equip it, although you will have to face a number of restrictions. Doing this work with your own hands is not so difficult, the main thing is to know how! When performing work, it is advisable to study building codes and strictly observe building technologies. Then the results of labor will delight the owner for many years and it will be possible to avoid sad consequences.
Step one: sizing
Work on arranging a viewing hole for a garage begins with its design and calculation of dimensions. It makes sense to fix the results of these works on paper in the form of a garage plan and a pit drawing. It is necessary to think carefully about where it will be located, how the car will enter the garage. The required dimensions of the inspection hole depend on the width and length of the car, the size of the garage, as well as the height of the owner. It is important to make the calculations correctly, otherwise the mistakes made will cost too much later.
- The width of the pit is chosen so that it is 20 centimeters less than the distance between the wheels of the car, but sufficient so that the person inside has room to work. At the same time, you should not be rigidly guided by the size of a particular “iron horse”, because the owner may eventually buy another car for himself.
The standard width is 75–80 cm. If a pit is needed for a car and a truck at the same time, then the final width is averaged, despite the fact that it will be more difficult for a car to drive;
 Inspection hole dimensions
  In the photo is a drawing of a viewing hole
  In the garage, a pit for inspecting a car is necessary
  Section of the pit showing its device
 - The length of the structure is determined by the personal preferences of the owner and the size of the garage. Its minimum value is equal to the length of the car + 1 meter. It makes no sense to make a hole less than 2 m long. Consideration should also be given to space for steps or a ladder;
- The depth of the pit should be such that the owner of the car, working in it, can freely reach any mechanism without bending down or standing on tiptoe. Although it is better to dig a hole a little deeper than necessary, than vice versa. Extra centimeters can be removed due to the thickness of the floor. The optimal depth is equal to the height of the owner + 15–20 cm.
The necessary allowances on each side should be added to the obtained dimensions for subsequent work on finishing, waterproofing and insulation. The dimensions of the allowances for brick walls are 12 cm, for concrete - 20 cm on each side. The allowance for the floor is 20 cm. If waterproofing or insulation of the pit is supposed, the allowances must be increased.
 If the groundwater level is above 2.5 m, then the pit will be flooded
 Be sure to find out how deep the groundwater is in the soil. This information is indicated in the research report before the construction of the garage. The level of groundwater in the area where the garage is located plays a very important role. If it is higher than 2.5 m, then it is impossible to make an inspection hole in an already built garage, because it will be flooded. In the garage under construction, you will have to make a drainage system that diverts excess water into the sewer. If groundwater lies deeper, there are no contraindications to construction.
 In the niches you can place the tools necessary for repair
 It is convenient when small niches are made in the walls of the viewing hole. They usually have the necessary tools for car repair. Places for niches, their dimensions should be considered in advance and drawn on the plan. The depth of the niches is usually made 15–20 cm, the length and width are determined at the discretion of the owner.
Step Two: Planning and Executing Construction Phases
After work "on paper" comes the turn of work "on the ground". The stages of building a viewing hole are as follows:
- Markup. On the place of the garage allocated for the pit, markings are applied with chalk or a marker, taking into account the calculated allowances, after which the existing floor is dismantled. It is not recommended to make a viewing hole close to the garage wall. The distance to the wall must be at least 1 m;
- Pit preparation. Undoubtedly, this is the most difficult stage, but workers can be hired to complete it. You will have to take out about 8-9 cubic meters of earth. The duration of the process depends both on the capabilities of the worker and on the properties of the soil. You need to dig with a bayonet shovel, sometimes with a pickaxe, starting from the far end of the future pit. Spacers from boards may be required so that the soil from the walls does not crumble.
Loose earth takes up 20–25% more space, so this must be taken into account when removing it.
Part of the earth must be left to fill the sinuses. Inside the excavated pit, the resulting walls and floor must be leveled with a manual rammer as carefully as possible. After the surfaces are ready, the bottom is covered with a 10 cm thick layer of gravel, well tamped. 5 cm of sand are poured on top, then rammed again. If the soil is wet, then 5 cm of clay is poured for waterproofing, covered with the same layer of gravel. The surface is covered with a plastic film, after which it is reinforced with a metal mesh;
- Do-it-yourself walls and floor of the viewing hole. The bottom of the pit prepared in this way is poured with a layer of concrete mortar 7–8 cm thick, left to dry for several days. After the concrete has hardened, you can proceed to reinforcing the walls with a mesh. To fill the walls with a concrete mixture, formwork is required, which is usually made from OSB sheets. Then from them you can make shelves for tools. The formwork is installed in tiers of 30-40 cm, connecting the elements with spacers. At the same time, a metal mesh is laid in two layers. In addition, embedded parts are used that are firmly fixed in concrete. Particular attention should be paid to reinforcing places for niches.
The space between the formwork and the edges of the pit is filled with mortar. A metal corner is laid in the last layer of concrete, protruding 10 cm above the surface. Such a border is needed to see where the pit is when entering the garage. Subsequently, boards are laid on it, covering the viewing hole.
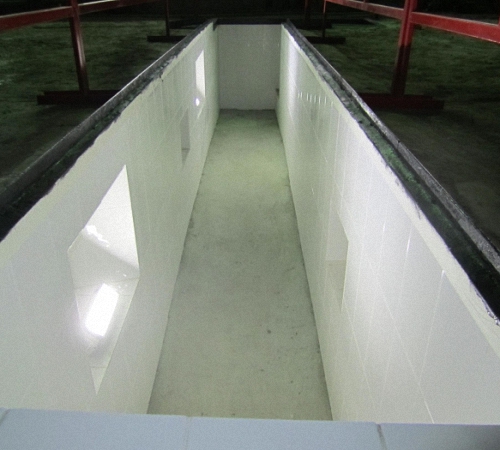
The formwork is removed 2 weeks after the walls are poured, after which the concrete is allowed to harden for another month. Only in this way can the strength of the walls be guaranteed. When the concrete hardens, they proceed to the backfilling of the soil, and then to the interior decoration of the viewing hole. Backfilling of the sinuses is carried out with clay or loam, which well protect the pit from water penetration. Pour layer after layer of 15–20 cm, compact well. Instead of clay, you can use the original soil, but it must be especially carefully compacted. Recently, ceramic tiles have been used to finish walls and floors. Another option is to plaster the walls with white gypsum plaster.
Step three: waterproofing and insulation
The pit preparation procedure described above is applicable when the garage is located in an area with fairly dry soil. If the soil is wet, then there is a risk of flooding and constant dampness inside the pit. In such a situation, additional measures for waterproofing the bottom of the structure are needed.
To do this, before pouring concrete, layers of special materials are laid on the floor to prevent the penetration of moisture. The edges of the piece of material should go 15–20 cm along the edges onto the walls.
Most commonly used:
- Materials based on bitumen (durable, inexpensive, easy to install);
- Polymer membranes (strong, durable, well compatible with other materials);
- Penetrating waterproofing (high degree of protection against moisture, resistant to temperature fluctuations);
- Liquid rubber (very high degree of protection, but the treated surface must not be damaged).
For additional protection against moisture, the concrete solution is prepared using special additives.
In order not to freeze when repairing a car in winter, it is better to insulate the inspection hole. So you can further save on electricity used to heat the garage. Insulation should be provided at the stage of determining the dimensions of the pit. Among modern heaters, expanded polystyrene is considered the best. It has the following properties:
- Does not rot;
- Does not burn;
- Does not pass moisture;
- It adheres well to concrete surfaces with glue;
- It's cheap;
- Safe for health.
Step four: additional arrangement
In order to work comfortably inside the inspection pit, you need to perform a number of additional works:
 Adequate lighting is required to inspect the vehicle
Important details when arranging a viewing hole
When carrying out work on arranging a viewing hole for a garage, one must not forget about the measures of one's own safety:
- When excavating in weak, unstable soils, starting from a depth of 1 m, install spacers and reinforcements from boards. The fact that the soil is crumbling is usually immediately visible;
- Use protective equipment: gloves, mittens, sturdy boots, goggles, especially when working with a grinder or puncher;
- Work with an assistant. It's much easier, faster and safer.
Such rules will help to cope with the work without harming your health.
Video
Watch a video about building a viewing hole in the garage with your own hands.
March 24th, 2016 Admin
 Car repair is often associated with an extensive range of works. In some cases, access to components and assemblies is possible only from below, which cannot be done without a lift or viewing hole. The first, due to its high cost and high energy consumption, is used in car services, but the second is quite possible to do in your own garage.
The presence of a pit will greatly facilitate the repair and maintenance of the machine, but to make it, you will have to work hard. Today we will tell you about how you can independently equip a viewing hole.
How to make a viewing hole in the garage

First you will need to take a few preliminary steps:
1) Find and study documents about what type of soil is in the area of \u200b\u200byour garage, how deep it freezes, at what depth groundwater is located, etc. These data will greatly affect the configuration of your pit (depth and degree of waterproofing);
2) Draw up a detailed drawing indicating the dimensions of the pit and its location relative to the walls of the garage;
3) Determine the necessary building materials, buy them and bring them to the right place, the same goes for tools.
Designing a viewing hole for a garage

At the stage of drawing up the drawing, it is important to decide where exactly the pit will be:
- In the center of the garage, if it contains only a car and items necessary for it, such as operating fluids, spare tires, etc .;
- Closer to one of the walls, if the garage is also a storage of various household items, i.e. also used as a shed. But remember, you can’t place the pit too close to the wall, otherwise it may collapse!
Don't forget to also provide a plank floor for the pit to cover it when not in use.
What should be the size of the inspection hole for a car

1) The length must match that of the car with an increase of 1 m, which is needed to equip the steps;
2) The width again depends on the width of the car, but it is not advisable to make it more than 80 cm;

3) Depth should be done based on your height. At the same time, it should be taken into account that you, standing in the pit, should have 15 cm above your head - this is a comfortable distance that allows you not to reach for the bottom of the car, but to calmly reach it.
Having calculated all the dimensions, outline the contours of the future pit on the garage floor and get down to business.
What you need to dig a trench under a viewing hole
![]()
At this stage, you will need a shovel and probably a drill. The latter is needed if the soil is stony and cannot be taken with a shovel. The selected soil can be used for agricultural purposes by moving the fertile soil to the garden (if you have one). Clay and stones are best put in a separate pile - they will come in handy if you need components for concrete. They can also be used to raise the floor of the garage.
In the process of digging a pit, do not forget that the edges of the pit should be at least 50 cm (this is necessary to create walls), and the depth margin should be made in the amount of 30 cm (for waterproofing), and do not forget to make an allowance for floor for the pit, the thickness of which is determined by yourself.
We build the walls of the observation pit
Before erecting walls, it is necessary to make a flat floor. The best way is a concrete screed, but asphalt can also be used.
The viewing hole must have walls, otherwise it will inevitably begin to crumble. There are quite a few options for creating walls, the most common of them are discussed below:
1) The simplest option is to use roofing material or foil isol, on top of which there will be a number of boards “painted” by mining (this slows down the decay process) or slate, but not wavy, but flat.

2) You can plaster the wall by throwing a rough “fur coat” on a metal mesh, and after it dries, bring out even walls with a new portion of the mortar.

3) If you are determined to build a truly durable structure, and the size of your garage allows you to do this, then it is better to build walls from brick.

The optimal wall thickness is 0.5 or 1 brick. Ideally, they should be new, but if the budget is limited, you can use used ones. The main thing is that they are even and not burnt. If the bricks are old, they must be cleaned of dirt. It is better to choose a classic masonry mortar, consisting of cement and sand in a ratio of 1: 3. If you are a beginner, it is better to add liquid soap or more water to the mixture. The solution will become more liquid and will harden longer, which will give you a large margin of time for laying and correcting flaws.
Naturally, the walls must be made even. To do this, before laying, pull the lace. For control during the masonry process, use a plumb line or building level.
If desired, small niches can be built in brick walls. During repairs, it will be convenient to put tools, spare parts and other small things in them.
Whatever method of erecting walls you choose, they must be strengthened with strapping so that the structure is strong and cannot collapse. For this purpose, a steel corner 50 × 50 × 5 mm is excellent. It is necessary to weld a contour from it, and in such a way that, on top, it is possible to easily lay the cover from the boards, which was mentioned above.
The finished masonry can be left in its original form or plastered, and then painted in any color. In addition, the floor for warmth can be covered with wooden flooring.
If you are a resident of the Far North, it is important to take care of thermal insulation. As a heater, it is better to use 5 cm polystyrene foam. Despite the small volume, this material has excellent heat-insulating properties.
What to do if groundwater is close?

As mentioned above, when digging a hole, it is extremely important to know where the groundwater begins. If it was not possible to find the relevant documents, you will have to drill a well or dig a hole. Water appeared already at a depth of 2 m.? Then you can’t do without waterproofing, otherwise in the spring your pit will turn into a mini-pond with melt water. Moreover, it is necessary to do waterproofing, strictly before the start of pouring the floor and erecting walls.
How to choose waterproofing material
At the moment, the most widespread are 3 types of waterproofing:
polymer membranes.

Considered the most reliable material. The service life is unlimited. In view of such outstanding qualities, the material is very expensive, and not every car owner will be able to overpower his purchase. In addition, its application requires special equipment, which can only be used by specialists. Because of these factors, we will not consider it in detail;
Roll materials based on bitumen (roofing material, rubemast, foilsol, brizol, etc.).

They have an affordable price and are very easy to use - no special knowledge is required. But the service life of such waterproofing is limited - 10, maximum 15 years, after which it must be completely changed.
Penetrating waterproofing.

A very effective way to prevent water ingress. More expensive than roll materials, but it has an unlimited service life.
Waterproofing a viewing hole in the garage: stages of implementation
Waterproofing should start from the floor. First, compact the surface tightly, then pour an even layer of clay on it, sand on the clay, and gravel on it. Pack each layer carefully. The total thickness of all these layers should be 30 cm.
Roll-bitumen materials
Before laying them, a special primer (deep penetration) in 2 layers must be applied to the surface. Each of them must dry completely before applying a new or laying roofing material.

Rolled waterproofing will be most correctly laid in U-shaped strips, giving an overlap of 20 cm. The corners must be turned so that the strips remain on a flat section of the floor or wall.
The joints are glued with molten bitumen, but you can also use a bitumen solvent, which will melt the roofing material and it will seize. Take the excess strip along the steps outside the pit - cut it off later. After the 1st layer (along and across), let the bitumen at the joints cool down, and proceed to layer No. 2. In the process, make sure that the joints of the layers do not coincide with each other.
Penetrating waterproofing
This type of waterproofing is a dry mix that is diluted with water before use. To prepare a solution, per 1 kg. the mixture requires about 0.3 liters. water.

It is very important to mix the mixture thoroughly so that no lumps remain. Then the solution is applied to the wall with a 1 mm layer. If the walls near the pit are brick, then it is required to apply another layer to the finished wall in order to reliably clog all the pores in the bricks. The principle of operation of the sealant is based on the fact that, covering the surface with a continuous layer, it does not allow moisture to seep out, as if “binding” it.
Together with a waterproofed brick wall, it can withstand water pressure up to 20 atm. Its service life is not limited.
How to ventilate a viewing hole in a garage
The ventilation system in the pit is a thing that is absolutely impossible to do without.

This is especially true for motorists whose “iron horses” run on liquefied gas, since when leaking, propane tends to go down (it is heavier than air), which means that it will inevitably fall into the pit.
The hood is built before the waterproofing stage, so as not to damage the sealant or roofing felt. Proper ventilation consists of 2 parts - supply and exhaust.
The first is a pipe led through the wall to the street. Through it, clean air will enter the pit. The second is also a pipe installed opposite the flow pipe, but it is not output through the wall, but through the roof. Its upper end should rise above the garage by no more than a meter. Pipes can be both steel and plastic, but it is better to give preference to plastic products - they weigh much less, are easier to install and are completely non-corrosive.
Lighting a viewing hole in the garage - how to hold the light
You can work in a viewing hole without stationary light sources, limiting yourself to a headlamp. However, it gives little light and only in a limited sector. Therefore, it is still better to get normal lighting. As with any wiring, it is important to follow a number of rules:
1) If you do not have the appropriate education, it is better to entrust the work of creating an electrical circuit to a specialist so that he does it in compliance with all safety standards;
2) Lighting should be uniform, you may need several lights;
3) All switches, fuses and sockets should not be located in the pit - only in the garage itself;
4) If you plan to install a 3-phase outlet, be sure to ground it securely.
The wire through which electricity will be supplied to the pit must have a cross section of 4 mm2 or more. It is desirable that the material from which it is made is copper. The wire should be with intact insulation, ideally double.
Lamps suitable for garage lighting are low and high voltage:
- 12 volt bulbs;
- lamps for 36 volts;
- lamps of various classes for 220 volts.
To operate low-voltage lamps, a step-down transformer must be installed next to the meter.
As for the type of lamps, it is better to use fluorescent lamps in the pit itself. Due to their oblong shape, it is advisable to place them in small recesses in the walls, otherwise they may interfere. It is better to purchase such lamps with a protective casing, since an open lamp will not last long due to moisture and pollution.

Incandescent lamps in the pit should not be used. They heat up during operation, and if you touch them, it is easy to burn yourself. The light from them is too bright, which harms vision. In addition, they consume a lot of energy, and if there is a voltage drop, they can spark and burst, which is fraught with injury and fire.

Fluorescent bulbs are good because they have a wide variation in color, use little electricity, and last a long time. However, they are not suitable for a pit, because they are sensitive to cold - when the ambient temperature drops below 5 degrees, they become unreliable. They must be disposed of in a special way, since they contain mercury.
Energy-saving lamps have all the advantages of fluorescent and an almost complete absence of disadvantages, with the exception of a higher price and difficult disposal: they also contain mercury.

LED lamps are the most perfect, because they combine all the positive characteristics of other light bulbs. There is no mercury in them, but the price is very high, and for good lighting they need several pieces, which not everyone can afford.

Also in the garage it is useful to have a carrier lamp or a mobile 36-volt lamp. They can come in handy if you need to consider the place of repair better.

When installing wiring and lighting fixtures, strictly follow the fire safety rules! Remember, any shortcomings in this matter can turn into a tragedy.
An inspection pit in a brick garage is a simple building necessary for self-repair of a vehicle. Previously, experts advise to prepare a plan-scheme of the future structure, determine the level of groundwater, purchase building materials and tools.
The inspection hole for the garage should be located in the middle of the building.
A brick observation pit is being built taking into account the purpose of the garage:
- for car storage - a pit is located in the center of the building;
- for the repair and storage of a vehicle and food - the pit is moved to the wall of the main building.
The diagram indicates the length of the pit, which should exceed the length of the car by 1 m (for arranging a comfortable descent and steps). The width of the recess ranges from 75-80 cm. The next stage is digging a foundation pit in the garage.
To do this, use a shovel and a drill with a nozzle. A drill will be required in case of rocky and hard terrain. Experts recommend pre-foresee the use of excavated land. The next step is building walls. First of all, insulation is carried out with roofing material. A hard roofing material is mounted on top. The viewing hole is reinforced with mesh. Then the walls in the pit are plastered. Finishing is carried out after the solution has dried. Preliminarily, the edges of the recess are fixed with aluminum corners.
Additional points
If the inspection pit in the garage is built of brick, then the floor is pre-arranged, then the walls are erected.
the thickness of the partitions is a whole or 1/2 brick. If an old brick is used for the construction of a structure, then the material is first cleaned of old plaster. To do this, use the grinder. The mortar for laying bricks is prepared taking into account the ratio of 3:1. It is recommended to add liquid soap to the resulting composition. In this case, the solution will be more elastic. This will increase the hardening time, which is very important for novice builders.
To make the brick wall even, pre-stretch the cord, check the verticality. Experts advise placing niches in the side walls of the pit. They can be used to store tools. The upper rows of masonry are protected from destruction by mounting the strapping from metal corners. The last elements must be welded taking into account the formation of a shelf on which the flooring from the boards will be laid. The resulting coating ensures the safe entry of the vehicle to the inspection hole.
We lay a wooden grate on the flooring, and paint the walls with a water-based emulsion. If the inspection pit is equipped in the northern regions, then thermal protection is carried out by laying polystyrene foam 50 mm thick.
Creating a pit with a close location of groundwater
Before starting work, it is necessary to clearly determine the location of the pit.The inspection pit in the garage is built taking into account the depth of groundwater. To do this, you need to dig a pit. If the value of the indicator is less than 2 m, then it is waterproofed. To do this, experts advise using:
- polymers with one and several layers of membranes - such materials should be laid by specialists;
- liquid or rolled bitumen is the cheapest and most affordable method of waterproofing a brick inspection pit - the service life of such a structure reaches 15 years;
- penetrating waterproofing - unlimited duration.
Waterproofing work begins with the preparation of the flooring. To do this, you need to tamp the soil. Loose material is laid in the trench. Ruberoid or brizol is laid after surface treatment of the GGP pit. The first layer of roofing material is used in strips. At the same time, an overlap of 15 cm is observed. We process the joining points with hot bitumen. If the last material has cooled down, then the 2nd layer is laid.
Experts advise isolating the inspection hole in the garage with penetrating waterproofing.
It is applied to the damp wall covering, and then to the brick. The composition of such a mixture includes a mineral filler and various additives. To prepare a sealant solution, use 1 kg of powder mixture, 0.3 l of water.
If the viewing hole in the garage will also be used for storing vegetables, then a partition will need to be made. Particular attention is paid to humidity and air temperature in the storage. If the flooring and walls are poured with concrete, then the formwork is set up.
Arrangement of hood and lighting
For digging, it is better to use a shovel and a drill with a nozzle.The next work plan is to install a ceiling, insulate the pit, and possibly insulate the garage itself, install ventilation and lighting. The hood is necessary to ensure normal operation in the garage. If the pit provides for the laying of waterproofing material, then the hood is mounted before the start of work. Otherwise, its integrity will be violated.
2 pipes are mounted in the pit:
- Supply - removal of clean air masses from the street to the inspection hole;
- Exhaust - the withdrawal of polluted and moist air masses from the pit to the street. In this case, the following requirement is observed: the pipe is led 1 m from the roof level. To equip such a system, plastic or metal pipes are used.
The observation pit requires lighting. This should take into account:
- electrical safety requirements - it is recommended to draw up a lighting scheme with the help of a qualified specialist;
- to ensure uniform lighting in the room, general and local electricity is installed;
- sockets and switches are installed in the garage;
- the cross section of the copper cable should be 4 square meters. mm.
To provide the room with light, install low-voltage lamps. For their performance, it will be necessary to equip a step-down SPP.
Types of light sources
Lighting in the garage and inspection pit is carried out using:
- 12V lamps;
- 36V fixtures;
- battery lamps.
When using the above lighting fixtures, an additional transformer (200/12 V) is mounted near the meter. Experts advise installing fluorescent lamps in the inspection hole. They are located on two sides of the pit. Special recesses are pre-arranged. Lamps must be protected from dampness with a hermetic sheath. If you need to illuminate a hard-to-reach place in a vehicle, then a portable lamp is used. It is connected to an electric wire with a length of more than 4 m.
Lighting in the garage is carried out using lamps:
- incandescent;
- energy saving;
- LED;
- luminescent.
//www.youtube.com/watch?v=MoV09oECmmI
Characteristics of lighting fixtures
Each lamp has certain advantages and disadvantages. Incandescent lamps are not recommended to be installed in a garage with a viewing hole, as these lighting devices are highly dangerous, they consume a lot of electricity, emitting light of different shades. This negatively affects vision.
Fluorescent lighting devices are recommended to be installed in a warm room. If the air temperature does not exceed +5°C, then the fluorescent lamp is not reliable in operation. Its disadvantages include the presence of mercury. Therefore, after the expiration of the service life, the lamp is disposed of.
More often, energy-saving lamps are installed in the inspection pit, which provide bright and uniform illumination, and have a long service life. Their performance does not depend on the temperature in the garage. Experts attribute the high price and careful handling (due to the presence of mercury) to the minuses.
//www.youtube.com/watch?v=MnWXLs4z2lg
LED bulbs are used for local lighting. They do not blink, giving an even light. At the same time, these devices will require a minimum of energy, without adversely affecting human health. After completing electrical work, you can proceed to


