Aren't you tired of cooking, preserving vegetables, getting ready for noisy and plentiful feasts with barbecue or barbecue inside a country house, where all the kitchen equipment is located?
It is quite possible to avoid being in a stuffy room and transfer all these processes to fresh air or to a separate, well-ventilated room. It is enough to build a summer kitchen in the country. The features of this process will be discussed in the material below.
Varieties of designs
Before embarking on the realization of your dream, it is advisable to consider all existing summer kitchen projects in the country: it is advisable to build not too expensive and complex structures with your own hands, otherwise you may not finish the construction at all.
All buildings for cooking in a suburban area are divided into two main groups:
- Open kitchen. Its distinguishing feature is the complete absence of walls. This allows you to achieve a feeling of spaciousness and freedom, as well as provide excellent air circulation. At the same time, all the necessary equipment - a stove, a table, a sink, and so on - must be present without fail.
Note!
Some cottage owners, wanting to get as close to nature as possible, get rid of not only walls, but also.
This is not the best solution, as you will lose protection from both the sun and rain.

- Closed kitchen. Often this is not only a place for cooking. A small light building can serve as a guest or hunting lodge, a pantry or a workshop for those who like to do something with their own hands.
For construction, you can use plywood, lining or other materials, the price of which is low. And summer kitchens for summer cottages, built of brick, foam or gas blocks, can be successfully operated for a long time throughout the year.
By combining certain materials and summer kitchen projects in the country, you can create original and original buildings with your own hands that will become the highlight of the landscape design of your suburban area.

In any case, do not forget to equip the summer kitchen with amenities:
- plumbing;
- sewerage;
- stove or grill;
- lighting and electrical outlets.
Advice!
If you do not have the opportunity to bring electricity to the summer kitchen, renting a diesel generator to give will help out.
This device will provide power to all kitchen equipment.
Location
The construction of a summer kitchen in the country begins with the search for a place where it will be installed.
This site must meet the following requirements:
- Convenient connection of engineering networks. It must be possible to supply water, sewerage and electricity.
- Remoteness from economic and household buildings. Pets emit an unpleasant smell that is inappropriate in the kitchen. Therefore, it is desirable to make sure that it is removed from the economic zone of the cottage as far as possible.
- The presence of a cellar. It’s good when the summer kitchen plan in the country includes a cellar under it or nearby. This provides access to products during cooking and the possibility of quick storage of homemade preparations.

Note!
If, before building a capital house for housing, you use country houses from block containers, you need to choose a place for building a kitchen so that free and convenient access to it is subsequently provided.
Construction order
Step 1. Preparing the base
There are various projects of summer kitchens for summer cottages. Depending on the shape, materials and size of the building, the foundation is selected. The most common are strip and column bases.

The first type is used when it is planned to build a closed summer kitchen from brick or other artificial stone. Open country summer kitchens or wooden houses can also be built on columnar supports. They can be made from cinder blocks or cast from cement mortar.
If you intend to install only a light canopy, then you can simply concrete the area of \u200b\u200bthe desired size, reinforcing it with a metal mesh or rods.
In any case, the sequence of actions for arranging the foundation is as follows:
- Excavation. According to a pre-made marking, a continuous excavation of the soil is carried out or holes are dug with dimensions of 30x30 and a depth of 70-80 cm.
- Pillow arrangement. For this, a sand-gravel mixture is used, which is poured onto the bottom of the pit with a layer 20 cm thick and carefully compacted.
- Pouring the foundation, platform or pillars. Depending on the type of structure and its dimensions, as well as the ambient temperature, it will take from a week to a month for the concrete to fully harden.
- Floor arrangement. In some cases, additional filling of the subfloor may be required. To do this, a layer of soil is removed from the site, then a layer of sand 15 cm thick is poured. Crushed stone is laid on top of it, after which the cement mortar is poured.

If the floor is subsequently to be tiled with ceramic tiles, ensure a smooth surface by cement screeding and sanding.
Note!
The floor of the open summer kitchen should rise 5-7 cm above the ground.
Otherwise, a heavy summer downpour will flood the site.
Step 2. Building walls
The presence or absence of walls depends on which design of the summer kitchen in the country you have chosen. In any case, you will need to install and properly secure the support posts that will support the roof or canopy.
The walls of the summer house for cooking can be made of various materials:
- Wood. All structural elements are fastened together with self-tapping screws or metal corners. The material for external cladding can be a board or siding, internal - drywall, grooved board or lining.
- Fake diamond. Given the purpose of the building, it is enough to build walls one brick thick (cinder block). If you intend, despite the name, to operate the kitchen in winter, you should take extra care of insulation and heating.

Step 3. Arrangement of the roof
The simplest and most inexpensive option is a flat pitched roof. It is easy to install, and the cost of construction is minimal. However, most summer residents prefer the gable version, considering it more attractive.
If you expect round-the-clock operation of the summer kitchen, you need to lay thermal insulation from basalt fiber, glass wool or polystyrene between the roof joists.
To prevent water from flooding the walls, it is necessary to provide for a long visor. This will extend the life of the structure.

Step 4. Interior decoration
The flooring in the summer kitchen can be made of ceramic tiles or decking (decking). In the latter case, the surface is painted with one or another shade of paint or varnished.
It is advisable to cover the ceilings and walls with drying oil, which will protect the wood from the effects of negative environmental factors.
Original accessories made of ceramics, wood or other materials that organically fit into the dacha concept will help to give the kitchen interior an individuality.

Conclusion
When choosing a summer kitchen project, consider combining this space with a dining room or barbecue area. So, you can not only cook food, but also eat it in the fresh air, enjoying being in nature.
You can learn more about the arrangement of suburban areas from the video in this article.

The arrangement of a summer kitchen in the country gives a lot of positive aspects. Firstly, outdoor cooking turns a routine process into a pleasant pastime. Secondly, for the period of mass harvesting of canned vegetables, compotes and jams, you can get rid of fumes and odors in a country house. And the third - if you equip the summer kitchen with your own hands, then in the future you will not have to look for a place for evening gatherings with relatives and weekends with friends.
Do-it-yourself brick summer kitchen with barbecue
The special aroma and appetizing appearance of dishes cooked on B-B-Q will be appreciated by both adults and children. For a summer residence, you can buy a factory structure that allows you to cook food on a grill, however, a summer kitchen built of bricks with a barbecue oven can serve not only as equipment for frying meat and fish, but will also become the central figure of a summer cottage recreation area.
We present to your attention the E. Gudkov barbecue oven, which you can build with your own hands. It combines all the advantages of a grill and a hob with a burner. Using the detailed instructions, in which the drawings and ordering are given, it will not be difficult to fold such an oven with your own hands.


The project of the stove for the summer kitchen. A photo
Construction of the foundation of the summer kitchen
The design proposed for repetition has an impressive weight, so the arrangement of a serious foundation for it is mandatory. To build a tiled foundation, you will need concrete reinforced with a metal mesh.
Materials and tools
Our construction is not so responsible to use high-quality and expensive building mixtures, so concrete grade M200 will suffice. For its preparation, you can use the following ratio of building materials:
- 1 hour - cement brand 400;
- 4 hours - crushed stone or coarse gravel (fraction 30 mm);
- 2 hours - coarse river sand.

Make sure that the content of impurities in sand does not exceed 10 parts of its volume, and in crushed stone - a value of 2%.
Using the proposed proportion will require the following consumption of building materials per 1 cubic meter. m. of concrete:
- Cement M400 - 325 kg;
- Sand - 1.3 t
- Crushed stone - 1.3 t
- Water - 205 l.
To strengthen the foundation, a mesh frame of class A3 reinforcement is required. Starting to mark the base, 20 cm are added to the dimensions of the future furnace on each side. With a structure size of 1.4 × 1 m, a foundation is laid out with a size of 1.6 × 1.2 m.

The project of the foundation of the summer kitchen. A photo
When starting to pour the base, prepare:
- narrow, round and square rammers;
- scraper, trowel, trowel;
- probe for removing air bubbles from the mixture;
- shovels for soil and mortar;
- trowel;
- board for fine leveling of the surface.

How to lay concrete correctly
In order to build a solid foundation, it is necessary to take into account soil features Location on. Water-saturated, swelling, peaty and other specific soils will require additional strengthening before arranging the base for the furnace.

To mark out foundation, it is enough to drive pegs into the ground, check the diagonals and pull the cord. At the same time, the dimensions of the pit for the tiled foundation must correspond to its size (in our case, 1.6 × 1.2 m). Since the building is designed for outdoor use, the ground under its base will freeze and thaw in winter. Therefore, in some cases, a sand cushion up to 1 m thick may be required.

It will be right when arranging a sand cushion to protect the bottom and walls of the pit geotextile, which will prevent erosion of the base by groundwater. Tampering is performed in several stages. To do this, sand is added every 10-15 cm, which, after compaction, is additionally spilled with water.
In order to waterproof and to avoid leakage of concrete into the sand, two layers are laid on the prepared site. roofing felt. Further along the contour of the pit, every 0.5 m, racks for formwork boards are driven in and fixed with slopes. Fix and moisten the formwork.
Before pouring concrete, install fittings, for which, at a height of 20-30 mm from the bottom, a grid is installed over the entire surface of the foundation. Then, with the help of vertical jumpers, a second reinforcing belt is installed at a distance of at least 20 mm from the upper plane of the foundation slab.
They try to pour concrete and compact it at a time. In this case, the solidity of the structure and a certain period of concrete hardening will be ensured.

A prerequisite for high-quality concreting is to maintain optimal humidity, so the foundation is covered tarpaulin. After 3 - 4 hours after pouring on the surface of the base of the furnace, they are covered with sawdust or sand. Concrete is moistened with water for 1 - 2 weeks until the foundation finally sets.
The formwork is removed only when the corners of the structure acquire sufficient strength. It is possible to start the construction of the furnace no earlier than two weeks after concrete work.
Construction of Gudkov's barbecue oven
For the construction of the furnace body you will need fireclay refractory or red clay brick in the amount of 465 pcs. Refractory material is preferred because it can withstand elevated temperatures with ease. If you decide to use ordinary ceramic bricks, then make sure that the material is fired with high quality. Cracks, voids, insufficient firing are unacceptable. Not suitable for barbecue ovens and sand-lime bricks.

In addition, you need to prepare the following oven parts:
- cooking stove with one burner 500 × 420 mm in size;
- grate 500 × 420 mm for barbecue;
- sheet metal 600 × 500 mm;
- soot removal door 140×140 mm;
- blower door 140 × 270 mm;
- loading door 270×250 mm;
- grate 300×200 mm;
- metal corner with a shelf length of 32 mm, a thickness of 4 mm - 4 pcs. 500 mm and 6 pcs. 600 mm each;
- steel wire OE2mm - 10 m;
- asbestos cord OE5 mm - 10 m.

Masonry mortar
During the construction of the furnace, the brick is laid on a clay-sand mortar, using plastic grades of red clay and coarse-grained sand sifted on a sieve. The ratio of materials is chosen, depending on the fat content of clay:
- add 1 hour of oily clay - 2.5 hours of sand;
- for 1 hour of medium clay - 1.5 hours of sand;
- for lean clay - the ratio is 1: 1.
You can determine the degree of fat content of clay by the content of sand in it:
- from 2 to 4% - oily;
- up to 15% - medium;
- from 30% - skinny.

To prepare the working mixture, the clay is soaked for 1 day, and then, gradually stirring, sand is added to it. To prepare the solution, you can also use special factory-made high-temperature mixtures, which can be found in the distribution network.
Furnace body
It is best to start work on the furnace with the construction of a temporary canopy under which it will be possible to work in any weather. To avoid mistakes during the laying process, the body of the building can be laid out dry.
Construction begins with moistening the brick. Red ceramic bricks are dipped into water for one or two minutes, and fireclay bricks are rinsed from dust.
Brick laying is carried out with dressing of seams in half a brick, observing the thickness of the seams from 3 to 5 mm (the smaller value is for refractory material). It is important that chips and cracks on the surface do not face the inside of the working chamber or chimney.
As you lay, you will need to install oven appliances. To ensure the reliability of the structure, a wire is attached to the metal parts of the furnace, which is embedded in the masonry. Since metal and ceramics expand differently when heated, a thermal gap of 3–5 mm is necessarily made, which is subsequently eliminated with an asbestos cord.
Orders


After the level of the combustion chamber is completely removed, a grill-brazier or metal grill is installed on the corners. hotplate.


Metal corners as a support are also used in the arrangement of the arch. The smoke channel can be 270×140 mm, 270×270 mm and 400×140 mm. To reduce the formation of soot on the inner walls of the chimney, they are plastered.
To finish the barbecue oven, plastering, pasting with tiles or tiles, as well as simple jointing are used.

After the summer kitchen with a barbecue is built, do not rush to test the stove to its full potential. To avoid cracks, the stove should be warmed up with small portions of firewood during the week.
Summer kitchen in the country with their own hands. Step-by-step instruction
The proposed design of the summer kitchen combines a hob, a small Russian stove, as well as work surfaces that provide additional convenience in the cooking process. Installed under a canopy made of boards or polycarbonate, an open kitchen will take on all the responsibilities for preparing all kinds of dishes and sunsets in the summer.

Summer kitchen project A photo
The main materials that will be needed for construction:
- cinder blocks;
- red or fireclay brick;
- finishing materials;
- formwork.

Having chosen a place for future construction, they begin to draw up drawings and calculate the amount of materials. The step-by-step instructions below will help systematize all the stages of building a summer kitchen.

Foundation for the summer kitchen. A photo
Foundation construction
Having marked a hole for the foundation with the help of pegs and a cord, they begin earthmoving. Having reached a depth of the pit of 35 cm, its walls are reinforced with formwork boards, and the bottom is covered with a 5-cm layer of gravel and compacted.

Equip two-layer armored belt from a metal grid and vertical steel bars. Make sure that the reinforcement does not touch the boards, and after pouring it is protected by a layer of concrete with a thickness of at least 20 mm.

After pouring, the concrete is compactedvibrating screed, cover with a film and leave for 2 weeks until complete setting.

Summer kitchen with your own hands. Step-by-step instruction
Hull masonry
Laying starts from the corner, constantly controlling the geometry of the rows and corners with the help of a level and a plumb line.

To shift the rows by half a brick, the laying of the second row begins in the dressing.

After passing two rows, they equip the blower by mounting its door into the front wall. In the overlap of the working space above the blower, a grate is installed, and one row higher - the door of the combustion chamber. The combustion zone itself is made low, one or two rows of bricks above the loading hole, otherwise the flame will not reach the stove with burners.

The furnace body is built to a height convenient for further operation.

Summer kitchen in the country with their own hands. A photo
After laying, the seams are filled with mortar and smoothed with a grater.
Table top installation

The arrangement of the working surface begins with the laying of supporting rods from steel reinforcement. Formwork is mounted on them, which is poured with concrete.

After the concrete has set, the countertop is finished with flagstone, carefully leveling the individual fragments and the gaps between them. At the final stage, the walls of the summer kitchen are plastered or lined with heat-resistant finishing materials.
Choosing a stove for a summer kitchen
Of course, in the summer kitchen you can install an electric stove or a gas stove powered by a liquefied gas cylinder, however, truly delicious meals are obtained in a real wood-burning oven. In the carefully heated space of a miniature Russian stove, you can cook hot dishes in cauldrons or bake amazingly fragrant pies and pizza.
Many articles have been written about how to put the stove in the summer kitchen. In our design, the simplest scheme of the Russian stove is used. For its construction, a semicircular vault is made with a side channel, which leads into a common chimney.

Do-it-yourself stove for the summer kitchen. A photo


How to make an oven for the summer kitchen. A photo


The outer lining of the wood-burning hearth can be made with sandstone, carefully fitting the fragments of the decoration to each other. After that, the seams are filled with mortar and smoothed with a spatula and grater.


Summer kitchen roof
After the stove and the working area are equipped, they begin to equip the roof of the summer kitchen. To withstand the style in which the proposed structure with a wood-burning stove is built, it is best to make a gable roof.

Do-it-yourself summer kitchen roof A photo


To do this, a frame made of wooden beams with a size of at least 100 × 100 mm is installed around the working space, after which a ceiling is made of wooden boards, metal tiles or other materials.
Summer kitchen design and finishing options
When equipping a summer kitchen, you want to get not only the functionality and convenience of an open working area, but also a beautiful structure, designed in the style of other buildings and structures of the summer cottage. The kitchen, located near the house, can be placed on a large veranda adjacent to one of the entrances. A well-equipped barbecue area will eliminate the need to install a portable barbecue. Ornamental plants and shrubs are planted around the summer kitchen. If there is a need to shade structures, then all kinds of arches and supports are used. A pergola installed near the summer kitchen will provide the necessary shade on hot days and create a secluded corner for leisurely conversations and gatherings with friends.

Summer cuisine. A photo
In the process of creating an optimal working area, the main thing is not to overdo it with decorative elements. It is important to understand that, after all, the main purpose of the summer kitchen is cooking, therefore, if you want to cook on it every day, then one brazier will not work. You will also have to install an electric, gas or wood-burning stove. It will be difficult without other benefits of civilization, so the working area is supplemented with a sink, all kinds of cabinets and shelves.
A simple option for a summer kitchen for a summer residence is available for any budget and level of your skill.
If desired, the kitchen can be made completely closed, but then you can only use gas and electric stoves in it, and a barbecue and a wood-fired barbecue can be located next to the kitchen.

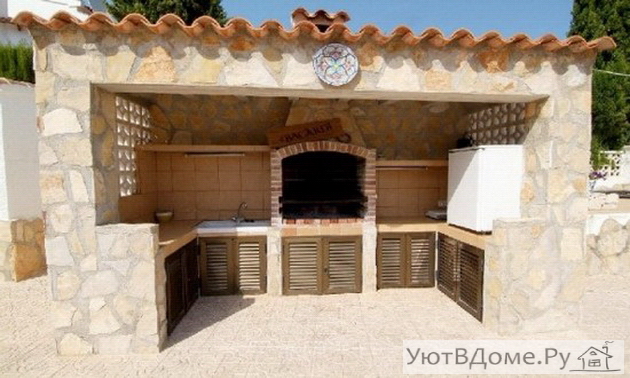
A simple summer kitchen with a barbecue and a barbecue with your own hands.
This version of the summer kitchen is used only for cooking on an open fire. It includes a barbecue, a work table and a sink under a canopy. The dining area and barbecue are located on the adjacent site.

For the construction of the summer kitchen, the site was first leveled, a layer of gravel and sand was laid on it, and the pillars for the supporting pillars of the canopy were concreted.

At the next stage, we lay the tiles on the prepared site. In the area intended for the barbecue, there will be no tiles, it will be with sand, just decorate the edges of the site with curb tiles. Then we lay out a circular masonry under the brazier with refractory bricks.

We install the canopy: first, the supporting pillars, then we connect them with floor beams, the roof of the canopy has a slope away from the site. We sheathe the frame of the summer kitchen with wooden planks.

We cover the brazier with decorative masonry made of natural stone.

We install a slate roof, sheathe the inside of the summer kitchen with a magnesite slab designed for outdoor use. We install the desktop, sink and barbecue.

Such a summer kitchen can be made with your own hands in just a couple of days off.
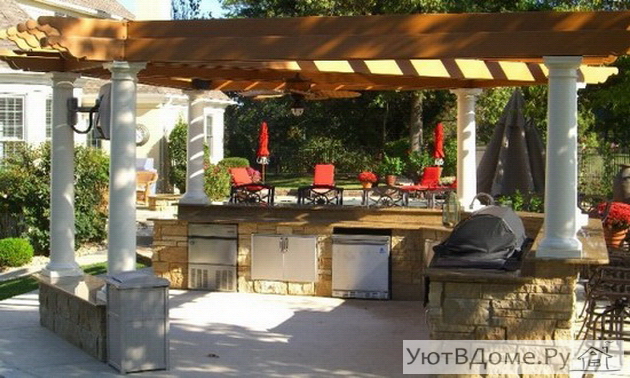
Summer kitchen with bar.
The project of this summer kitchen included a canopy for the summer kitchen itself and a pergola for the dining area. The summer kitchen includes an oven, barbecue and, in the future, a pizza oven. 
Using the example of this kitchen, you can see that a do-it-yourself summer kitchen can be built in several stages. At the first stage, everything is being built, except for the pizza oven, which is only in the plans so far, but there is no ability to build it and no means to hire a master to build it. It was postponed until next year.

The order of work is standard - we level the site, concrete the pillars for the supports, lay a gravel-sand cushion on the site, pave the site.

Because Since the summer kitchen is located in a quiet corner of the garden, we decided not to close it on three sides, but to make only the back blank wall. A simple laying of their cinder blocks forms a work surface. The tabletop was made from a wooden beam.

The very process of building such a kitchen is not very laborious and any summer resident can afford such a summer kitchen project.
A simple summer kitchen near the house with your own hands.
Unlike summer residents, the owners of a private house have a serious plus - they do not need to go anywhere and the construction process can be more calm and measured. The construction of this kitchen began with the paving of this beautiful area in front of the house with natural stone combined with cobblestones. When the site was ready, it was decided that it could also be used for a summer kitchen next to the house.

First, the pillars were concreted under the canopy supports and installed. The entire kitchen will be made of concrete slabs, and the supporting platforms will also be concreted under them.

In order to make a concrete countertop, they made a formwork, covered it with a film, and laid reinforcement. Places for the sink and barbecue were marked with containers of appropriate sizes. After the concrete had hardened, the formwork was removed and the edges were sanded.

We are erecting a desktop of our summer kitchen from concrete blocks, we are supplying water inlet to a place intended for a sink.

Our summer kitchen is almost ready with our own hands - a sink is installed, on the right side of the countertop there is a place for a barbecue, on the lower left side there is a place for a barbecue.

Additionally, a storage cabinet was built next to the summer kitchen.

Pillows from furniture that will stand in the dining area will be stored here.

We covered the roof of the summer kitchen with transparent polycarbonate, finished the decorative fence around the kitchen to give the building a more finished look.

A simple and beautiful do-it-yourself kitchen can really be done inexpensively and easily.

But how pleasant it is to enjoy dinner outdoors in the garden!

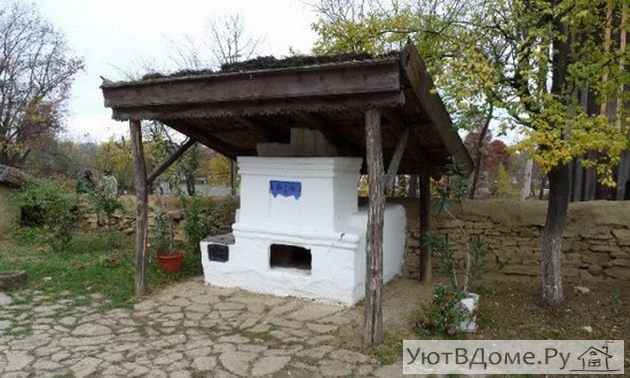
Do-it-yourself summer kitchen next to the gazebo.
A small shed next to the main gazebo can be turned into a small summer kitchen.

Stylized wooden furniture made from reclaimed materials will add a relaxed atmosphere of comfort to this corner of your garden.

If necessary, you can take a fairly large company here - you just need to put a large table.

So a simple canopy next to the gazebo can turn it into a dining area for a summer kitchen.

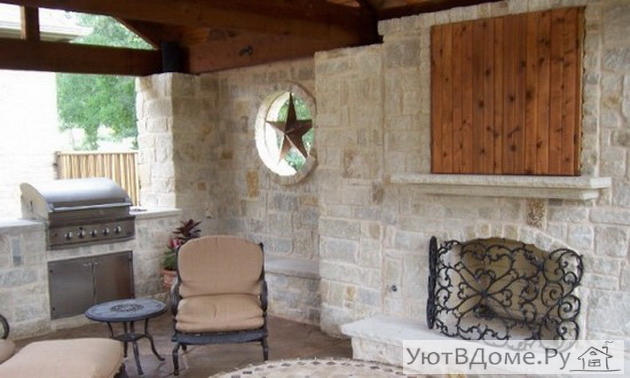
Summer kitchen with oven.
If you know how and love to cook in the oven, it is not necessary to follow the general fashion for barbecues and barbecues. Complete an extension to your gazebo, make a stove in it - and you have a wonderful summer kitchen, not like others.

By the way, barbecue and barbecue may well find their place in your summer kitchen.

This option is great for areas with cold summers, where while standing near the stove it is warm, but when you sit down for dinner, you want comfort, not refreshing coolness.
You already have a gazebo - it can be used as a dining room on cool days. And for summer days, you can simply set up a table between the house and the gazebo.

For the barbeque itself, an ordinary canopy tied to a gazebo and a small work table next to it for cooking will be enough for you.

So, if you are creative about what you already have, then it is not necessary to build a new free-standing structure for a summer kitchen. By intelligently adding small elements, you will significantly increase the functionality of existing buildings.

A simple do-it-yourself summer kitchen can be built with a very modest budget, you just need to turn on your creativity and it can be built quickly and inexpensively.

If you have approached this process wisely, then you can always expand, complete and improve your summer kitchen.

Do you agree that a simple summer kitchen with your own hands is within the power of each of us?
A country house has a very significant advantage - it gives us the opportunity to dine outdoors. The dining area can be equipped in different ways.
You can just put plastic furniture in the garden, but it is much more convenient to equip summer kitchen. Then cooking and dining in the fresh air will turn into a real pleasure.

The summer kitchen will be a salvation for the owners of small country houses. It will help to release the stationary kitchen in the house for the whole summer and use it as an additional room. And cooking in the garden is much more pleasant and convenient. You can continuously cook, treat and communicate with guests.
The summer kitchen is simply created for cooking barbecue, grilled meat, barbecue, canning and cooking jams. It is very convenient to process the harvested crop here, without fear of littering the house. Here you can immediately “twist” jars of cucumbers and make jam for the winter, seducing the neighbors with a wonderful aroma.
How to equip a summer kitchen in the garden and near the house
Today, there are many ways to equip a summer kitchen in the garden. It could be like separate room, so small gazebo or barbecue area. The main thing is that it should be equipped with a hearth on which you can cook food, continuously communicating with guests sitting at tables nearby.
If you have a large enough garden, then you can place in it large-scale summer kitchen-pavilion. Typically, such facilities are installed near the house in order to make it easier to provide the kitchen with water and electricity.
Summer kitchen: options
The design of the summer kitchen can be light, open from all sides or from several sides. At the same time, it is important to consider protection from the weather. A roof or canopy will protect from rain, and removable partitions made of glass or wood, sliding structures or roller blinds will save you from the wind. Thanks to this, you will be able to dine and cook even during bad weather.

You can also make walls in the style of an openwork gazebo. And to protect from prying eyes and wind, plant a hedge nearby. For example, you can plant spicy plants nearby or put roses or climbing plants on the trellis. To make the dining area more romantic, you can hang air curtains.

If your summer season lasts almost the entire year, then it is worth building a more serious object that will withstand any bad weather. In fact, this closed gazebo or small house-kitchen. There is another convenient option for arranging a summer kitchen - on the open veranda of the house overlooking the garden. A stove, stove or fireplace, as well as tables and chairs, are installed on the veranda. This option is considered the most economical and simple. You can easily run water for a sink, gas for a stove or electricity, since the veranda is an extension to the house. On the railing of the veranda, you can hang balcony boxes with herbs, then you will always have fresh herbs at hand.

Summer kitchen: cooking area
A small space in the kitchen will take up space for cooking. It can be equipped with a traditional stove, a small gas or electric stove, a stone oven or a grill fireplace. In the same area there is a cutting table and small cabinets for kitchen utensils. Well, the rest of the summer kitchen is a dining area where tables, comfortable chairs or sofas are set.

Summer kitchen - photo


Various types of summer kitchens allow you to build this structure in almost any house in various areas. Kitchens are either closed or open. The simplest open-type summer kitchen is a terrace equipped with all necessary kitchen equipment and kitchen furniture. Closed summer kitchens are a veranda, closed partially or entirely.
Closed summer kitchen in the country (photo)
Whatever the design of the open summer kitchen, it is traditionally divided into two main areas - a place for cooking and a living-dining room. The minimum set for the "culinary zone" includes a stove, oven or grill-fireplace, cabinets and shelves for kitchen utensils and utensils, a work surface or a cutting table and a sink.
Summer kitchens, equipped in buildings separate from the house, are also open or closed according to the design solution.

Summer kitchen in the form of a house in the photo
It can be an open summer kitchen in the country or a kitchen in the form of a light frame house (often not heated), although it happens that such a house is built of brick and even equipped with a fireplace or stove.

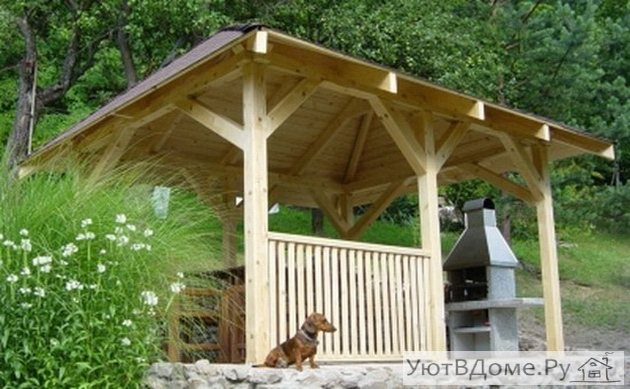
An open kitchen is a building without walls, when the effect of free space is visually created. Such a kitchen may have a canopy or a roof on pillars, or not have a roof at all, being at best under the branches of a sprawling tree.
In this case, there is a feeling of complete unity with nature.
An open kitchen can be built in the form of a veranda or gazebo. Its main elements are kitchen furniture (table, benches, chairs), a sink and a stove for cooking.
The main advantage of open kitchens, in addition to unity with nature, is that they do not need to be ventilated and they are not hot in summer.

Usually, when building an open kitchen, the supports and the roof are made of wood, and natural and artificial stone are used for the foundation.
If a furnace is being built, it is usually also lined with stone. Small cash costs make the arrangement of an open-type summer kitchen inexpensive.
In addition, the construction does not involve complex work and the use of equipment, so building such a summer kitchen is also quite simple in technical terms. So we can safely say that this is a good option for beginner builders.
All open summer kitchens have the same advantages:
- low costs of building materials during construction;
- much faster and easier construction;
- no need for expensive earthworks and roofing;
- cooking outdoors in the summer is always more pleasant than indoors;
- a great opportunity for both family outdoor recreation and holidays with a large number of guests;
- using a barbecue, barbecue or grill for cooking meat dishes;
- minimal fire hazard of such structures;
- significantly lower overall project cost than a closed kitchen.
Open-type summer kitchens also have disadvantages, which include:
- the impossibility of using the kitchen in the cold season, as well as in windy weather and during heavy rain;
- exposure of the working area of the kitchen from dust, which requires additional efforts during cleaning;
- attacks of mosquitoes and other insects in the evening;
- the inability to leave food overnight, as they can be stolen by animals or birds;
- the inability to leave equipment and valuables that attract thieves overnight;
- the impossibility even in the summer to use as additional housing;
- the need to hide furniture and other interior items during rain, as well as remove them for the winter;
- performing only one function - as a place for cooking and eating in the fresh air.
A summer kitchen with a closed veranda is very similar to an ordinary small house with walls, a roof, windows and a door. This makes it possible to use them in any weather and, if heating is provided (although this is usually not done), even in winter.

Closed kitchen on the veranda (photo)
The closed kitchen on the veranda in the country, in addition to the main function it performs, can be used as an overnight stay for guests, a hunting lodge, and in winter - as a pantry. Such a summer kitchen with an open terrace is usually built from plasterboard, clapboard or plywood, and more durable structures designed for many years are built from brick, foam blocks or stone.
Look at the kitchen veranda in the photo, which illustrates a successful layout:
The main advantages of a closed building are:
- the security of the room from dust, wind, precipitation and insects, so you will not have to clean it as often as it is required in open kitchens;
- if there is heating, it is possible to use the building in winter;
- the ability to safely leave food supplies, appliances and other valuables in a closed kitchen at night, especially if the room is locked;
- use as a guest house;
- the possibility of combining with other additional premises - a bathhouse, a cellar, a workshop or a garage.
The main disadvantages of a closed summer kitchen with an open veranda are the features of operation:
- more building materials and more complex construction, including labor-intensive work that requires the involvement of assistants and equipment;
- the need for careful drafting of the project, as well as the calculation of the foundation, truss system and other components of the building, as in the construction of a house;
- a significant increase in the cost of construction in general and a longer construction period.
In addition to general information, it is worth considering in more detail the varieties of open and closed summer kitchen options.
For example, a summer kitchen-veranda is built in the form of an extension to a country house. When erecting it, it should be borne in mind that, like any extension, it should become a harmonious continuation of the house, fit into its design solution and at the same time retain its main function - to be a kitchen and dining-living room, and not become a hallway.
The construction of a summer kitchen in the form of a veranda should begin with laying the foundation. Its depth should be equal to the depth of the foundation of the house, so that the extension does not come off in winter. Then the frame for the walls is installed, the outer skin is made and the shed roof is covered.
Ideally, a country house and a veranda should have one roof covering, but if the veranda is added later, its roof or canopy should be combined with the main roof both from an aesthetic point of view and from a technical standpoint (so that there is no leakage during rain, etc.) .
To make the kitchen-veranda brighter and more airy, you can install large hinged windows or glaze the entire front or side parts.
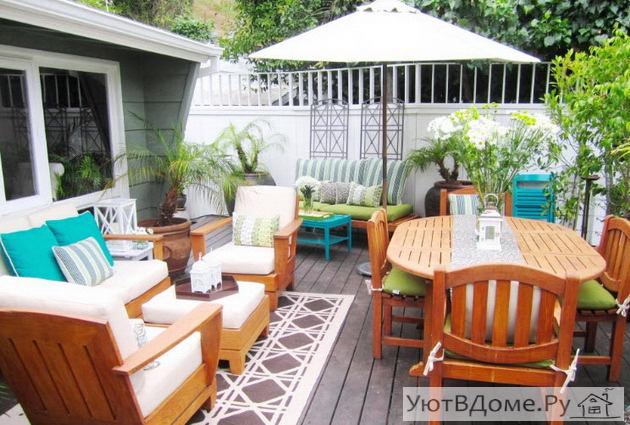
The open kitchen annex is a structure in the form of a terrace due to a significant expansion of the porch. In this case, support beams are installed along the wall of the house, on which an inclined canopy is laid on top.
If the terrace is arranged on a well-leveled area and there are no problems with the accumulation of water, the floor can be laid directly on the ground - it can be just a paving slab covering. To protect the terrace from any bad weather (rain, wind, etc.) will allow side partitions (both capital and decorative) or, for example, waterproof curtains. You can build pergolas and decorate them with climbing plants or plant a hedge of shrubs that will decorate the terrace and provide a pleasant coolness on hot summer evenings.
When constructing a summer kitchen-gazebo, one cannot do without a columnar or strip foundation. Racks of a frame made of brick, stone or timber are installed on it in the corners, and then the whole structure is fixed with a roof made of light roofing material, such as ondulin, bituminous sheets, etc. Buildings of this type are more than all other types of summer kitchens suitable for installing a barbecue, barbecue in them or stoves.
In such a kitchen, it is also very convenient to process the harvested crops without fear of wind or rain and without worrying about the cleanliness and ventilation of the room from kitchen aromas.
The openings between the racks of such a summer kitchen can be left open or one of the walls can be sewn up to install kitchen cabinets and shelves. You can arrange pergolas with climbing plants, decorate openings with textile curtains, lattice wooden panels.
Sliding or removable partitions can be provided, as well as roller blinds to open them in good weather.
Other options for a summer kitchen can be formed on the basis of existing ones, so, for example, if the gazebo is glazed or hinged windows are made, it can also serve in the cold season, especially if the kitchen is equipped with a fireplace or stove.
Such options for summer kitchens in the country as a house are almost a full-fledged dwelling, therefore, its construction requires more effort in comparison with the same gazebo. Here you will need a reliable foundation (preferably monolithic), walls, a reliable roof, you will need to install windows and doors. But such a house will be multifunctional.
In addition to the kitchen, it is possible to equip a cellar in it, then construction will need to begin with digging a foundation pit, and the walls of the cellar will become the foundation for the ground part of the building. The house can be supplemented with a terrace or veranda, which in this case will serve as an outdoor living room with a dining area with a large table, chairs, benches, armchairs, and cooking will take place inside the house.

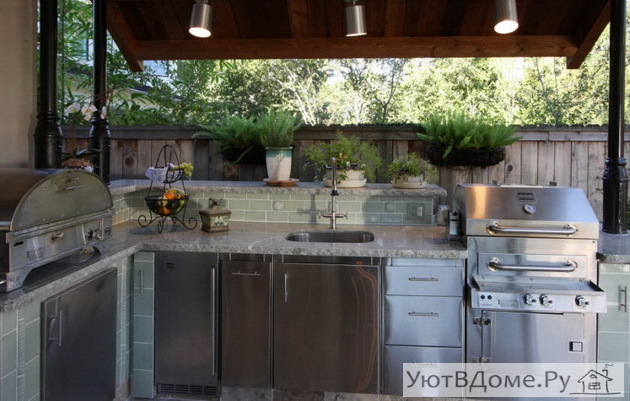
Summer kitchen with cooking equipment in the photo
In a country summer kitchen, there must be equipment for cooking. Usually, electric or gas stoves are used for everyday cooking, but some summer residents choose a more exotic option - a wood-burning stove, fireplace, barbecue or barbecue, which should be made of refractory bricks. And in this case, you should think in advance about the fire safety of the entire structure and a high-quality ventilation system. Such types of hearth not only make the summer kitchen cozy, but also contribute to significant savings - while firewood is burning in the stove, food is not only cooked, but the room is also warmed up. Well, talking about how tasty and healthy food cooked on an open fire and fresh air is completely superfluous.
When planning to equip the kitchen with a fireplace, barbecue or barbecue, it must be borne in mind that in this case the room should be as ventilated as possible. You can make such a focus temporary or permanent. For example, there are collapsible models of barbecues and barbecues, which, with the onset of cold weather, can be safely stored away until the next summer season.
If it is planned to build a summer kitchen in the form of a house, it is possible to lay down a capital stove made of refractory bricks in it - with various compartments and additional devices.

Kitchen with a bath in the photo
Recently, complex structures have become very popular, including, in addition to the summer kitchen, other country buildings, such as a bathhouse, a terrace, a hunting lodge, etc. Depending on the desire of the owners, the combination of such structural elements can be anything, and they are all being built on one common foundation. At the same time, the amount of materials required for the construction of structures is reduced, which allows significant savings in construction. For example, a common roof is much cheaper than the roof of several separate buildings. There is also no need to lay many paths connecting various buildings on the site, since in this case all objects will be in one place.
As a result, it will be more profitable to build an integral structure in many respects than to build disparate premises. In addition, a complex designed in the same style and built from matching materials will look much more attractive from the outside than several separate structures built at different times and from various materials.
In this case, energy resources for heating are saved, and the organization of electrification, water supply and sewerage is generally simplified. Finally, less land will be required for construction than several buildings, and in general it will be much more convenient to move from one room to another if they are all under the same roof.
There are several options for complex buildings. For example, one of them is a summer kitchen in the form of a house with a barbecue and a veranda, in which the owners can not only have a good time themselves, but also meet guests. The house can be made as one- or two-room, in which case the second room can be used as a guest room. Light comfortable furniture can be placed on the veranda to have breakfast, lunch and even dinner in the summer, and during rain or cool weather, the dining room can be moved inside the house. Naturally, the roof for the entire structure should be the same.

Another option is a summer kitchen with a barbecue and a gazebo. In this case, it is also possible to do everything under one roof. The gazebo can be open or glazed, and the summer kitchen can also be closed or open. The choice of the best option depends only on the imagination of the owner and his budget.

Another popular option is a summer kitchen with a stove and a sauna, which can be used not only in summer, because both the kitchen and the sauna can be heated with a stove all year round. Often, all the charm of using a bath can be felt in winter, when the temperature contrast in the bath and on the street is greatest, which causes an inexpressible feeling.
Video: Summer kitchen options


