In ancient times, when such material as plastic was not yet invented, and bull bladders were stretched instead of glass in window openings, children played with wooden toys. Each clan had its own craftsman, who created not only cart wheels and ralos, but also various wooden toys: nesting dolls, horses and much more.
Wooden dolls did not always have arms and legs, and everything was limited mainly to the designation of the mouth and eyes, and everything else was the fruit of a child's imagination. At the same time, there were masters who created unique mechanical masterpieces that were passed down from generation to generation. For example, almost all children had a rocking chair made of wood in the form of a Sivka-burka. With all this, children's wooden toys were environmentally friendly and safe, so even today they remain quite popular.
Rocking chair in the form of a horse
You can make a rocking horse out of wood with your own hands quite quickly. Let's figure out what is needed for this and how it should be done?
What will be needed?
To make a wooden toy you will need:
- a board 20-30 mm thick or a finished furniture board;
- cutting;
- wood screws;
- wooden pins;
- drills and drill;
- jigsaw;
- glue.

Work process
You can assemble a wooden rocking horse with your own hands according to the following instructions:
- Find the right drawing. You can take it in our article or find another option on the Internet.
- Transfer the drawing to the board.
- Using a jigsaw, cut out the details along the contour and drill holes for the pins and the handle.
- Insert the pins into the holes, smearing them with glue. Assemble the rear legs and seat.
- When the glue dries, continue the assembly process.
- Treat all roughness and sharp edges. Draw the muzzle of the horse in the right place, and your horse will be ready to entertain the children.

If your child loves to play knights or heroes, you can make a wooden weapon for him. It can be a hatchet, sword, shield and much more. It is better to cut them out of a single piece of wood according to a pattern that can be transferred from paper. After cutting, the workpiece must be sharpened, polished and coated with a suitable paint. This toy weapon is also suitable for various children's parties for the New Year and other holidays.

One of the first children's toys after the rattle is the cubes. In the modern world, cubes made of plastic and other synthetic materials are sold in stores, but they do not deliver the same tactile pleasure as wooden products. If you want to make wooden cubes for your baby with your own hands, you can do it without the professional skills of a carver.

All that is required of you is to carefully process all surfaces, cut down all sharp corners and round the edges. Wooden cubes do not have to be coated with paint or varnish, as the child will definitely start to gnaw them.
Wood craftsmen in Russia were not limited to wooden horses and clay whistles. In the museum called "Bogoroditskaya Toy" today you can look at moving toys, whose age has exceeded a hundred years.
Without knowledge of the laws of mechanics, but solely on a whim and with the help of their ingenuity, the craftsmen created various chickens that pecked grains, or hares playing the harmonica, as well as blacksmith bears.

For carving crafts, they usually used linden, which had been sawn several years before. For the work of the master used special knives. The modern development of technology makes it possible for everyone to make such toys, which can become an original New Year's gift for children.
To make such toys, you will need drawings. You can simplify the design if you deprive it of volume and replace the linden with plywood. The most difficult stage of the work is determining the place for attaching the paws and legs, so that when the planks are moved, the figures perform an accurate movement (for example, the blacksmith and the bear clearly hit the anvil with their hammers. This can be done empirically and you have to deal with it.
For all the kids, one of the most memorable holidays is the new year. You can involve your child in the fun process of making wooden Christmas decorations. For example, you can make Christmas snowflakes using old clothespins:
- Separate the two halves of the clothespin, turn them back to each other and glue eight pairs in this way.
- Fold the four glued halves into a cross and fasten in the center with glue.
- Attach four more inverted clothespins and secure them with glue at the base.
- To make snowflakes made of wood for the Christmas tree more attractive, glue circles of colored cardboard or paper on both sides of them, and sprinkle tinsel on top.
- Tie a string to the snowflake, on which you can hang a New Year's toy.

moving kangaroo
With your own hands from wood, you can make a simple toy in the form of a kangaroo descending down the plank.
Necessary materials and tools
To work, you will need a certain list of tools and materials:
- board 10-20 mm thick;
- plywood 5 mm thick;
- wooden axle 5 mm in diameter;
- the wooden axis is thinner - about 3 mm;
- drill with drills;
- jigsaw;
- washers;
- sandpaper;
- stain or paint;
- glue.

Let's start assembling
Cut out the body and two legs from plywood according to our drawing, or make your own version. The bottom hole in the leg should match the diameter of the thin wooden axle, and the top one should match the thick 5mm axle. Make a hole in the body a little more than 5 mm so that the main axis rotates inside it.
Make the main wooden axle: add together the thickness of the kangaroo's body, the thickness of the four legs, and the thickness of the washer. As a result, you will find out the required length of the axis. Sand the edges, holes and cuts with sandpaper. Insert both axles into one leg and put the washer on the main axle, and then thread it through the hole in the body. Put a washer on it from the other side and insert both axles into the other leg. No need to glue anything yet - test the toy first.

The thin wooden axle at the legs should move freely before colliding with the protrusions at the bottom of the calf. The step width of our kangaroo depends on the protrusions. Thus, the legs are always under the center of gravity of the toy, giving it movement.
Test the kangaroo on an incline and place the board on a book or other support, tilting it about 25-30 degrees.
Place the toy on a sloping surface, raise the tail and drop it slightly, giving the kangaroo movement. If the toy does not jump, you need to change the angle of the surface. If the hind legs are slipping, you can put duct tape or something similar on them. You can also make it rougher with sandpaper or a file.
If the toy jumps, glue all parts except the axis inside the kangaroo body. You can also paint the toy or stain it.
If the kangaroo doesn't jump
In the event that the toy still does not jump, you can do the following:
- Start removing weight from the front, reducing the ears, paws and head. It is necessary to achieve a shift in the center of gravity to a place above the legs.
- You can drill holes in the tail and insert some weights into them.
- Raise the body of the kangaroo on your index finger and try to determine the center of gravity by balancing it. Drill a hole for the axle about 3 mm in front of the center of gravity.
- Make sure that the legs move easily under the body along the axis.
- Try changing the angle of the plane on which the kangaroo should jump.

Additionally, you can watch a video on creating a wooden toy.
Helicopter
Airplane 


locomotive whistle 

Great moving toy! 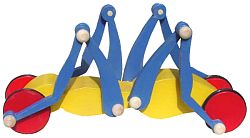
Motion animation http://www.uniqueprojects.com/projects/crawlingbug/crawlingbugintro.htm
Blueprint http://www.uniqueprojects.com/projects/crawlingbug/crawlingbug.pdf
Toy boat with rubber motor

Cut a notch in the back for the paddle wheel. Leave enough wood on the sides of the neckline to support the elastic. Make a cutout 1/2" larger than wide. 
Make a paddle wheel out of 1/4" plywood or whatever thin wood you may come across.
Cut two square pieces about 1/4" in a narrower circle than the cutout at the back of the boat.
Cut notches down the center of each piece as wide as the wood and 1/2 the width of the paddle. 
Put glue on the two parts of the paddle and slide them together.
Catamaran 

Use the chart to cut out all the pieces to your desired sizes. A rudder is not required, but it helps to steer the boat better. If you are making multiple boats, use cardboard, such as 2x4, for the body, then sawing it into several 1/2" thick pieces. Drill a 1/2" deep 1/4" diameter chimney hole, at the top of the cabin, as shown in the picture. Cut the groove into the paddle pieces. It should be a width equal to the thickness of the paddle and go halfway through. Drill four pilot holes (slightly smaller than the nail width) for the nails. Chimney cut from 1/4" dowel.
Now all your Junior Woodcrafter needs are just these six pieces, one rubber band, seven 1" finishing nails (two per part), a hammer, some wood glue, one sheet of 150 sandpaper, and safety goggles.
Assembly.
A. Drive two trim nails, for the cab, to the bottom of the body where the black dots in the pictures indicate.
B. Drive the nails to the point they are going to go through or "just a little bit through" the wood.
C. Apply glue to the bottom of the cabin and place it on your upper body.
D. Hammer two nails all the way in.
E. Sand the cutting edge of the rudder is tapered, but not quite to sharp edges.
F. Drive two finishing nails, behind the wheel, to the upper body where the black dots in the pictures indicate.
G. Again, drive the nails to the point they are going to go right through or "just a little bit through" the wood.
H. Apply glue to the top of the handlebar and position it to the bottom of the body.
I. Hammer these two nails all the way in.
J. Place a drop of glue into the hole in the top of the cabin and glue the pipe into place.
K. Test fit two pieces of spatula together and sand to match if needed.
J. Assemble and glue the two parts of the shoulder blade together.
K. Sand all corners and round edges.
L. Place a rubber band over the paddle wheel and plug it into the grooves at the back of the body.
M. Allow all glue and paint to dry overnight.
N. Wind paddle wheel (back), then place it in the water and release.
Click on the image above to download a higher resolution image.
monkey
You can easily see how good the monkey rides that the tricycle is. The leg joints are all turned into a monkey.The front wheels are attached together on the dowel axle and both turn together.
Pistol
The gun template you can find at href="http://www.runnerduck.com/images/toy_gun_handle.gif"> www.runnerduck.com 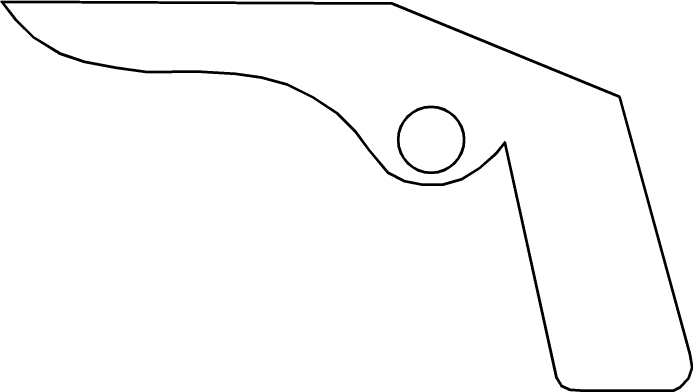
/ a photo /  on a piece of 1/2" to 3/4" wood.
Use the scroll saw, saw band or jigsaw to cut out the pattern.
Sand all the edges are smooth.
Drill 1" hole to run.
Cut a 5/8" piece of dowel 8". tapered i one end to fit the handle.
Cut a small notch in front of the dowel under the rubber band to allow the rest of the inch
Drill two holes in the handle, glue and dowel screw on the handle.
Drill two holes in the clothespin, blue, and screw it to the handle.
target;
Cut into 1/2 piece plywood 4" X 10".
drill 5/8" hole in the center of each end.
Cut two 5/8" dowel pieces 6" long. Drill a small hole large enough for a 1/2" wire clothes hanger from top to bottom in each dowel.
Glue dowels in plywood.Run the wire through the holes with small clothespins and balls for the gaps.
Bend the wires at both ends to hold in place.
Cut your targets out of paper.We already have for youwww.runnerduck.com / photo / 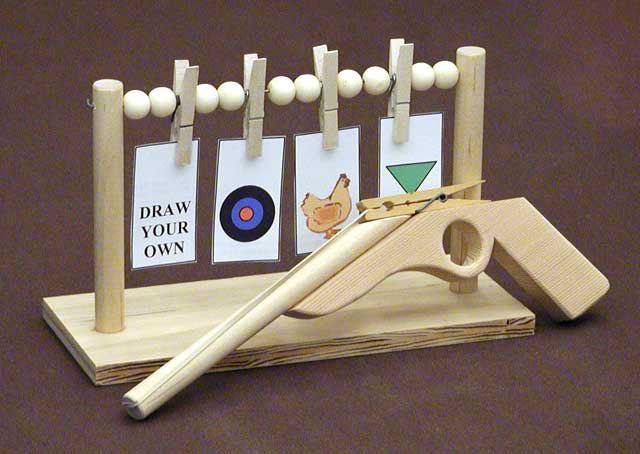 font> Parental controls are always recommended.
Toys made of wood are not only environmentally friendly, but also quite durable when compared to plastic ones. In addition, kids often handle toys, to put it mildly, sloppy. And if broken plastic parts often cause cuts, this does not happen with wooden toys.
Having a small hand saw or a jigsaw at home, you can easily make a variety of wooden toys for your child with your own hands. Blocks and boards, paint and varnish - that's all you need to make children's wooden toys with your own hands.
For the little onesDo-it-yourself wooden educational toys will come in handy if there is a baby aged one to two years in the house. A variety of toys can be considered the most useful for development toys, because with their help the child masters both the shapes of objects, and. In addition, the baby has to solve such complex tasks for his age as sorting shapes by shape and color. We offer a master class on creating a do-it-yourself educational wooden toy with detailed drawings.
We will need:
- wooden blocks 2 cm wide;
- ruler;
- compass;
- pencil;
- sandpaper;
- dye.

 |
 |
If you don’t quite understand how to make a wooden toy according to the drawings, and you don’t have time or desire to bother with calculations, give your child an exciting, but easy-to-make toy.
We will need:
- wooden boards of any thickness and size;
- paper;
- jigsaw;
- pencil;
- paints.


 |
 |
 |
Your little one will not be able to resist the new toy, which is made for him with great love!
A long time ago, when there was no plastic yet, and instead of glass, bull bubbles were pulled into window openings, little girls, just like now, played mother-daughters, and boys played warriors and hunters. Each clan always had its own Left-hander, who made not only ralos and cartwheels, but also amusing toys for his children in moments of leisure. The most accessible materials then were clay and wood, so most often children's clay whistles and wooden nesting dolls came out of the hands of a craftsman.
Wooden dolls did not always have legs and arms. Often the manufacture of crafts ended with the designation of the eyes and mouth, the rest was added by children's imagination. But sometimes a loving dad made such crafts or mechanical masterpieces that were passed down from generation to generation. For example, almost every kid had a wooden rocking chair in the form of a Sivka Burka.
Rocking horse
In order to start making this toy, you will need:
- a board about 20-30 mm thick or a furniture board;
- stalk from a rake;
- wooden pins;
- wood screws;
- jigsaw;
- drill;
- glue.


Work order


- Transfer the drawing from paper to the board.
- Cut out all the details with a jigsaw along the contours and drill holes for the cuttings and pins.
- Insert the pins into the holes, smearing them with glue. Assemble the seat and rear legs.
- After drying, continue assembly.
- Treat all sharp edges and roughness. Draw a muzzle. The horse for the little rider is ready.

Weapon
If he wants to play as a knight or an epic hero, such wooden armor, a sword and an ax will certainly come in handy. They are carved from a single piece of wood, polished and coated with metallic paint. With such weapons, you can even arrange children's New Year's performances.

Cubes
The very first toy after the rattle is, of course, cubes. In a world dominated by synthetics and plastics, it is so nice to touch natural materials. To make wooden cubes for a baby, it is not necessary to have the skills of a carver. The only indispensable condition is careful surface treatment, cutting sharp corners and edges. Such cubes do not need to be varnished or painted, because the baby will definitely try them by mouth. Put a gift under the Christmas tree, and your child will be busy with an exciting game all New Year's weekend.

Mother of God toy
Homegrown kulibins were not limited to whistles and horses. Mobile "live" crafts, which are several hundred years old, can be seen today in the Museum "Bogoroditskaya Toy". Without knowing the laws of mechanics, purely on a whim and thanks to their own ingenuity, the masters created these hens pecking grain, hares playing the accordion and blacksmith bears.

Wooden figurines were carved from linden, cut down 3-5 years before. Special knives were made for work in the village of Bogoroditsky. Today's development of technology allows anyone who wants to make original New Year's gifts under the Christmas tree for their children.

Start making crafts with drawings. You can significantly simplify the design, depriving it of volume, and use plywood instead of linden. The most difficult thing in assembling is to determine such a place for attaching legs and paws so that when moving the planks, the bear and the blacksmith hit the anvil with hammers exactly. This is done by experience. But if our ancestors could make wooden mechanical structures, then, probably, modern dads can do it too.

Christmas snowflakes on the Christmas tree


For any kid, the most memorable moments of the holiday are making toys for the Christmas tree with your own hands. It is very easy to make wooden Christmas tree snowflakes from old clothespins. For this:
- remove the two halves from the spring. Unfold the reverse side and glue 8 pairs with even “backs”.
- fold a cross from 4 glued halves and glue it in the center.
- attach 4 more turned-out clothespins, gluing them at the base.
- New Year's snowflakes on the Christmas tree should be beautiful. Glue circles of colored paper or cardboard on both sides, sprinkle with tinsel;
- do not forget to tie a thread on New Year's toys to make it more convenient to hang them on the Christmas tree.
DIY wooden toys
Now in the store you can buy almost everything. The variety of toys is amazing. However, a toy bought in a store and a toy made by oneself are, as they say, two big differences. Indeed, in a toy that you made yourself, you invested your skill, your taste, your diligence. This toy is made according to your sketch, is the realization of your imagination.
Now in the store you can buy almost everything. The variety of toys is amazing. However, a toy bought in a store and a toy made by oneself are, as they say, two big differences. Indeed, in a toy that you made yourself, you invested your skill, your taste, your diligence. This toy is made according to your sketch, is the realization of your imagination.
Working on making crafts or toys with your own hands, you gain experience and this will help you in the future in helping others, while repairing a house or in the country.
These days, handmade crafts are much more valuable than factory ones. DIY toys very often have no analogues, they exist in the singular, they are not like others, they are exclusive handicrafts.
However, in order to become a true master, you need to start with the basics. So we will try to talk about how to make simple toys.
We will make toys from wood, more precisely from various planks that can be bought at any hardware store. But with the same success, you can make the proposed toys from foam plastic or from any other block structures, for example, corrugated cardboard glued in several layers, fiberboard, chipboard, plywood, and even from plasticine or quick-hardening plastic.


Your toy plane will consist of the following parts: upper wing (5x24x1.5 cm), lower wing (5x15x1 cm), fuselage (5x30x1.5 cm) and rudder. Boards should also be of the appropriate size, so select suitable blanks for this work in advance.
First, make a sketch of the future product. Clearly draw the main parts of the aircraft and its general appearance. It is best if the drawing matches the size of the intended product. Then think over the sequence of making the toy and how to connect its parts. Try on the main parts and assemble them without nails. In fact, a wooden plane is a simple product, so you will probably prepare all the main details quickly enough.
In order to make tail wings, take a board, measure half and draw a line for sawing, that is, make an accurate markup. Then they sawed off the part and cleaned the cut. After that, you can start fastening the parts of the aircraft with nails. First of all knock off the upper and lower front wings with the base, and then the tail scrapers with the base. Mark in advance with a pencil the places where you will begin to drive nails on the wings, and make sure that the lower and upper wings are at the same level on the base. It is best if they are nailed at a distance of a third of the length from the nose of the aircraft.
Then you will need to nail the steering wheel. Take nails without hats for this. Carefully connect the top to the tail wings. Drive a nail without a head halfway into the middle of the tail wings and push the rudder part onto the second half of the nail, which is visible above the body of the aircraft. After that, drive a nail into the pre-marked hole. However, you can fix the steering wheel in another way: turn the tail wings over, put on the top and gently nail at an angle with nails. It is better to hammer 2 nails into the middle of the wings.
Place the rudder with tail wings on the base and nail it. After the main parts of the toy are fastened together, you can add a propeller, wheels, etc. Color the product to your liking. For example, you can draw stars or something else on the wings, as well as cover the toy with carpentry varnish.
Television

Making a toy TV out of wood is also easy. To do this, you will need the following details: the body of the product - a rectangular bar 20x16x10 cm in size, the TV screen - a board 15x10x1 cm in size, slats for legs 35x1x1 cm in size.
Just like with an airplane, draw the drawing first. Clearly mark all future parts of the toy on a piece of paper. Separately, draw a general view of the TV. Determine the sequence of work and select the right material. Make sure that all wooden blocks are free of cracks, burrs and other defects.
For the TV case, choose a suitable bar or drank it from a larger one. Then we sawed off the screen from the board of the required size, holding it in a vise, and filed the edges with a file. The legs should be the same length, so accurately measure the desired distance on the rail. It should be equal to the width of the body of the toy.
If all the details are ready, proceed to assemble the TV. Drive nails into the screen first, then nail it to the body. After that, carefully hammer nails into the legs and attach them to the TV. When the product is ready, you can color it and draw buttons on it. In addition, you can also attach an antenna: a piece of wire or a thin metal rod will do for this.
sailboat

Ships and sailboats made of wood have been made by people since ancient times. They were the children's favorite toys. A wooden sailboat can be allowed to “sail” into a pond. Having trained on one ship, if you wish, you can make a whole flotilla of sailboats.
You will need the following parts: a 10x25x1.5 cm sailboat hull (it should be pointed at both ends) and a 25x1x1 cm rail. In addition, you still need to prepare sail fabric and colored paper.
As in the previous case, first make a drawing, depicting the details and general appearance of the sailboat. Then take a board with a pointed end and mark the sawing lines on the other end with a pencil. Then they carefully saw off the corners, guiding the hacksaw blade along the drawn lines. To make a mast, grind a rail to the desired size, then fix it in a vise and prepare a hole in it with an awl. After that, carefully drive a nail without a hat (up to half) into the center of the hull of the sailboat and put the finished mast on it for better strength, you can pre-lubricate it with glue.
Any fabric is suitable for a sail (even cardboard can be used). Keep in mind that it should be shorter than the mast. After cutting the sail to the desired size, fix it to the mast with small nails or glue. The finished product you can paint, varnish and decorate with colored paper.
Cart

Making a wooden cart is also quite simple. To do this, you will need the following parts: a trolley body measuring 9x15x1.5 cm and wheels 1.5 cm thick and 4 cm in diameter.
As in other cases, at the first stage, make a drawing of the future product. The trolley will have few details: a base, 4 wooden wheels, nails and a rope.
In order to make wheels, take a cylindrical bar, measure a distance of 1.5 cm thick on it and mark with a pencil. After that, make 4 more such marks (to get 4 wheels) and these details along the lines. Gently sand the resulting rounds.
You will also need a board from which you will need to saw off the base of the cart to the desired size. Clean the resulting frame from roughness and burrs with sandpaper. After that, mark on it with a pencil the places where the wheels are attached at the same distance from the edges of the frame and make shallow holes in them for driving nails.
The wheels must turn. To make this happen, nail them with wide-head nails, which should protrude 3 mm. Spin the wheels around the axle nail and see how they spin.
Attach the wheels on one side first. When you hammer in the wheels on the other side of the frame, they will rest on the already attached wheels and their axle can go all the way in, then they will become motionless. To prevent this from happening, you need to put studs with a diameter of 2–3 mm between them and the frame, and then the wheels will retain their mobility.
At the end of the work, nail a nail into the center of the front of the frame, bend it with wire cutters so that you get a hook, and tie a rope.
Automobile

Once you learn how to make a cart on wheels, you can also make a car. In this case, you will need the following parts: a base measuring 8x20x1.5 cm, a cabin measuring 8x16x2.5 cm and wheels 1 cm thick and 4 cm in diameter.
First of all, draw a picture and think over the sequence of work. Pick up the necessary wooden blanks, clean and sand them well with sandpaper.
Make wheels for the future car according to the same principle as for the cart. You already know how to make them. Then you should prepare the base of the car. To do this, use a ruler to measure the required distance on the board and mark it with a pencil. Clamp the workpiece in a vise and drank the base. After that, you need to attach the upper part (cabin). To do this, drive nails from the side of the base, after marking these places with a pencil. Then hammer nails into the wheels until they come out the other side, and nail them to the base in the same way as in the case of the cart.
When all the parts are connected, the craft should be painted. In addition, you can make headlights on your car, attach a number, etc.
Helicopter


Making a helicopter out of wood will be a little more difficult. But if you successfully coped with the previous toys, then you can make this one. You will need to prepare the following parts: cockpit (its corners were cut to the center line at a distance of 2 cm from the edges at an angle of 22.5 degrees), a 2x2x1 cm gearbox, an 8x5x4 motor, a lift screw (4 symmetrically located blades 18 cm long, wide in the center 1.5 cm, the ring in the center is 2 cm in diameter). In addition, you will need a tail boom measuring 16 x 3 x 1.5 cm, a tail rotor bar measuring 8 x 1.5 x 1.5 cm, a tail rotor (3 symmetrically arranged blades 5 cm long), bars for fixing wheels measuring 9x2x3 cm and 4 wheels with a diameter of 3 cm and a thickness of 1 cm. You also need to prepare glue, an awl, scissors and thick cardboard.
First, cut out 4 symmetrically located lifting screw blades with a ring in the center from thick cardboard, piercing a hole in its middle with an awl. Make the tail rotor in the same way. After that, make a detailed drawing of the toy. Clearly draw all parts of the helicopter and the general view. Well, if you have a photo of a real helicopter, then you can imagine what this or that part is for.
As in other cases, select or make bars of the right size. Saw them off, after holding them in a vise and marking the place of sawing with a pencil. Make the wheels in the way you already know. When all the details are ready, start assembling the toy.
At a distance of 1 cm from the straight line between the corners and 2 cm from the edges of the cabin, drive 4 nails halfway. With a mallet, put the wheel fastening bars on them. After that, attach the tail rotor with a nail to the tail rotor bar. The nail does not need to be driven in completely in the middle of the front side surface of the bar. In the finished helicopter, the propeller should be at a distance of 1 cm from the edge. You can also additionally secure the screw with glue.
Then drive a nail into the tail rotor bar in the middle of the rear surface to the depth of the bar. Previously, first prick a hole in the bar with an awl so as not to split it when hammering. After that, put the tail boom vertically and nail a bar with a tail rotor to the upper cut. For greater strength, the cut of the bar can be smeared with glue. Then, with two nails in the middle of the motor bar, nail the gearbox and pre-mark the hole for the nails with an awl.
Turn the motor bar over and place it on the gearbox attached to it, then half-drive 2 nails without hats at a distance of 1 cm from the edges, turn the part over and nail it to the cab with a mallet. After that, put the cab, together with the parts nailed to it, on its side and nail the wheels on the left and right sides, do not forget to put a hairpin. Nail the tail boom to the cockpit. In order not to damage the wheels, place the cab on a small block and nail the lifting screw to the cab with 2 nails. After all the details are fastened, paint the helicopter and varnish it.


