Good for everyone plastic skirting board with cable channel! It’s easy to use, you can hide the wire in it, and it looks decent. But even when working with it, incidents may arise that require your ingenuity, non-standard solutions. Why invent something if this is already a passed stage for some people? After reading this material, you will learn how to attach plastic skirting boards at non-standard angles and rounded walls.
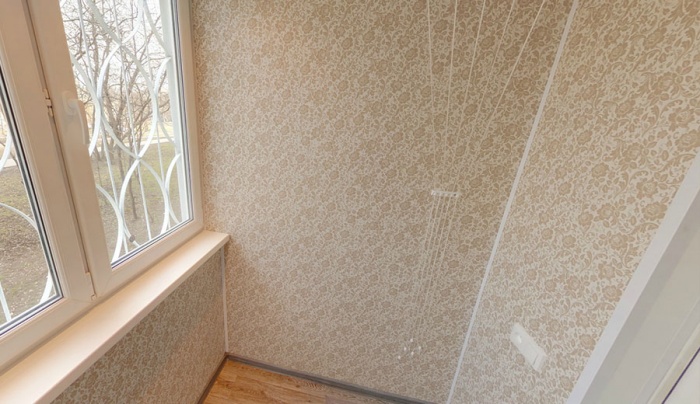
If the walls have curves
IN lately You can increasingly find such details in the interior of apartments. How to fix the plinth in such a place? If the radius of curvature is large and smooth, then there will be no problems. What if the radius is small and quite steep?
Try this. Using a hacksaw, make cuts on the back side of the baseboard so that the plastic on the outside is not damaged. Be careful! The sawn plinth may bend to the required circle. If this does not help, it will be necessary to break it in this area by installing plugs.


An example of installing a plastic skirting board on a rounded wall.
Most likely, this is what you will have to do. But you will need to attach the plastic plinth in the area of the rounded wall more often than in flat places. Just a few centimeters later, new fasteners!
How to attach a plastic skirting board if the outer angle is more than 90 degrees
Such interior details are also not uncommon now.

An example of installing a plinth on an external corner of more than 90 degrees.
The trouble here is that fittings for such corners are not available.
Typically the fittings are represented by four parts; external right angle, internal right angle, end cap and connector. When the external angle is more than 90 degrees, there are two options for operation.
First
Try “finishing” the fittings for the external right angle. If you carefully try to trim this part on both sides, the result may be like in the photo below.


The plastic corner itself will no longer hold on, since the grooves for fastening will be cut off and the corner will have to be glued.
Second
Practice creating a corner from a plinth, as you would with a regular one. wooden element. Take up artistic cutting. This can be done using a grinder. Adjusting the angle is a painstaking task, but quite realistic.
If the internal angle is more than 90 degrees
The problem is the same: lack of fittings. In this situation, we get out of the situation in the same two ways. We are just finalizing the connector. It will close such a corner if the internal fastenings are broken.

We take into account that we will have to glue this part, since it will not stick naturally.
Well, “artistic cutting” has not been canceled either. Having suffered quite a bit with the grinder, trying to join two elements in such a corner, you can achieve the desired result.
How to attach a plastic plinth if you need to cover the end of the podium
In such a situation, it is convenient to initially adjust the height of the podium to the height of the baseboard. At least the podium should not be lower. But this is not always possible. And it's not always worth it. If this is an exit to the balcony, then high threshold will spoil the interior.
And with a plinth you can cover a threshold that is lower than itself. After all, plastic is easy to cut, and it is enough to accurately measure and carefully trim its lower part. It will look something like this.


If you try, it looks very interesting.

Even more interesting than in the case where the threshold was the same height as the baseboard.
Such situations when installing plastic skirting boards are still quite rare. But, nevertheless, they take place. You are now armed with the appropriate knowledge to deal with them.
If anyone knows other ways to get out of such situations, share them in the comments below.
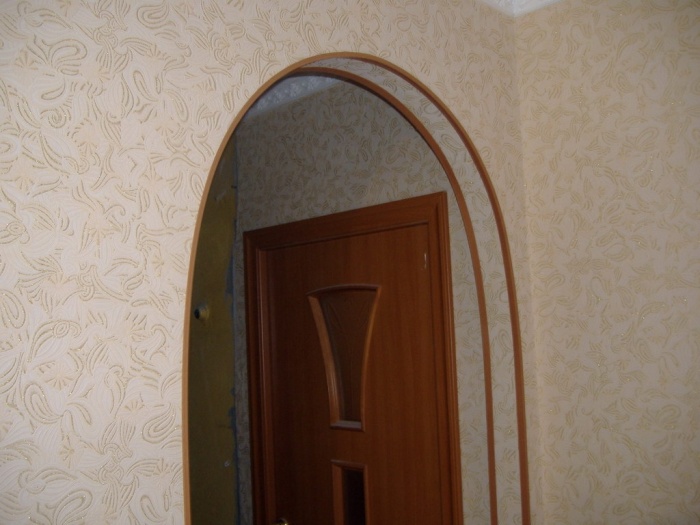
The topic of today's article is the arched corner. We will talk about the types, purpose and methods of attaching this finishing element.

First, let's define the terminology: which corners are called arched and what is their difference. In general, such angles are used to design curved structures made of various types finishing and building materials.
The main purpose of these elements is protection decorative covering corners They prevent paint, wallpaper, etc. from falling off and abrading. These corners also seem to highlight the shape of the structures on which they are attached. For example, arches plasterboard niches, figured ceilings.
Types and purpose of arched corners
Decorative corners


Plaster arched corners
- This type auxiliary materials for finishing, it has perforations (holes) on its entire surface. One side of these corners has petals (similar to cuts). Thanks to this design, they bend perfectly.
- Basically, a perforated arched corner is used to give a smooth edge to curved structures. For example, when installing plasterboard arches, figured suspended ceilings, graceful partitions.
- Corners for plaster are made of plastic. The most common length is 3 meters.
Fastening arched corners
Fastening decorative arched corners
If you decide not to install an interior door and make a semicircular opening (see Arched openings), then you need to “ennoble” it - attach an arched one along the entire contour decorative corner.
There are several ways to do this:
- Glue it with glue.
- Secure with self-tapping screws.
- Pin with nails without heads.
Let's look at each of these methods in more detail.
Most often, PVC corners are glued to the wall using glue. For example, for liquid nails or Titanium.
You should know! No need to use liquid nails for heavy structures! They may contain solvents that can corrode plastic. The best option is Express Decor class glue.
Before you start gluing the corners onto the surface, it should be prepared:

You should know! Do not under any circumstances stick plastic corners onto wallpaper. Even if the latter are firmly attached to the wall.
- All loose materials must be removed.
- If you already have wallpaper glued, then remove it from the place where the corner will be glued as follows: attach the PVC arched corner tightly to the “native” place and mark its edge on both sides with a pencil. Then remove the corner and carefully use a sharp utility knife to trim and remove the wallpaper.
Now you can start gluing. If you decide to use liquid nails, it is better to take them in a tube (under a gun). It will be more convenient to apply glue from such packaging. Also buy the gun itself.
Apply a small layer of glue along the entire length to the corner and attach it to the wall. Move the corner a little so that the glue is distributed over the surface. Then remove the corner and wait about five minutes.
After this, press the corner tightly again and secure it to the wall with masking tape.
You should know! For corners white buy white glue, and for colored corners - colorless.
How to glue a cork arched corner: Follow all the surface treatment steps described above. You need to use a special glue - contact glue, for products made of cork.
Attaching arched corners to studs and furniture staples has a number of disadvantages:
- Aesthetics are lost, since fasteners will be visible.
- At the moment of tightening the screws (shooting the staples) cracks may appear on the surface of the corner.
- If you tighten the fasteners, then the corner may bend.
Fastening perforated arched corners
Perforated corner mounting includes next order actions:

- Should press the corner tightly to the surface and shoot it with staples using construction stapler on both sides.
- Next, a solution is prepared from gypsum plaster(or basic putty) and apply it to the corner with a spatula. In this case, you need to press the plaster more firmly.
- Immediately after application plaster mortar necessary remove excess.
- After the plaster has dried, sand it with a special mesh or sandpaper.
You should know! It would be optimal to use VOLMA-Layer gypsum-based plaster. It is very elastic and easily rubbed after drying. It is also possible to use ready-made putty with an application thickness of 3mm or more.
Since the arched perforated corner is flexible, it will perfectly hide all the design flaws of any form of curvature.
All the steps described above will help you secure the arched corners yourself.
If you still have questions on this topic, then you can watch a video about fastening corners for arches, as well as read other articles.
Huge selection finishing materials allows you to decorate walls, ceilings, doorways of an apartment or house in the most daring and interesting options decor, but there is one condition. You need to think in advance about how to strengthen and protect the corner lines of the walls. Feature of modern wall decoration is such that they are the first to grow old and lose their appearance external corners walls
In some cases, you simply cannot do without protective plastic corners for walls, as in the case of tiling or wall panels. Therefore, people knowledgeable in matters overhaul When choosing a finish, be sure to look for plastic corners to protect the corners of the walls.

Where and how are profiles used to protect wall corners?
You have to get acquainted with the first version of the profile corner at the stage of plastering or leveling the surface of the walls using plasterboard. Installing a plastic corner under the wallpaper makes it possible to solve two problems at once:
- Strengthen finishing layer putties;
- Give the outer corner an ideal geometry, at least visually the line of junction of the two planes looks quite even.

Anyone who has at least once had to glue wallpaper on walls with crooked corners will appreciate all the benefits and practicality of the simplest plastic profile.
For your information! Using a plastic wall corner, you can easily create external and internal corners even on the most uneven walls.
The main difference between corner profiles and decorative plastic corners is that installation option always has perforation along its entire length. The corner does not need to be glued; it is simply imprinted into a layer of putty or plaster. Even professional plasterers always use a plastic corner in their work.

But use mounting profiles for leveling walls does not solve problems appearance corner edges, both internal and external, especially if the walls are decorated with light-colored trellises. Therefore, plastic corners are often installed in addition to the perforated profile.
What does it give:
- Complete corner protection. No matter how carefully the owners handle the decorative finishes at the corner joints of the walls, after a few months, or at most a year, marks, scratches and chips of the cladding will appear;
- Eliminate cracks and gaps between wall panels, especially at wall corners and baseboards, on a curved surface;
- Dramatic improvement in appearance. Colored plastic corners for walls will help with minimal costs transform and significantly refresh wall decor.

In this case, it is not necessary to limit yourself to the outer corners of the walls, although they are, as they say, in plain sight and require protection in the first place. Often, a plastic corner on the corner of a wall has to be installed after the fact; it is worth rearranging the furniture once and moving the largest interior items. Scuffs and dirt can still be removed or washed, but chips and deep scratches on the walls have to be hidden.

Internal corners also have to be covered in order to disguise the transition from one type of finishing to another, for example, when simultaneously covering the walls of a corridor with plasterboard, MDF or DFP panels, and living rooms wallpaper and wall slabs.

Plastic profile for sealing corners
For decorative purposes, corners made of polyvinyl chloride, polystyrene, polyurethane and even silicone are used. If the walls of the room are decorated with wood or tiles, then you will need a corner made of a similar material; a plastic profile for such decor looks unnatural. For all other cases, the list of most suitable materials invariably heads the PVC corner, it remains the most in demand. Almost everyone who is faced with the problem of finishing and protecting the corners of walls with an overlay profile is unanimous in their choice of PVC profile.
The exception is metal and MDF corners used as flashings, covering the line of the window opening from the street side. At the same time for balcony doors plastic is often used outside corner ok made of polyvinyl chloride.
The reason for the popularity of PVC profiles is determined by three important properties:
- Beautiful appearance, there are practically no problems with choosing the right shade of colored plastic corners to protect the corners of the walls;
- Plastic material is highly flexible and “democratic” during installation. There are no problems with gluing, as in the case of polystyrene or polypropylene corner profiles;
- Easy processing when adjusting the size of the corners. The material can be cut without problems with scissors, a bread knife or, best of all, a metal blade.

For your information! The good workability of the material does not exclude the possibility of cracking of the profile, especially if the plastic corner has been stored for a long time on the balcony or in the garage at low temperatures.
In this case, before cutting the plastic corner, it must be kept for an hour at room temperature.
Plastic corner size
The advantages of a plastic corner include the low cost of the material. Depending on the height of the shelf, the price of a 2.7 m long strip ranges from 50 cents for a size of 10x10 mm to $1.7 for a profile of 50x50 mm. For cladding home walls and corners, a corner with a shelf of 20 mm and 15 mm is usually used; their cost is in the range of 0.7-1 dollars for a standard strip of 2.7 m.
On the PVC market, PVC profiles are represented by three types of plastic corners:
- Standard equal-shelf option, in which both shelves are the same size;
- Double corner or T-profile used for decorating interpanel and tile seams;
- L-shaped or arched plastic corner with different shelf heights.

No matter how hard the craftsmen try to level the planes of the walls, over time a gap will still form in the corner, which needs to be somehow masked by installing a plastic corner on the corner of the wall. Otherwise, there will be an unsightly transition line from one type of finish to another. For the case when you need to close the joint on the wall between the wallpaper and decorative plaster, the smallest profile, 10x10 mm, is quite enough. The same shelf size is selected for outer corner for plastic plinth. The largest profiles, 50x50 mm, are used for installation on the corners of building facades; sizes 20x20 and 25x25 are the most popular for interior work.
Options for using a corner profile for finishing corners
At first, most apartment owners are quite restrained about using corner profiles when decorating corners and wall junction lines. What hinders us, first of all, is the well-established classical opinion that use of PVC materials in the apartment should be limited and used primarily in places where it is simply impossible to do without it. For example, for entrance doors in the bathroom or kitchen.

It is possible to destroy mistrust in plastic corners only if people see with their own eyes the difference between finishing walls without a corner and after installing a plastic corner profile. The difference in perception even with the simplest decor is significant.
Finishing door and window slopes
Most a clear example advantages of installing a corner PVC profile the windows and doors of a modern apartment remain.
With replacement of old wooden window frame When installing a double-glazed window, you usually have to re-plaster the slopes and look for a way and material to close the resulting outer corner to the walls of the room.
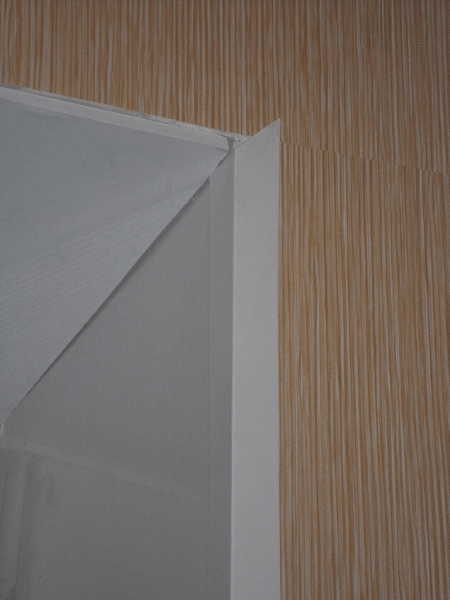
Traditionally window slopes are made on the basis of plasterboard sheets, with the outer corner reinforced with a perforated metal corner, photo.

This makes it possible to perfectly align the planes and achieve the most even angular line, but the edge will still remain a risk zone. The window is used quite often, so even curtains or curtains often cause damage to the edges. If you are finishing the slopes using MDF or PVC panels, then you simply cannot do without installing a plastic corner on the slopes. First of all, you will need to close the end of the facing panel, otherwise the entire decorative effect the finish will be smeared from use. The dimensions of the plastic corner for slopes depend on the height and width of the window opening.

Plastic corner for drywall and wallpaper, choose 20x20 mm, for the corner at the transition MDF board- wallpaper is installed with a corner profile measuring 25x25 mm. In the latter case, if desired, you can hide the installation of the protective profile; to do this, you just need to select the right colored plastic corners for the slopes. PVC is quite difficult to paint, so the repainting option is used if the entire window with slopes and corners is planned to be painted.
In addition to finishing the outer edge, it is necessary to install plastic strips between window frame and the slope plane, as well as close the line of intersection of the window sill with the walls. For these purposes, it is best to use a T-shaped profile with a deflection in the central part.

At first glance, the line of intersection of the slope and the window sill may not be covered with a plastic corner, but this is not entirely true. Plastic window sill It springs quite strongly even under a small load, so after a few months the material with which the corner joint is sealed may simply spill out of the gap, so it is better to close it with a corner profile in advance.
The same plastic corners are often used for decorative sealing the seam line between the bathtub and the tiled wall. PVC is ideal for the damp atmosphere of the bathroom.

The second section of the walls, where it is almost impossible to do without installing a decorative plastic corner, is the entrance door. If the entrance doors in a house or apartment are changed, this means that the owners have a lot of work to do on finishing and decorating the vestibule and door slopes. Since the front door always remains the dustiest place in the house, the slopes of the doorway, with rare exceptions, are traditionally finished with MDF, lining and PVC panels, most often wood or natural stone.
After the walls of the door vestibule are plastered and puttied, the cladding can be laid. Any master can confirm that after finishing works at the angle of intersection of the corridor walls and the slope plane, the ends will remain visible cladding panels. They must be closed in order to achieve a finished appearance of the doorway and to prevent the accumulation of dirt and dust in the cracks.

If the vestibule was lined by directly gluing PVC tiles or panels onto a plastered surface, then in order to close the gaps, a plastic corner with a shelf width of 30 mm would be sufficient. For decorative trim laid on pre-stuffed sheathing or galvanized profile, you will need a 40-50 mm plastic corner profile.
Arched doorways
Among the many options for designing an interior opening, the arched design is considered one of the most beautiful and expressive. The arch is most often assembled on the basis metal frame with cladding with plasterboard sheets, or laying out of light wall foam blocks.
One of the problems encountered when assembling an arched arch is related to the inflexibility of drywall and galvanized profiles. Both of them are almost impossible to bend in a smooth curve. In order to obtain an arc, the supporting frame has to be assembled from a dozen short segments - chords. The lining of the inner surface of the arch is also made from short pieces of drywall.
You can simplify the task by finishing the arch with a plastic corner in the form of several straight sectors, photo.

There are two ways to solve the problem of making the arch as smooth as possible:
- Installation of a finished arched plastic corner photo. You only need to adjust the dimensions of the opening to the finished profile, install and secure the polypropylene frame;
- Make an overlap of plasterboard wall sheets with a curved arc cut out according to the template. Inner part the slope is covered with polyurethane foam, and the edge is sheathed with a decorative plastic arched corner.

The use of a decorative plastic profile allows you to close the joint and corner transition from the drywall to the slope. This way of arrangement arched passage it turns out cheaper and easier. But there is one condition: you need to know exactly how to bend the plastic profile under the arch. At first glance, bending a soft polyvinyl chloride profile is not particularly difficult. One of simple descriptions How to bend a plastic corner onto an arch is shown in the video
An ordinary plastic corner is not suitable for these purposes. Any attempt to glue or nail it to the edge of the drywall results in the decorative profile moving away from the wall at the top and breaking into two parts. You have to cut one of the shelves of a regular corner into segments 25-30 mm long or, more conveniently, use a special plastic corner for the arch.
Most often, a profile measuring 17x5 mm is used for an arched doorway. Due to the reduced side flange of the plastic profile, the corner bends almost without distortion, which means that when laying the material with glue, the risk of detachment from the edge of the wall will be minimal.

If the arc radius of the arched opening is small enough, the plastic profile has to be bent so much that even a special decorative corner begins to warp. In this case, you can use the “hot” bending method. The corner is fixed at one end of the arch using a clamp or clamp. Next, the polyvinyl chloride profile is heated with a hairdryer to a temperature of 60-70 o C and pressed against the edge of the drywall. While the material cools, it is rolled into place using a soft paint roller.

Advice! If it was not possible to bend the desired arc profile in two or three warm-ups, then bending should be stopped, since the material becomes hard and brittle after several heating cycles.
Before gluing the plastic corner to the arch, it is necessary to determine the contact points of the profile to the surface of the walls in order to apply glue exactly in these places. If you do this “blindly”, most of the adhesive material applied to the plastic profile will be wasted without benefit.
Do-it-yourself installation of a plastic corner
Laying process decorative profile on a corner or on the edge of an arch is not particularly difficult; it requires care and careful handling of plastic. Polyvinyl chloride scratches easily and loses its glossy shine. Often the front part of the plastic corner is sealed with paper to avoid damage and contamination with glue. After hardening adhesive base The surface of the corner can be polished with a soft cotton cloth.

One of the advantages of using a PVC profile is the fact that during production, coloring of the material occurs throughout the entire mass; any scratches and abrasions do not lead to a change in color or shade. So the material can be polished an infinite number of times.
How to glue a profile to a corner joint
Working with a corner profile is no different from similar operations with polyurethane glazing beads or plinths. Initially, before gluing the plastic corners to the slopes, you need to do a little preparatory work.
First, use a tape measure to measure the length of the PVC profile at each slope angle. Since the window opening has rectangular shape, then all the plastic corners will fit together at right angles. We will cut the joint line at an angle of 45 degrees. For other structures - arches or polygonal vaults, the cut angle will need to be determined by the location of the sticker.

After marking, you need to cut the plastic strips according to the measurements taken. This must be done as carefully as possible, since the corner is quite thin, only 1-1.5 mm, so the material can easily be split if cut incorrectly.
Experienced craftsmen cut the profile construction knife under a ruler or well-sharpened scissors. If you do not have relevant cutting experience, then it is better to use a carpentry tool for corner cuts. PVC is ideally cut with a regular hacksaw blade.
After cutting, carefully remove the burrs and perform a final fitting of the cut blanks at the place of the sticker. To do this you will need tape and a building level. Having placed the plastic corner blank in place of the gluing, we level its position and fix it with several strips of tape. We install the upper corner strip in a similar way.

Only by installing all the cut sections of the corner “roughly” and aligning them to the building level, it becomes clear how correctly the corner was cut. Usually, amateurs create a gap of 1-3 mm wide at the joint line. It is clear that it is impossible to glue a plastic corner with such cracks.
Advice! When cutting an angle profile, add an allowance of 2-3 mm to the calculated size. This margin during adjustment will help correct the situation without any special consequences.
To get rid of the cracks at the joints of the walls, you will need to once again clarify the passage of the cut line along all three workpieces. To do this, draw a correction line with a pencil and disassemble the structure to adjust the corners. The cut line can be trimmed with scissors or sharpened with a piece sandpaper, wrapped around a wooden block.
How and what to glue
All that remains is to glue the plastic corner onto the corner edge of the slope. First of all, you will need to choose how to glue the plastic corner to the wall. In salons and construction stores as the most suitable remedy will recommend adhesive composition"Liquid nails" From positive characteristics One can only name convenient packaging in the form of a tube.

Everything else is up to the manufacturer. This composition can be used to glue lightweight polyurethane bovelachchi or a plastic corner measuring 10x10 mm to the joint between the tiles. In addition, the white adhesive mass becomes beige-gray over time, so traces of glue are very clearly visible on the seams and joints.

Slopes on windows, on entrance doors it is necessary to glue it with silicone, it can be transparent, but if desired, you can easily choose a colored version of the sealant. Not all adhesive materials adhere well to the smooth surface of PVC corner. Silicone sealant is a pleasant exception; it does not flow or shrink.

But the main advantage is to obtain a durable and elastic seam. If you have to glue something on door frame For light partitions that vibrate with every door slam, choose silicone. Any other adhesives that produce the strongest and stiffest seams cannot withstand vibrations and chip, especially when it comes to a plastic corner.

The technology for gluing a corner plastic strip is quite simple. Apply glue in thin lines to the inner surface of each shelf. If the glue is very thick, then the adhesive mass can be applied to the wall with short oblique lines or dots. You cannot cover the entire surface of the wall with a continuous layer. Firstly, such a plastic profile will be impossible to press into place, and secondly, 50% of the adhesive mass will be squeezed out uselessly beyond the corner. If the glue is too liquid, it will simply leak out from under the plastic strip.

Carefully place the prepared plastic corner with glue applied onto the gluing area. To ensure a strong adhesive seam, you need to carefully press the bar into place. A small amount of adhesive mass may be squeezed out from under the plastic profile, but do not rush to remove it - first you need to level the corner. The polyvinyl chloride profile is very flexible, and it will not be possible to straighten it by hand, so the laid corner is brought into a straight state using a metal ruler and building level. To prevent the plastic corner from falling off the wall and sliding down until the glue dries completely, you need to secure it with several strips of tape.

We glue the next strip of plastic profile in the same way, but before laying it in place you will need to apply a small amount of glue to the joint line. After settling, part of the glue will protrude at the joint; all excess can be removed only after the adhesive mass has completely dried. Until the glue has dried, any attempts to remove excess glue will lead to stains on the wallpaper.

Sometimes there is a problem with the length of the arched corner. Maximum length the plastic strip is 3 m. This may not be enough if the arched opening is made across the entire width of the room; the length of the corner profile on such an arch can reach 3.5-4 m. In this case, the arched arc has to be sharpened with a small piece. It is best to make the central part of the arc solid, add two small segments to the sides, and seal the joint line silicone sealant in the color of the plastic material.

After a couple of years, due to shrinkage processes, the seams may come apart a little, but the arch will still retain its original effectiveness. If you increase the length of the plastic corner on one side, the joint will be perceived as a stain and spoil the impression of the entire structure.
Conclusion
Plastic corners are successfully used not only for residential premises. For example, for a dacha or bathhouse lined with clapboard, for country house made of timber, the protection of corner joints of external walls always remains relevant. This is not so much a matter of aesthetics of the appearance of the building, but rather an urgent need for protection from moisture penetration. In this case, two load-bearing wooden slats are stuffed under a 50x50 mm plastic corner, onto which the plastic corner profile is glued.
Mounting angle (KU/KUU) is metal structure curved type, which serves as the basis for reliable fastening or connecting parts to each other. In construction, it is most often used for fixing wooden beams of different diameters to each other or to other material that will become the support or frame of a future building. Using a corner, the required angle is created between two supports, and the part itself serves as a connecting element.
1
The mounting bracket is cast from durable, galvanized steel material by hot metal stamping (grade 08PS, GOST 14918-80). Along the entire surface there are uniform, perforated holes for various fasteners, such as screws, self-tapping screws, bolts of various diameters, etc. Fastening angles for construction vary in size, shape and area of application. Regardless of type and shape, this fastener has a number of advantages, namely:
- Versatility. No application required for operation special tools or complex binders. It is enough just to select reliable screws or other screw-type fasteners with or without nuts and washers.
- Reliability. Due to exact angle at the junction of two bars or other parts, the structure has high degree reliability, while strengthened metal corner It is not subject to corrosion, as it is made of stainless steel using a special stamping method.
- A wide selection of sizes and shapes, due to which you can choose reliable fastening angles for any type of timber or other building material.
Mounting angles made of galvanized steel material
Reinforced or normal steel angle used in various branches of construction, as the main fastening element for timber, beams, supports or wooden columns in the construction of residential buildings, boiler houses, commercial and production premises. In addition to the corners, for fastening timber and wooden structures special ones are also used in construction metal supports, holders, connecting plates, backlashes, etc.
2
All steel fasteners that are used to connect two or more structural parts together come in two types:
- All metal. The most common types of corners, holders and plates, which are used to fasten timber of standard sizes and sections.
- Separate type. Prefabricated structures, which are usually used to support, fasten or connect non-standard types of timber or beams. In terms of reliability and rigidity, such parts are inferior to solid structures, therefore, before using them, various structural rigidity parameters are additionally calculated.

All metal fastener
In addition to differences in type of production and assembly, corners vary in size and shape, as well as in thickness, which, depending on the type and manufacturer, varies from 2 to 3.5 millimeters. The most common types in construction are:
- Reinforced mounting bracket (KUU). It has one or more special stiffeners, which allows it to be used when connecting large-section timber and beams with other materials (brick, aerated concrete, metal) to ensure high reliability and rigidity of the structure.
- Standard, equilateral, reinforced (KU-R). It is a flat metal plate bent at an angle of 90 degrees with uniform perforated holes on both sides. Mainly used for fastening wooden parts among themselves in places where there is no high load for deflection. There are equilateral narrow and wide parts of this type.
- Anchor type (KUA). special form reinforced or regular, which is distinguished by a disproportionate length-width-height indicator, where the first two values are equal, and the height comes in several types (usually 80, 120 or 200 millimeters).
- Asymmetrical (KUAS). Most often used to create a right angle to a plane, the properties and diameter of the perforation of the holes are similar to an anchor-type angle, but they differ in width.
- 135 degree angle (KUS). A fastener for creating a reliable connection of timber at a given angle. Typically used in the construction of roofs and canopies for fastening wooden rafters among themselves.
- Z-shaped. A reinforced part of a narrow specification, designed for fastening building materials located in two different planes relative to each other, that is, in parallel. In addition, it is used to connect load-bearing structures or for securing timber of non-standard sizes.
3
As a rule, corners should be purchased in bulk, several pieces of one or different types, in this case the retail price of the product will be significantly lower. Standard reinforced ones cost between 15-25 rubles apiece in various construction stores and online sites.

Standard mounting angle 70x70x55
To securely fasten the corner with your own hands, you also need to choose the right screws or self-tapping screws. We recommend using steel screws for perforated holes of various thicknesses. You should not use nails, as over time their fastening properties weaken due to corrosion. If you use a reinforced fastening angle to fasten timber in places with high further load, it is better to choose long screws with several types of threads and reliable fixation.
The optimal thickness of the corner is 2.5 mm for a reinforced part and 2 mm for a regular or steel plate. And you should definitely pay attention to the manufacturer. Low-quality parts can quickly rust and lose their properties, while weakening the main structural elements.
Finishing corners in an apartment should be used in cases where the family has small children or animals. Since plaster finishing mixtures do not have great strength, they are destroyed when lightly impacted.
External corners are especially susceptible to destruction. Dents often appear on wallpapered corners, and nicks appear on painted corners.
To protect corners, the use of special devices and techniques is required to protect corners from destruction.
Let us immediately note that the process of finishing corners in an apartment is a complex and important stage. Smooth surface It’s much easier to get than to straighten the corners. Next, we’ll look at ways to protect the corners of walls in an apartment or house from damage.
When do you need to trim corners?
Finishing corners in an apartment is advisable in cases where rectangular furniture is installed in the corners. Aligning the corners eliminates distortions and allows you to harmoniously place rectangular furniture.
In case of large distortions, you should not resort to leveling the corners, since leveling reduces usable area premises, but it is possible to beat with a stone.
Which material is best for protecting corners?
In any room, corners are divided into internal and external.
And if before internal corners difficult to reach, the outer corners suffer more often, and not only from careless carrying of heavy household appliances or furniture.
Animals scratch the corners, and they often block the path of children.
For finishing corners, plastic, metal, polystyrene foam, wooden corners, special galvanized metal profiles, decorative stone.
Plastic corners have a wide range of colors. They have increased softness and varying degrees of roughness.
To the question: “How to decorate the corners of the walls in an apartment?”, the article below will best answer.
Let's consider all the materials and devices used to protect the corners of the walls.
By materials we mean the use of plasterboard, and as devices the use of metal, wood, polystyrene foam corners, and PVC corners.
Aligning corners is one of the most difficult stages of finishing a room, requiring theoretical knowledge and extensive practical experience.
Wall corners are protected by installing special devices. Corners made of different materials are most often used to protect wall corners.
Most often, PVC corners are installed as corner protection.
Plastic corners should be installed after all finishing work has been completed.
Plastic corners are installed on walls using mounting adhesive for plastic products.
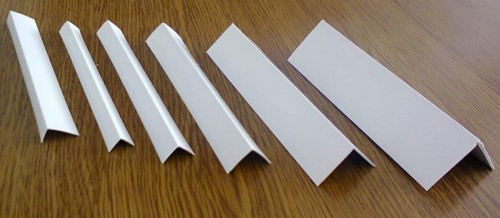
Plastic corners are available in lengths of 2.5 m. The width of the corners varies, from narrow to wide.
To select the correct corner width, you should measure the curvature of the corner.
For large curvatures, it is preferable to choose corners with a larger width.
Narrow corners are used on almost even corners
How to properly attach plastic corners to wall corners?
Option 1
- 1. Using a construction angle, you need to measure the angle deviations.
- 2. Mix the solution from the dry putty mixture to the desired consistency.
- 3. Apply the solution with a regular spatula, level it with a corner one, giving the corner a rectangular appearance.
- 4.After the corner has completely dried, apply a plastic perforated corner and cover it with finishing putty.
- 5.When the layer is completely dry, sand the surface with an abrasive mesh.

Option 2
The most common and inexpensive way is to use plastic corners of various sizes and colors. When choosing, pay attention to the correct angle; the fit to the wall depends on this.
 Types and sizes of PVC corners
 - 1.Plastic corners are installed on a previously prepared surface. If necessary, remove old wallpaper using a drywall knife and clean the surface of old paint.
- 2. Apply glue to the inner surface of the corner in increments of 30...50 mm. The glue is applied dotted.
- 3.When the glue reaches the desired viscosity (indicated in the instructions for the glue), attach the plastic corner to the protected corner and secure it on top with masking tape.
- 4.In place liquid nails It is possible to use colorless silicone.

These options for protecting wall corners are also suitable when using metal profile corners.
If you want to not only protect corners, but also perform decorative design corners in the apartment, use wooden or polystyrene foam corners. 
Expanded polystyrene corners
Expanded polystyrene is a non-flammable material.
Corners made of polystyrene foam do not absorb moisture and dirt does not stick to them. Polystyrene corners can be used in rooms with any temperature conditions.
The surface of polystyrene corners can be painted. The corner profile is created by pressing and is available in various forms.
Finishing the external corners of the apartment using polystyrene foam corners is justified in those rooms where there is little traffic of residents.
Decorative corners made of polystyrene foam allow you not only to protect the corners, but also to decorate the corners.
Fastening is possible both with special glue and with ordinary acrylic sealant.

Wooden corners
The main advantages of wooden corners are:
- attractive appearance;
- environmental friendliness;
- possibility of creating carvings or decorations.
Wooden corners are an indispensable material for decorating corners in an apartment.
It is not the best option to use wooden corners in rooms with high humidity;
Stone as a means of decoration
Recently, it has become fashionable to use stone for interior decoration premises. The decorative design with stone looks especially organic when protecting external corners. 
The use of stone is especially appropriate when external corners have large deviations from geometric shape. There is no need to level walls and corners.
Let's note it right away! It is better to use decorative stone. It is also lighter than natural. And the presence of a smooth surface makes maintenance much easier.
The stone is secured with special solution or tile adhesive.
Step 1
For installation decorative stone the surface should be prepared,
clean from dirt, dust, old coating and
If the surface is very dry, or you are working at a temperature of +30C or higher, it must be moistened.
This is necessary for better penetration of the glue into the depth of the prepared surface.
Step 2
The glue is diluted according to the attached instructions in quantities that you can use during work. The properties of the glue are maintained for 2 hours.
Step 3
It is best to prepare glue in plastic container using a drill with a mixer attachment. After mixing, the glue is kept for several minutes and mixed thoroughly.
Step 4
On back side The stone mortar is applied with a spatula, the edges of the tiles are coated with the mortar. Several sheets of mortar are applied to the surface of the wall and a stone is applied.
Step 5
The stone is pressed against the surface with force, and the correct installation is checked with a plumb line and level.
Step 6
Having laid the stone in three rows, stop work. The glue will completely harden after two hours. This will allow you to continue laying the next 3 rows.
Failure to comply with step 6 will result in the structure collapsing under its own weight.
Drywall when finishing corners
The use of gypsum plasterboard sheets allows you to level even the most crooked corners.
There are two methods for installing drywall sheets: frameless and framed. 
Method 1
Frameless installation of plasterboard sheets is used at both internal and external corners:
- surface preparation is carried out;
- a sheet of drywall is applied to the surface and marked;
- on the other side of the corner a sheet is also applied and marked;
- blanks are cut out with a knife and cuts are made with a plane to the mating corners of the drywall;
- the prepared blanks of plasterboard sheets are again applied to the corner and adjusted;
- polyurethane foam is applied to the sheets;
- both blanks are applied to the wall and pressed;
- the sheets are removed, leaving traces of polyurethane foam on the wall;
- polyurethane foam is reapplied to the sheets;
- the foam should be allowed to dry a little and the sheets should be put in place;
- All that remains is to adjust the angle using a wooden lath or a building level.

Method 2
The frame method is recommended for use in cases of significant curvature of the surface.
This method is more labor-intensive, but can significantly improve sound and heat insulation:
- it is necessary to measure the amount of angle deviation;
- install the frame using galvanized metal profiles, securing them with dowels and self-tapping screws;
- installed on the frame plasterboard sheet and fastened with self-tapping screws;
- the resulting surface is puttied and sanded;
- The corner is protected by a perforated mesh.


 How to make mastic from bitumen")
")


