If you love saunas and have a summer house, then you should already be thinking about stopping depending on private steam rooms and building your own. If you wish, you can do this project yourself. Moreover, from a technical point of view, construction is not particularly difficult.
The shelf plays a special role in the bathhouse. A comfortable pastime in the steam room depends on how correctly you do it. The structure itself consists of: logs and frame. Special significance has a ratio of elements. How comfortable it will be to sit or lie on the shelf depends on the correct selection of sizes.
What should the shelf be like?
Usually a two-tier shelf is made in the bathhouse. You can sit on the first tier, and the second is great for lying down. This is where some of the complexity lies. The top floor should be wide enough to lie on.
It is very important to choose the correct thickness of the logs for the bathhouse shelf. The fact is that if you buy logs that are too thin, they will sag under your own weight. But on the other hand, the thicker the product, the higher its cost.
Fortunately, there is a more than worthy way out of this situation. It is necessary to make the holes in the frame small. This will allow you to choose thinner and cheaper boards, but at the same time the shelves for the bathhouse will have sufficient strength.
Regarding the size of a shelf for a bathhouse, opinions vary quite a lot, but if we take into account the canon, then overall height the structure should be 70 centimeters. In this case, the first tier needs to be made 40 cm high, and the second 30.
The distance between the lags of a bathhouse shelf should not be too large, but if it is not done at all, this can lead to deterioration performance qualities designs.

If you wish, you can not buy logs, but make them yourself. But for this you need to have at least the skills of a carpenter basic level. You will also need tools and drawings.
Of particular importance when designing a shelf for a bathhouse is the number of people who will be steaming here. In this case, you need to take into account the size of the room. After all, if you make the shelves too large, it will be inconvenient to move inside.
Attention ! The parameters of the shelf depend on the size of the room.
It is better not to place shelves for a bath near a window. The fact is that high temperatures can cause the glass to burst and this will lead to injury to people inside.
It is best to make shelves for a bath along a blank wall. At the same time, the interior of the room itself can be quite diverse. If the room is quite large, then you can place benches on several sides. This will allow you to make the most of the available space.
Making shelves with your own hands
Selecting a tree
Selection the right tree for the shelf - this is the basis on which your comfortable time in the bathhouse will be based. The most commonly used varieties are:

In principle, each of the types of wood described above are suitable for a bath shelf. All of them have suitable thermal conductivity and high moisture resistance, although each variety has its own disadvantages.
Preparation

Before you make a bathhouse shelf with your own hands, you need to make sure that you have everything you need to create it, namely:
- level;
- roulette;
- square;
- electric drill;
- a hacksaw with teeth designed for wood;
- screwdriver;
- set of drills;
- set of screwdrivers;
- mallet;
- pencil with ruler;
- self-tapping screws;
- hammer;
- abrasive sandpaper for several types of processing.
Having collected this entire set of tools, you can make shelves with your own hands. But you need to take into account that there are many projects. From all of them, you need to choose the one that is best suited for your room.
General algorithm
Some builders use nails to make shelves for a bathhouse, but such a solution is not considered the best, since it does not guarantee the strength of the structure. Therefore we will use wood screws.
Attention ! Shelves connected by nails are almost impossible to disassemble without damage.
It is best to fasten the shelf boards from the inside. This approach will allow you to hide the screws inside the wood. As a result, the risk of getting burned when bare skin comes into contact with metal disappears.
But a shelf is required to attach the boards exact calculation. Fortunately, there is another way to arrange interior space baths It is enough to make a blind hole for the cap. Then you need to prepare a wooden dowel. With its help you can cover the metal.

The pin must be carefully processed so that the shelf in the bathhouse has a uniform surface. For this you will need abrasive sandpaper. After all the work is completed, you will receive a perfectly flat surface.
Special attention When creating a shelf for a bathhouse, you need to pay attention to the order of actions, it consists of the following steps:
- To make shelves, apply markings for the rear pillars.
- Attach the studs to the wall. To fix the lower ends, use rubber gaskets.
- Mount the top beams and secure them to the posts.
- The upper side beams need to be slightly fixed.
- Side beams must be mounted to the front outer pillars. This will make the shelves more convenient.
- Install support beams at the front.
- Assemble the top frame.
- Take measurements and set right angles. Use self-tapping screws.
- By analogy with top frame make the bottom one. Consider the shelves ready.
Before the final assembly of the entire structure of the bath shelf, align all the elements with each other to check how the dimensions are maintained. Only after this fasten the jumpers and secure the structure with bolts.
Bath shelf projects
Two tiers
Two tiers in a shelf are ideal option for a small bath. A design with three tiers may only be suitable for a large room. Also needed high ceilings, and this is an unnecessary financial investment.
To make a two-tier shelf with your own hands for a bathhouse you need at least four meters. In this case, the height can be at the level of 2.3 m. This is the ideal ratio at which the benches will fit perfectly into the interior.
Attention ! Small baths The good thing is that they heat up quickly.
When creating a shelf for a bathhouse, you need to take into account that the lower bench is entry level, where the temperature is much lower. The higher you go, the harder it will be to breathe.
To create a bottom shelf for a bathhouse, you need to make initial calculations. The ideal height is 30 centimeters, but it can be increased to 35 if it is more convenient for you.
Calculating a shelf for a bathhouse begins with you measuring the height from floor to ceiling. It is very important that there is at least 1.2 meters from the top shelf to the ceiling. This distance is more than enough to make the bathhouse comfortable.
Attention ! The maximum permissible distance between shelves is 50 centimeters.
Three tiers

The three-tier design of a bath shelf is considered more complex and will not be appropriate everywhere. But if you have enough free space and you expect that many people will use the bathhouse, then it is better to do this option.
You should also take into account that a three-tier shelf design requires more materials, which means high costs to your building. For example, the first bench cannot be more than 25 centimeters.
The second shelf is installed at a height of exactly 55 centimeters from the floor. This is the optimal proportion, tested by time. The third shelf needs to be raised by 95 cm. As a result, you will get convenient shelves for a bathhouse, which will be extremely spacious.
Attention ! The width of each shelf cannot be less than sixty centimeters.
If your room is small, but you still want to install shelves for a bath on three levels, then the top shelf can be made folding. Such a move will save space and add functionality to the bathhouse.
Results
A sauna is an opportunity to get rid of toxins in the body and feel renewed after a stressful working week. The shelves play a special role in it. The overall comfort depends on how well you do it. Particular attention should be paid to wood selection and design.
Reading time ≈ 4 minutes
Nothing relaxes and cleanses the body like a Russian bath. Almost everyone dreams of building their own steam room on their site. The article will highlight important issues regarding the construction of shelves in a bathhouse with your own hands, with photo and video materials for a better understanding of the entire process.
Before you begin, you need to obtain basic information about correct selection materials for arranging shelves in a bathhouse and familiarize yourself with recommendations on construction features. Better plan ahead future design with the execution of sketch drawings and calculations overall dimensions each tier.
Shelf options

The design of a shelf for a bath in a steam room depends on the size of the area and the height of the room. The shelves are located only near solid walls without windows and glazed ventilation vents and, depending on the territorial possibilities, can have different designs.

They can only be located near one wall in several stepped tiers or near two parallel walls opposite each other. Also possible corner shelves in the bathhouse with the most various options arrangement of tiers.
It’s better to sketch out several shelf layout designs in order to choose the best one in comparison. best option. Once the location of each element is finally approved, you can begin to calculate the main dimensions of the structure and select the necessary materials.
Calculation project

Height calculation multi-tiered design starts from the ceiling. The top shelf should be 60 cm wide and located at a distance from the ceiling of at least 1.1 meters. This distance is necessary so that on the upper tier it is possible to sit normally and whip the steamer with a broom.

The height of each tier should be about half a meter. The lower tier should be at least 30 cm away from the floor. It is better to make the lower step, 40 cm wide, removable and not attach it to the floor, so that you can dry and wash the steam room floor. Based on these recommendations, the number of tiers is calculated, varying their height and optimally using the area of the room.
Selecting materials for bath shelves

Particular attention must be paid the right choice steam room shelf material. Multi-tiered structures are made of wood, but not all types are suitable for a bathhouse. They must meet a number of requirements. It is best to choose for a steam room wooden boards from linden, aspen or African abasha.

These types of wood have a fairly dense, strong structure and a low thermal conductivity, so they practically do not heat up. Wood perfectly tolerates conditions of high temperatures and humidity without losing its properties and quality appearance. Under the influence high temperature, such species emit a pleasant healing aroma of fresh wood.
Aspen, linden and abashi wood have a smooth surface with beautiful pattern, easy to process and has high durability. It has antibacterial properties and is resistant to the formation of mold and other fungi.
Features of the manufacturing process

When building shelves for a bathhouse with your own hands, no special talent or skills are required. Shelves are made in the usual way, the main thing is to follow some rules. There must be ventilation gaps at least 10 cm wide between the walls and shelves.

The dimensions of the timber 50x70 mm are optimal for shelves, since wood with such dimensions dries most quickly and completely. When making a bathhouse shelf frame made of wood, we secure the support with a board both top and bottom along the entire length. Removable shelves on legs should have rubberized linings so as not to spoil the surface of the steam room floor.

A distance of 1 cm should be maintained between the planks of the beds. As a fastener instead metal products, it's better to use wooden nails or pins driven into pre-drilled holes. If metal nails are used, the heads must be driven in deeply to avoid burns when they are heated.
In order to take a steam bath comfortably and profitably, you need to install shelves in compliance with certain standards. The decking material also needs to be chosen wisely. In this article we will tell you how to make shelves in a bathhouse with your own hands, we will give step by step guide, as well as drawings, photos and video instructions.
Shelf material
The atmosphere in the steam room is characterized by high temperature and humidity; not every material can withstand this combination. Traditionally, wood is used for bath flooring. Suitable variety wood must have certain properties:
- low thermal conductivity, guaranteeing a comfortable flooring temperature for humans;
- moisture resistance;
- minimal amount of resin in the wood structure.
Experienced craftsmen recommend linden, aspen, maple, poplar, and abashi for shelves. Conifers tolerate moisture well, but at high temperatures, resin begins to appear on their surface. This can lead to burns, so it is better to use excellent pine or spruce wood for furniture in the rest room or washing room.
Linden - when heated, it emits a special aroma and healing fumes. The wood dries quickly, does not crack, and is easy to process. In a hot and humid atmosphere, the material changes color from light to dark.
Aspen is a common choice for shelving due to its combination of strength and low price. The boards retain their dimensions during temperature fluctuations and do not deform. According to pagan beliefs, aspen frees you from negativity and heals mental trauma. Externally, the material is preserved for a long time, and inner part boards are susceptible to rotting.
Abashi - expensive African wood has a beautiful yellowish or creamy tint and retains its appearance high quality for a long period of time. It has low thermal conductivity, flexible and durable material serves as a comfortable flooring. The high price of foreign wood makes it accessible only to a limited number of people.
Maple – shows excellent resistance to moisture and heat.
Location

You choose the number of tiers in the steam room yourself; if there are not many people going to the bathhouse, 1–2 tiers are enough. Three tiers can be placed in a high room; there should be no space between the top flooring and the ceiling. less than a meter. The shelves are located along the walls that have no windows. Beds are placed:
- stepped along one wall;
- perpendicular to adjacent walls;
- parallel to each other on opposite walls, the top row reclines for convenience.
The dimensions of the shelves depend on the tier: the top one is 90 cm wide, the middle and bottom ones are 80 cm wide. The length can vary from 150 to 180 cm, it depends on the size of the steam room.
Shelf height should be comfortable for a sitting person - the top shelf is attached at a height of 120 cm, comfortable height the middle flooring is 70–80 cm, the bottom one is fixed at a level of 40 cm.
Installation

Before making shelves, the bars and boards intended for them are carefully sanded and treated with a special antiseptic. natural basis. The frame of the shelf is constructed from bars, the support posts are made with a cross-section of 50x70 mm.
- The position of the rear posts is marked on the wall, they are fixed to the surface with self-tapping screws.
- The horizontal beams, which form the frame to which the plank flooring will be attached, are screwed at their ends to the opposite walls. Transverse parts equal to the width of the shelf are attached to the walls along the entire length. Between the wall and the adjacent longitudinal beam, it is necessary to attach small pieces 10 cm thick so that there is a gap for water drainage. Horizontal plane beams are checked by level.
- The rear beam is attached with self-tapping screws to the vertical posts.
- Front vertical racks are installed parallel to the rear ones, rubber is placed under the ends. Correct installation should be checked using a level.
- The front beam is connected to the racks.
- Grooves are cut into the beams for attaching crossbars, at a distance of 60 cm from each other.
- The crossbars are placed in grooves and fixed with self-tapping screws.
- For reliability, the vertical posts are connected in the middle by beams.
- The length of the boards used is equal to the length of the shelf, width – 120 mm, thickness – 22 mm. They are screwed to the deck frame from the reverse side or the heads of the screws are recessed into the wood. The screw-in areas are covered with special mastic to prevent burns. A gap of 1–2 cm is left between the slats for water to drain.

Using self-tapping screws instead of nails allows you to securely fasten the structure and leaves the opportunity to disassemble the shelves to dry or replace the element.
This is how shelves for a bathhouse are made; if you are going to make several tiers, then they are made according to a similar scheme: the frame for the top shelf is assembled and the base for the bottom shelf is attached to it.
Video
Watch the video containing detailed description assembling a shelf for a steam room:
Photo
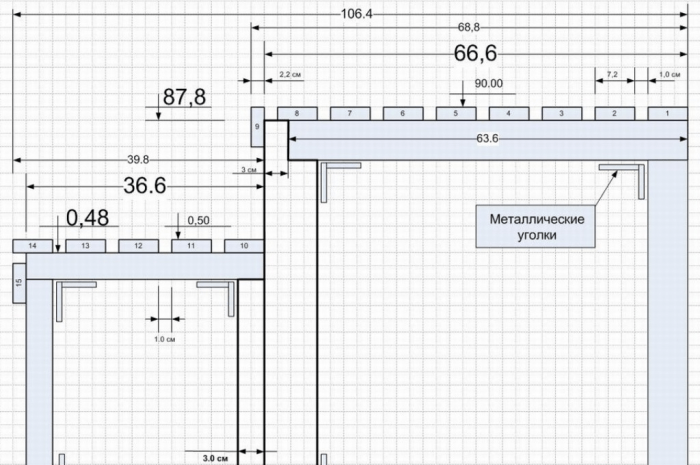
This selection of photographs and drawings will help you more clearly imagine the order of work:


Drawings
The drawings we offer indicate the dimensions of the shelves and their design features:


The Finnish sauna has a high temperature - from 90° C to 110° C, humidity 10-25%. Lovers of Russian baths prefer more low temperature from 40° C to 70° C, combined with high humidity 60-80%.
A Russian bath differs from a Finnish sauna not only in terms of temperature and humidity in the steam room. The fundamental difference between them is the different speed of movement of the heated air flow, the use of birch and oak brooms in the Russian steam room.

Patting the steam bather lying on the shelf of a Russian steam room with a broom, the bathhouse attendant occasionally increases the temperature by pouring water on the hot stones of the heater. Burning wet steam, escaping from the slightly open door of the heater, quickly rises to the ceiling and, slowly cooling, settles and gradually fills the steam room.
- large distances between the boards of the beds are required;
- the seats are tilted to drain water;
- to make cleaning the bathhouse floor easier, the side walls are not sewn up or are removable;
- you need a wide indentation of the bench from the wall of the steam room.
Differences in the basic dimensions, height and structure of the shelves also add features to the soaring process itself.
IMPORTANT: in a Russian steam room it is necessary to maintain the ratio of the height of the shelf device and the distance to the ceiling.
The height of the upper bench is made so that there is a distance of one meter between the top of the head of the person sitting on the upper bench and the ceiling - for the normal arm span of the bathhouse attendant with a broom gaining temperature in a cloud of steam.

The length of the shelves is regulated, which must be at least 220 cm, since it is advisable to take the bath procedure while lying down, exposing the body to massaging blows and stroking with a birch broom.
A traditional Russian bathhouse has only one or two steps of shelves located along one of the walls of the steam room; the steamer lies on a wide (at least 90 cm) upper bench.
IMPORTANT: Finnish steam room benches must be equipped with backs made of boards so that the person sitting does not burn his body on the hot wall cladding.
In a Finnish sauna, people often sit rather than lie on the benches, so the distance to the ceiling is shorter and the length of the loungers is not so critical.

You can often see on the walls of a sauna special supports for the legs, usually raised above the level of the body of the person lying on the upper bench.
Since the air in the sauna must warm up quickly, the size of the steam room is usually small, so the sauna shelves occupy the entire free perimeter of the walls, except for the wall with the door and heater.


Bath shelves can be of several types:
- compartment - when the beds in a small sauna are placed one above the other;
- complex bath shelves - with a retractable lower shelf or a folding upper shelf;
- in the shape of the letter “L”, when the bath seats are placed on two adjacent walls;
- Stepped shelves for spacious steam rooms have two or three steps, on which several steam lovers can comfortably sit.
Tree species used for making stands, bath chairs, backrests


Wood plays an important role in the interior and design of the bathhouse. Various varieties trees behave completely differently at high temperatures and high humidity ambient air. Therefore, you should carefully choose the material for making shelves.
| Wood | Photo | Description |
|---|---|---|
| Pine and spruce |
| Pine and spruce can be used to construct bath loungers, provided that the pre-dried boards are of excellent quality. In Finland itself, saunas are made from precisely these types of trees; resin secretions do not appear at high temperatures if the board is well dried and treated. Pine and spruce give a special coniferous aroma, which has a beneficial effect on the general condition of a person. Enough high price for other types of wood makes many steam lovers prefer those made from inexpensive pine wall coverings from boards - linings, bath shelves, backs. IMPORTANT: the only condition is the absence of knots or cracks on the surface of the boards, good quality drying the material, carefully treating the surface of the sunbeds. |
| Aspen |
| Aspen - used for making bath regiments, since it does not release resin when heated. It has special fame among the people, as a tree that successfully resists evil spirits, bad energy. The high cost of the material does not allow the production and widespread use of aspen bath seats, beds, and backrests. |
| Linden |
| Linden is an excellent material for making bath loungers. The structure of the wood is dense, has sufficient hardness, and low thermal conductivity. Linden lends itself well technical processing, the design details of the shelves and backs made from it are very durable. |
| Abash (Abachi) |
| Abash is the most expensive and beautiful material for the production of bath loungers. African oak is not afraid of high sauna temperatures. Loungers made from it do not burn the human body, since the material has low thermal conductivity and heats up very slowly. Successful advertising campaign made abash the most purchased wood for making bath shelves and saunas in the homes of wealthy nouveau riche. |


Prices for edged boards
edged boards
Stages of manufacturing a bath shelf

You can make bath shelves yourself if you follow a simple sequence of installing beams and boards, carefully process the material, and securely fasten the structural parts together.
IMPORTANT: the top boards of the couch must be attached to the supporting beams using oak wedges driven into pre-drilled holes in the parts. The use of metal nails or screws to assemble the deck chair is unacceptable. Hot steel caps can cause serious burns to the surface of the body.

1. Installation of racks
The racks on which the bath lounger is located must ensure the stability and strength of the entire structure. Typically, for the manufacture of the top row of beds, 4 to 6 racks are used, 1.05-1.15 m long, with a cross-section of 50x100 mm or 100x100 mm each, depending on the length of the shelf.


Frame bath shelves(one of the options)
The racks are connected to each other along the perimeter by rectangular bars 50X100 mm, onto which the load-bearing bars and boards of the bench are subsequently attached. The racks are attached to the wall with long (20 cm) dowel screws.
The timber for the upper seat posts can be used unpolished, without cracks or chips. A gap of 0.1 m is made between the wall and the adjacent rack - inserting pieces of thick boards for better circulation of hot air and improved ventilation of the shelf.

2. Assembling the supporting structure of the shelf
The supporting structure of the upper shelf must withstand the weight of the planks of the couch plus the mass of the people on top, so it is better to use a supporting beam with a cross-section of 50x100 mm or 50x120 mm.

The top row of supporting beams with a cross-section of 50x50 mm is attached across the length upper plane shelf every 0.5-0.6 m, depending on the thickness of the top boards. The thinner the board, the more often the supporting bars should be located so that the boards do not sag under the weight of people sitting on them.
IMPORTANT: the bars must be attached with a slight slope (1-2°) from the wall towards the steam room, for better drainage of moisture from the wooden surface of the bath lounger.

The width of the top shelf is ideally made 0.9 meters for the convenience of steamers, but the size can be reduced to 0.6 m.
Fastening can be done either using nails or self-tapping screws.
3. Arrangement of the upper bed
Smoothly planed and polished boards of the bench, from 3 cm to 6 cm thick and from 0.1 m to 0.24 m wide each, are laid on the supporting bars at intervals of 1-2 cm, ensuring the free passage of hot air.
Fastening the boards to load-bearing structure need to be done with wooden (oak) wedges into pre-drilled holes.
Boards arranged along the length of the bed look more aesthetically pleasing, but you can attach the boards of the top row across the bed. In this case, material is saved, since there is no need to pierce the load-bearing bars.


IMPORTANT: do not fasten the boards of the bench with nails or screws, leaving the caps on the surface of the benches. Only by recessing the metal parts of the fasteners 5-10 mm deep into the board can the steamer be protected from possible burns.
4. Arrangement of the lower shelf
When the height of the upper bath seat is 1.1 meters above the floor surface, for the convenience of the bath attendant working with a broom, the lower bench is lowered by 0.7 m.
The bottom shelf should be made at a distance of at least 0.3 meters from the floor - if it is used not only as a step for the bathhouse attendant, but also as a full-fledged bathhouse bench.

Most often in a Russian bath, the bottom step is made in the form of an attached bench on legs, which is removed while the steam room is being cleaned. But the installation of a fixed lower shelf is quite acceptable.
To do this, it is necessary to attach four load-bearing supports to the posts of the upper deck at a height of 0.4 m from the floor surface wooden beams with a cross section of 50x100 mm, making a kind of rectangle out of them - the frame of the lower bench. This is done so that one part of the load-bearing rectangle protrudes beyond the surface of the upper shelf to a length of 0.4-0.6 m.
The supporting frame of the lower step can be attached to the main posts with 12 cm long nails or self-tapping screws. In the corner and in the middle of the frame of the lower bench, four racks with a cross-section of 50x100 mm or 100x100 mm resting on the floor are fastened with self-tapping screws or nails.
Every 0.5 m, load-bearing bars with a cross section of 50x50 mm are packed. The boards of the lower shelf are attached to them using wooden wedges driven into pre-drilled holes.

How to make shelves in a bathhouse - types of flooring for shelves
IMPORTANT: the surface of the benches is carefully sanded. Boards should not have sharp corners, chips, cracks.
The boards should not be too wide; the optimal ratio of width to thickness is four. The fifty board should ideally be 0.2 meters wide.
Video - Assembling a bath shelf with your own hands
After completing the construction of the bath beds, they need to be impregnated with a protective solution, since negative impact water, air humidity, and high temperature destroy the structure of wood quite quickly.

To protect wooden surfaces in the steam room, you must use environmentally friendly products, otherwise you risk your health. Wooden beds Finnish saunas have long been impregnated with ordinary linseed oil, which perfectly protects against mold and mildew. The shelves of Russian baths were impregnated with a wax solution, which included purified turpentine and beeswax.
Ideally, you need to apply a wax solution or linseed oil in two layers. Drying time for one layer is about 8 hours.
Bath loungers do not require preliminary preparation or processing, provided that the boards have been previously sanded with high quality. After applying the protective impregnation, everything wooden surfaces acquire water-repellent properties and a characteristic matte shine.


Correct device of the heater, rational use steam room space, cozy design of the relaxation room and careful assembly of steam room beds will bring health, joy and satisfaction from bath procedures.

Wood impregnation prices
impregnation for wood
Video - The process of making a bath shelf
Video - DIY steam room shelves
Video – Sauna with sliding shelves
Shelves are the most important elements of a bath environment. Required technologies When making such benches, of course, it is not worth violating. Otherwise, using the steam room and washing room will be inconvenient in the future. The height of the shelves in the bathhouse, as well as their width and length, must be selected correctly.
Types of shops
Several types of shelves can be installed in baths:
stepped;
L-shaped;
In the first case, the shelves are a stepped structure of 2-3 tiers. L-shaped benches occupy space along two adjacent walls. Such shelves can be either single- or 2-3-tier. The design of the compartment is reminiscent of the shelves on a train. In this case, the tiers are not installed in steps, but directly one above the other. The top shelf is made folding.
All of the above options for shelves in bathhouses are used quite often. But the most popular type of such benches are still L-shaped. In structures of this type, one of the halves is most often assembled as a stepped two-tier structure. The second one is a regular bench, designed for installing water tanks, basins, etc.
What should be the height of the shelf in the bathhouse?
Dimensions bath shops determined primarily by the area of the steam room and washing room, as well as the growth of those people who will use them in the future. There are no special standards for structures of this type. However, it is still believed that the most convenient are shelves with a tier height of 40-60 cm. Most often, in bathhouses, structures are assembled with distances between the horizontal surfaces of the tiers of 45 cm. It is on such benches that it is most comfortable to take water procedures.
Seat correct shelf in the bathhouse, among other things, it is never located closer than 30 cm to the floor. It will simply be uncomfortable to sit on a shelf that is too low. In addition, it will be uncomfortable to take water procedures on such a bench, since the air temperature in the bathhouse next to the floor is usually not too high.

Also experienced builders It is not recommended to place the top shelf closer than 1 m to the ceiling. Strict standards in in this case not provided. If small people wash in the bathhouse, this figure can be reduced if desired. But still optimal distance from the surface of the top shelf to the ceiling is considered to be 1.1-1.2 m.
Length and width
What should be the height of the shelves in the bathhouse is therefore clear. In this case, one should be guided by the height of the owners of the structure and the size of the latter. The length and width of the shelves are also usually determined by the area of the steam room and washing room.
The width of the tiers of stepped structures can vary between 30-60 cm. The only exception is top shelf, on which people usually do not sit but lie when taking water procedures in a bathhouse. It is believed that the width of this tier should be at least 60 cm. But it is better to increase this parameter to 90 cm. In this case, steaming in the bathhouse will be as comfortable as possible.
When choosing the width of the shelf, you should be guided, of course, first of all by comfort. In addition to this design, there should be enough free space in the steam room to accommodate the stove and people. When drawing up a design for a 6 by 6 m bathhouse, for example, it is worth considering the width of the upper tier of the main shelf to be no more than 60 cm. Otherwise, the steam room will most likely be cramped in the future.
The length of the shelves in the bath can be any. However, traditionally, benches in the steam room and washing room are made no shorter than 1.5 m. Tiered structures usually occupy the space from one wall to another. For example, when designing a 6 by 6 m bathhouse with two rooms, the length of the main shelf in the steam room is usually 3 m.

What material to choose for manufacturing
Bath benches are assembled, of course, exclusively from lumber. In this case, select wood species that meet the following requirements:
low degree of thermal conductivity;
no resin pockets;
aesthetic appearance.
Most often, shelves in bathhouses are made of aspen. Linden and abashi can also be used for this purpose.
Advantages and disadvantages of the most popular materials
Aspen is very well suited for making bath shelves, primarily because it conducts heat poorly. At the same time, wood of this variety, among other things, is also very inexpensive. The only drawback of aspen is that in damp conditions it can begin to rot from the inside. At the same time, the boards will look quite high quality externally.
Linden is valued by bathhouse lovers primarily for the fact that even at very high temperatures it emits a not too intrusive and delicate pleasant aroma. This board is also suitable for a bathhouse shelf because, like aspen, it has low thermal conductivity. It will be comfortable to steam on linden boards in the future.
Abashi wood is the most suitable material for making shelves. Even in hot air, such boards remain cool to the touch. Moreover, after contact with the body, the abashi instantly warms up to its temperature. In addition, such boards do not change their pleasant cream color even after prolonged use in the bathhouse.

Is it possible to use pine
It is aspen, linden and abashi that are the most suitable materials for making shelves in a bathhouse. However, hardwood is still quite expensive. Therefore, many bathhouse owners are interested in whether it is possible to use cheap “coniferous” boards to make shelves.
In principle, it is allowed to use such material for assembling benches. However, experienced bath attendants still advise using pine and spruce for this purpose only as a last resort.
The fact is that it can release a lot of essential resins into the air. In small quantities, such vapors are even beneficial for health. However, an “overdose” of them can cause unpredictable consequences. IN large quantities Some substances released by coniferous wood can even be hazardous to health.
In addition to everything else, in the boards coniferous species There are usually many resin pockets present. At elevated temperatures, their contents begin to melt and flow out. If the resin gets on your skin, it will be very difficult to wash it off.
Thus, pine or spruce can be used to make benches. But it’s still better to spend money and buy hardwood for this purpose. It usually doesn’t take too much material to make shelves. So, buying aspen or linden will most likely not hurt the budget of bathhouse owners.
What wood should not be used for shelves?
For the manufacture of bath benches, lumber from most hardwood species can be used. However, some are never used in steam rooms and washrooms. Bath shelves cannot be made from:
white fir;
cypress
Boards of both of these varieties begin to smell very unpleasant when heated. White fir will give off a sour smell in the bathhouse, and cypress will give off a musty smell.

In most cases, the shelves in the bathhouse are made from the same type of lumber. But to increase the comfort of using benches and at the same time reduce their final cost, wood can be combined when assembling them. For example, a very good solution would be to make the frame of the shelves from inexpensive aspen, and their upper surfaces from abasha. You can also include one cedar board in the design of each tier for scent and beauty.
Wood quality
Of course, only good lumber should be used for making bath benches. Otherwise, even with the correct length, width and height, the shelves in the bathhouse will be inconvenient and unsafe to use.
There should not be any chips on the boards purchased for the shelves. Otherwise the shops will turn out ugly. In addition, when using such boards, you can get hurt in the future. Of course, only sanded wood is suitable for making shelves.
Also, there should be as few knots as possible on the boards and beams of the benches. The shelves are used in very unfavorable humidity conditions for wood. Knots in a sauna made from boards will most likely fall out very quickly. And the shops, again, will become ugly.
Dimensions of materials for assembly
The frame of bath shelves is usually assembled from timber 40 x 40 or 50 x 50 cm. It is better to use boards for the upper surfaces of the benches that are not too wide. This will give scope for choosing the width of the shelves in the bathhouse and will make the designs more aesthetically pleasing. In any case, usually a board is used to assemble shelves, the width of which is no more than 4 times the thickness.
Shelf design features
So, we found out what the shelves in the bathhouse should be like. But how to properly make such a structure? Assembling bath shelves with your own hands is not difficult. Such structures are made according to the principle of ordinary benches on a cobblestone frame. The assembly of L-shaped shelves begins with the most complex two-tier part.
In this case, the outer supports of the frame are first assembled:
a rectangular frame is knocked down from timber at the height of the top shelf;
install it close to the side and rear walls;
fasten the frame with self-tapping screws to the walls;
a frame is made according to the height of the lower tier;
they also attach it to the wall next to the frame of the upper tier.
In exactly the same way the second outermost one is made and intermediate supports for a multi-tiered structure. In order to give rigidity to the frame, transverse jumpers are used.
When filling the boards onto the frame, small gaps of a few millimeters are left. Such cracks are necessary for water drainage from benches during water procedures. To ensure that the gaps are equal in width, use a piece of lath of appropriate thickness as a guide.

Using approximately the same technology, at the final stage the second part of the L-shaped structure for the adjacent wall is assembled.
Additional items
To do upper tier more attractive, its front vertical surface should also be covered with boards. At the same time, between separate elements Gaps should be left. A couple of boards can also be placed on the front surface of the lower tier. However, of course, it is not worth completely covering the space between the floor and this bench. Otherwise, it will be impossible to clean under the canopy in the future.
How to make shops safe
Shelves are usually assembled using screws or nails. However, such fasteners in the bathhouse will, of course, subsequently become very hot. And in contact with the head of a screw or nail, a person taking water procedures can simply get burned.
In order to avoid injuries, the heads of screws or nails when assembling shelves must be recessed into the wood by 0.5 mm. You can also hammer in fasteners from below, that is, where contact with them will be impossible.
How to treat shelves in a bathhouse
Wood can last quite a long time in steam rooms and washing rooms. But in order to further extend its service life, at the final stage the shelves need to be treated with some kind of moisture-proofing compound. It is forbidden to use products that form a film to coat benches. Otherwise, you could get burned on the shelf boards in the future.

Most often, special impregnating oils are used to treat bath benches. For shelves, you should purchase products of this type, designed specifically for baths and saunas.


